


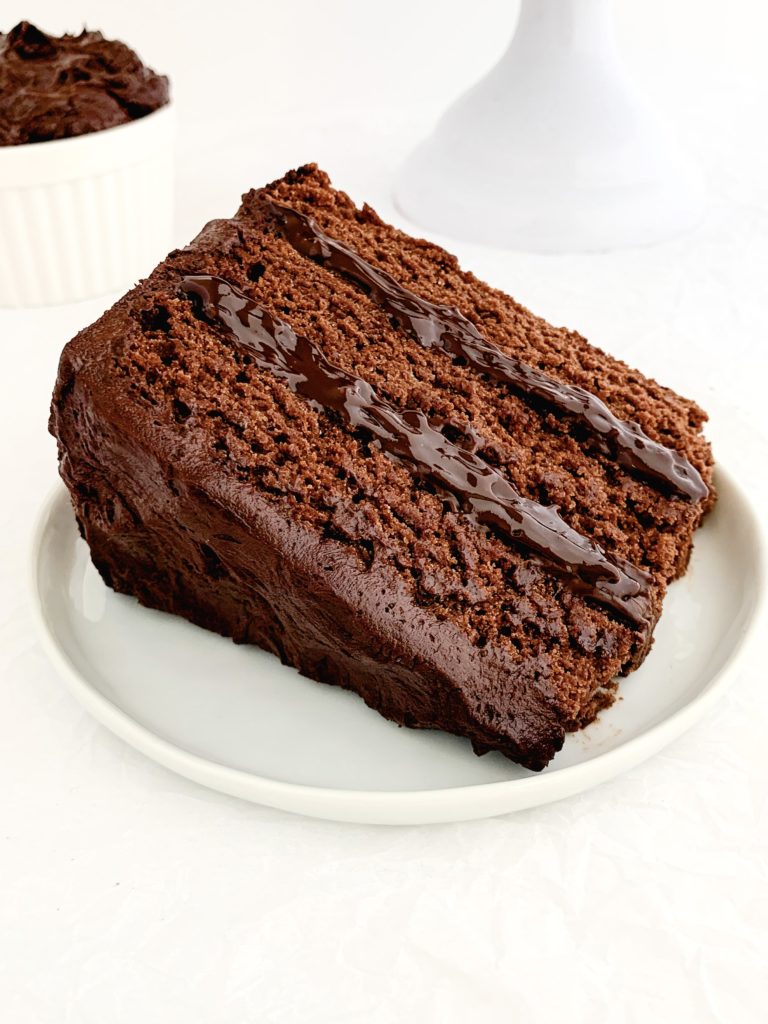
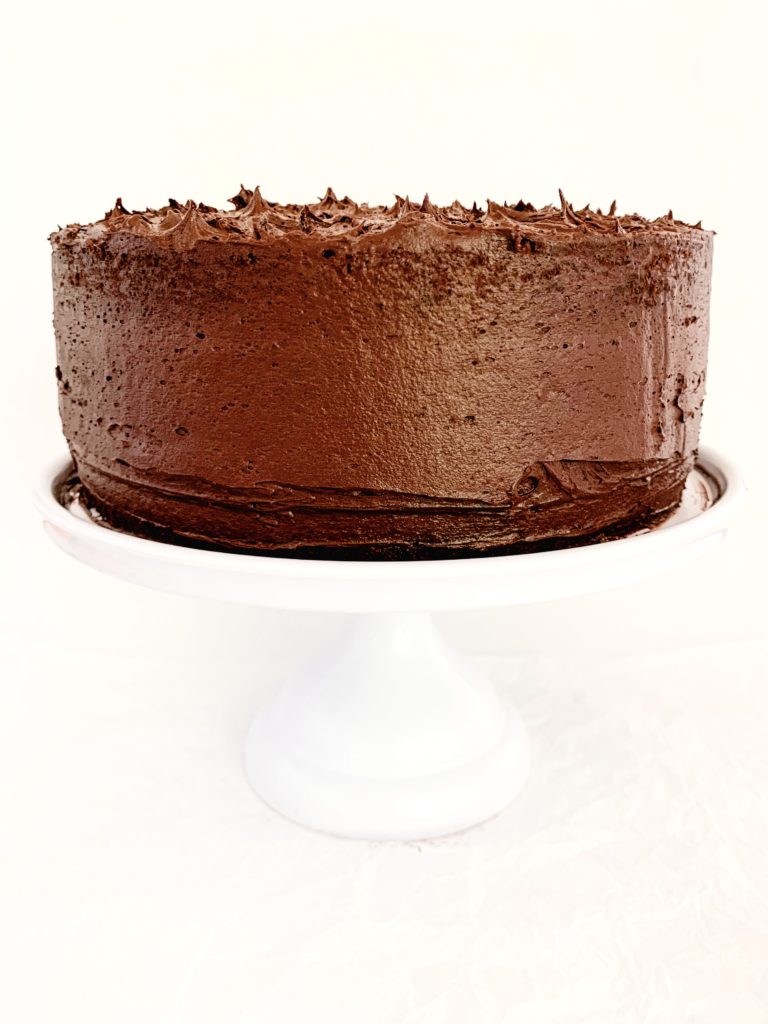
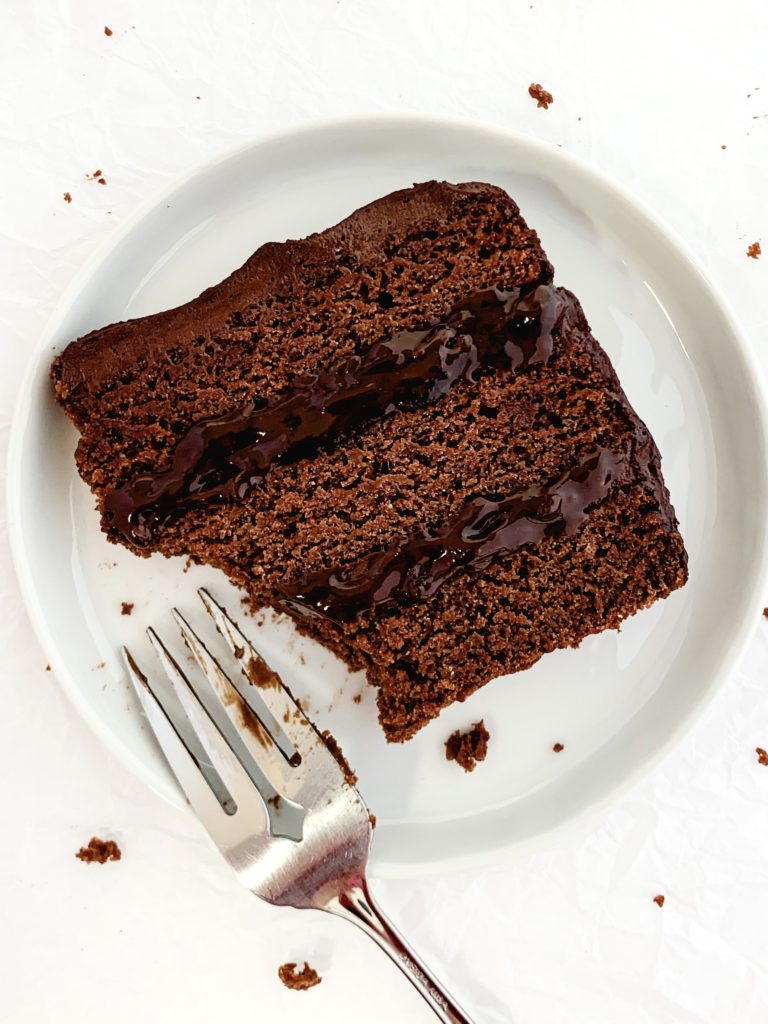
If you love chocolate, then you are in the right place!! This vegan triple chocolate cake is three layers of moist and rich cake, with a smooth chocolate ganache tucked away between the layers, and a luxurious dark chocolate buttercream frosting around the outside. Drooling yet? It’s also undetectably vegan, and easily made gluten free and sugar free!

Hello! Remember that scene in Matilda where the boy has to eat all the chocolate cake? If that scene makes you feel more hungry than disgusted, then you have found your new favorite cake. Also if you’re like hmm I like chocolate but maybe not THIS much.. then stick with me! Keep reading because later on I suggest some alternative frosting recipes in case you’re like, give me a double chocolate cake not a triple.
But if you’re going for the all out full on triple chocolate beauty you see here, then GET EXCITED because this vegan triple chocolate cake is all the chocolate you’ve ever wanted, and then some. It’s also shockingly easy, can be made in just two bowls, and believe it or not you can do it fully sugar free without compromising the taste. Shall we get going?!
How To Make It:
There are three components to this triple chocolate cake – the chocolate ganache filling, the cake layers themselves, and the frosting. We will make them in that order, since the ganache only takes about 10 minutes to make but needs 2 hours to cool, so don’t wait til the very end and then realize you forgot this step!
The ganache!
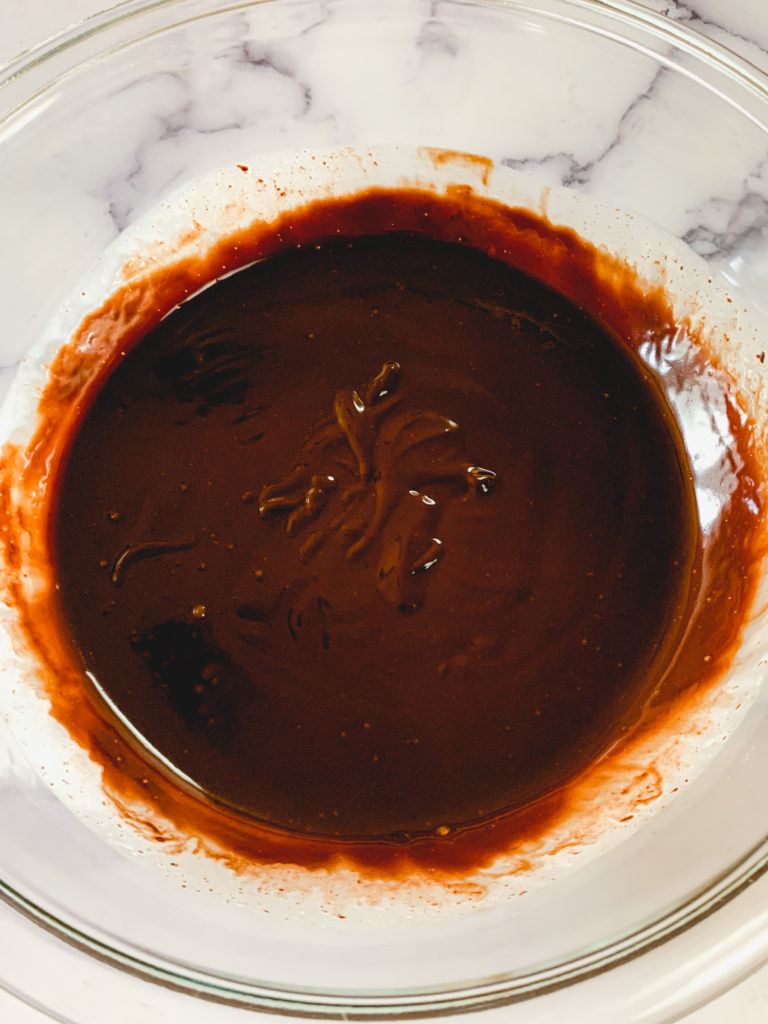
Chocolate ganache is magical! It can be made thin to drizzle over cakes or breads. It can be made really thick and turned into truffles. Or you can make it like this where it has a chocolate pudding-like consistency and spreads beautifully on top of or between cake layers, like an even dreamier frosting. Traditional ganache is just chocolate mixed with heavy cream, but since this is vegan, we mix our chocolate with coconut cream. I promise, there’s no lingering coconut taste!!
The process of making it is incredibly simple. Get two good 4-ounce chocolate bars – I like these Baker’s bars at 56% cacao – and chop them up very finely. See this photo below of how I chopped up all my chocolate? I probably should have even gone even finer.
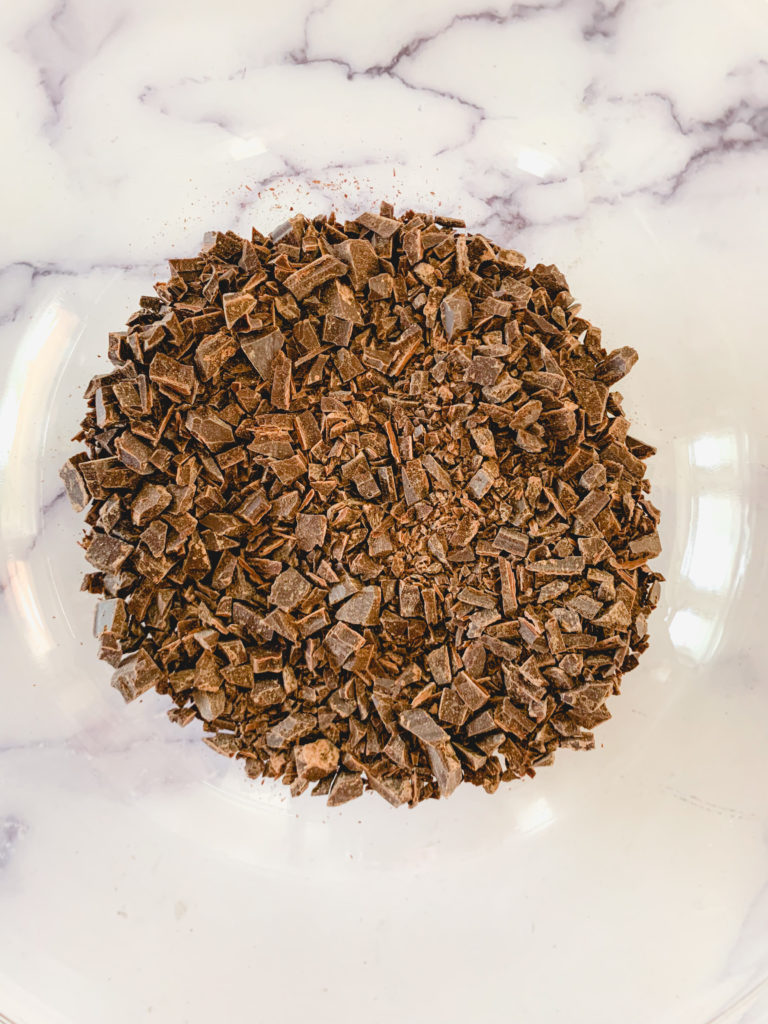
Once your chocolate is all chopped, put it into a heat proof bowl and set aside. Now grab a can of coconut cream but DO NOT shake it up!! The portion you want is the heavier cream part that rises to the top when the can is left on its own without shaking. The liquid separates to the bottom, and we will not be needing that portion. What we want here is a 1:1 ratio of cream to chocolate, meaning you have 8oz of chopped chocolate, so you want 8oz of coconut cream too.
Thankfully, one good can of coconut cream will have almost exactly 8oz of thicker part that rises to the top. Unless you get a dud can that doesn’t separate, this will work for you, too. If you want to be really cautious then get a kitchen scale and weigh the creamy part as you scoop it out. It’ll usually yield you around 7½ – 8½ ounces. It’s okay if it’s not EXACTLY 8 ounces.
Time to heat it..
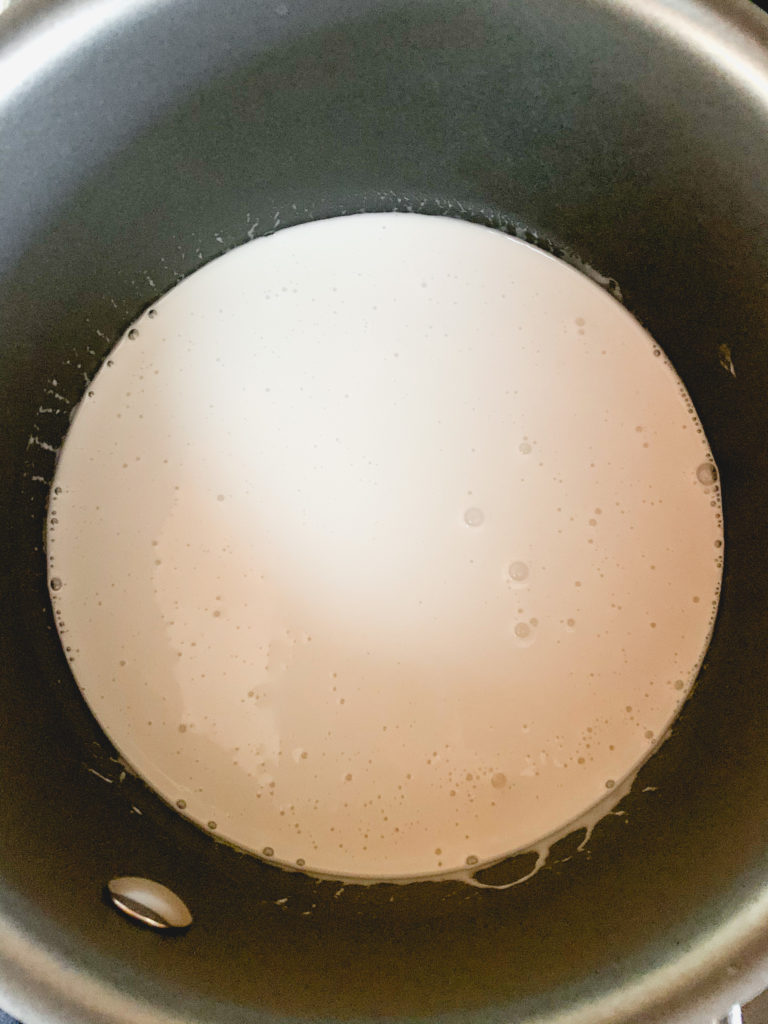
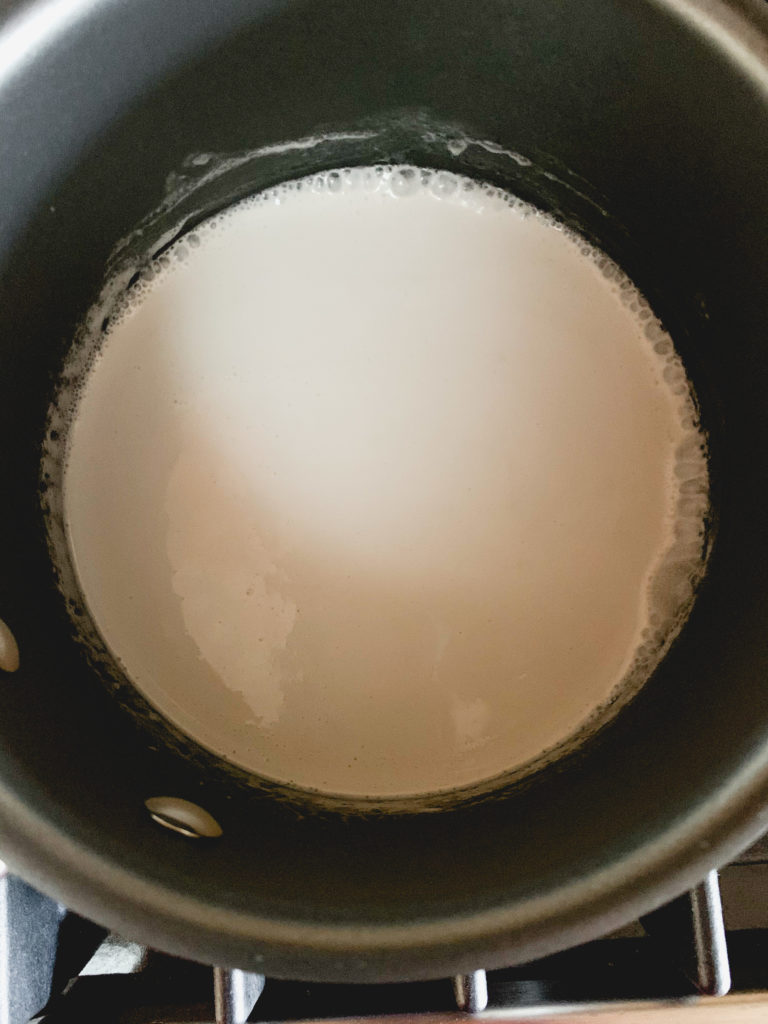
Heat the coconut cream until it is VERY hot, but NOT boiling. You can either do this in the microwave in little increments, checking as you go, or you can do it in a small saucepan on the stove which is what I do. As you can see from these photos, when you first start, it will be lumpy. As you start to heat it and stir it around, it will get thinner and have a more even consistency. I find that on my stovetop over medium heat it takes just over 3 minutes to hit the temperature you want. This is when it starts bubbling around the edges – as you can see below – but again, BEFORE it starts fully boiling. I like to test it with the tip of my finger, and as soon as it feels too hot to touch, I know it’s ready.
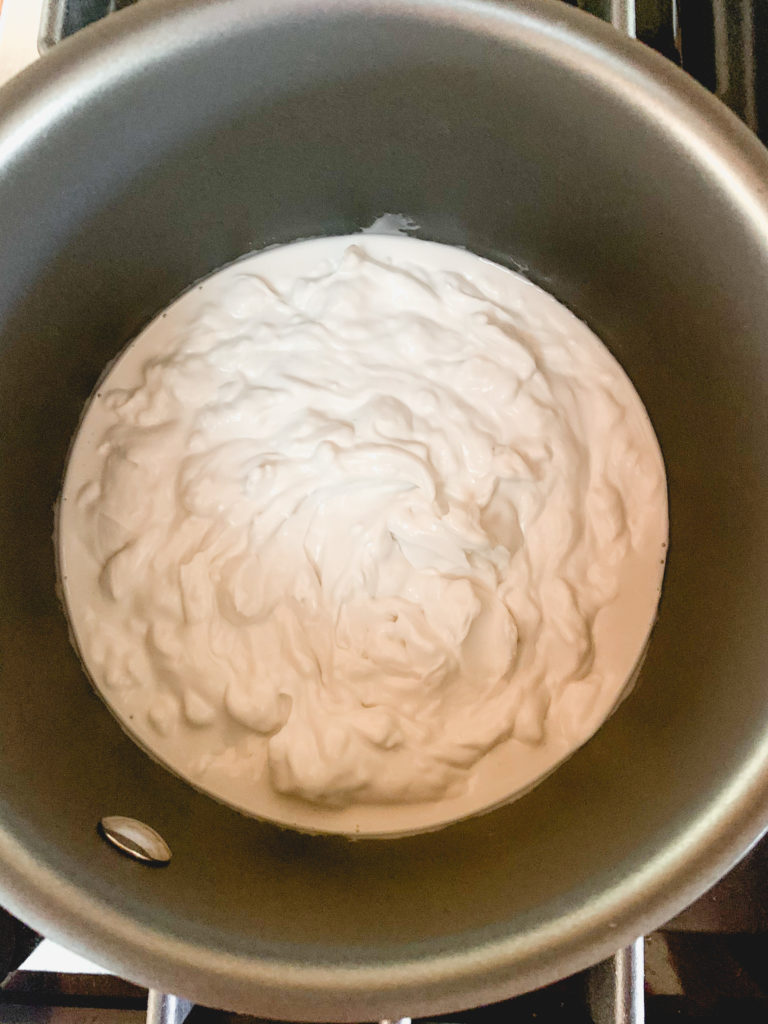
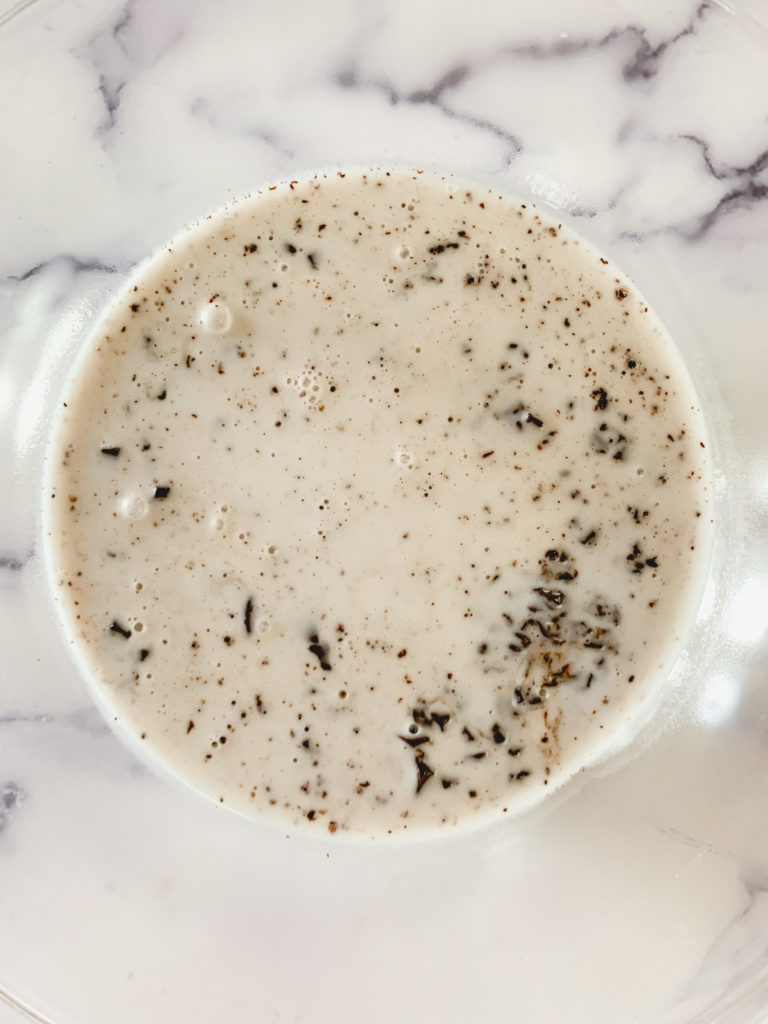
Remove the pan from the heat and immediately pour the cream over the chopped chocolate. Carefully and quickly make sure all the chocolate is submerged under the liquid, but otherwise DO NOT mix it or mess with it. It sort of looks like melted cookies & cream ice cream, as you can see below. Set a timer for 5 minutes, and just let it sit patiently for those 5 minutes, doing its thing.
Now to mix it up..
At the 5 minute mark, stir it together with a whisk or a metal spoon, starting from the center of the bowl since that’s where most of the mixture will be. It will take a minute or so of stirring, but it should all become evenly mixed and smooth, but will be very thin. Set it aside now for at least two hours at room temperature. During this time it will thicken up to a chocolate pudding-like consistency, but never get hard or seize. Make sure you don’t accidentally get water or anything else in it during this time!
The cake layers!
While the ganache is cooling, time to make those cake layers! This will also keep you busy and distracted so you’re not tempted to stick your finger in the ganache just to try it. The cake portion is incredibly easy. The amounts I use here are for 3 layers, but if you want less (or more) then of course just alter the batch size. Start by prepping two of the wet ingredients that need some advance work.
One is the vegan buttermilk. For starters, your milk should be room temperature. If not, put it in the microwave for a few seconds until it’s room temp or even slightly warm. Then, time to make the vegan buttermilk! Haven’t done this before? It’s so easy! Mix non-dairy milk with some apple cider vinegar, white vinegar, or lemon juice, and let it sit for a few minutes to curdle. This gives it a thicker texture and keeps the end result extra moist and well formed.
Next wet ingredient prep is the coconut oil, which will be melted for this recipe. So melt that and set aside. Remember to measure out the cup when it is MELTED, and not before. And remember to use liquid measuring cups!!
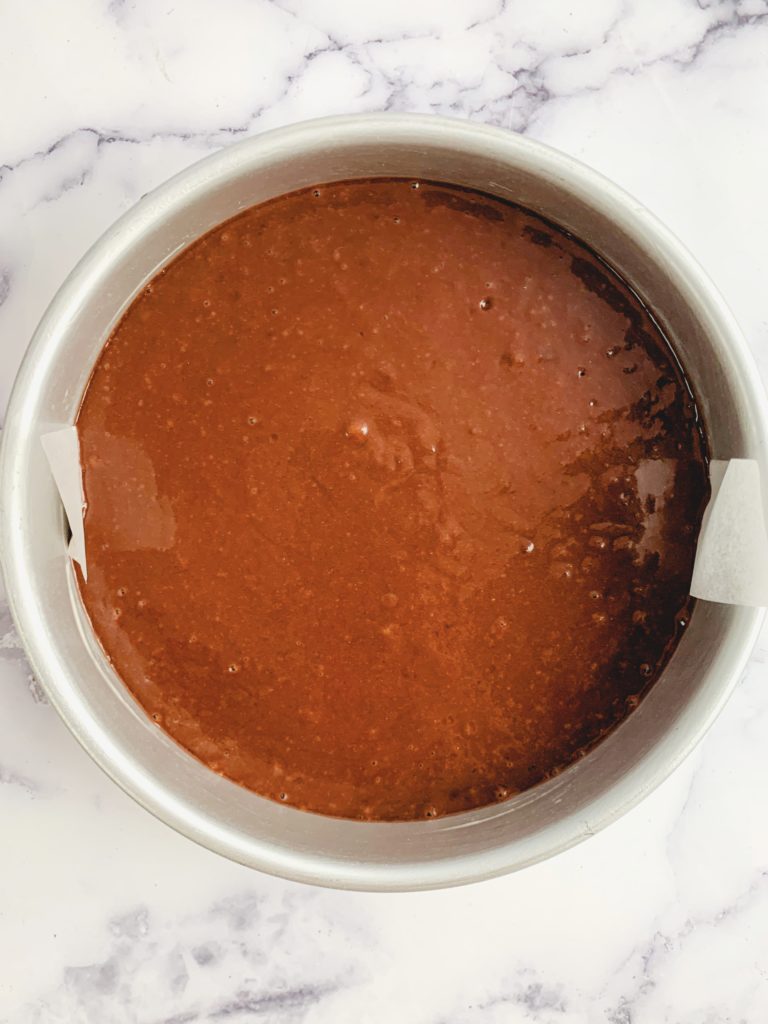
In a large bowl, combine all the dry ingredients – gluten free (or all-purpose) flour, unsweetened cocoa powder, granulated sugar (see the Ingredients Needed section to learn how to make the cake layers sugar free!), baking powder, and salt. Then add in your wet ingredients – the vegan buttermilk, melted coconut oil, applesauce, HOT or boiling filtered water, and vanilla extract. Don’t ignore the part where I say the water should be hot! This is important in helping make the cake ultra-rich and moist!
Mix and bake..
Mix until fully combined, then pour evenly into parchment lined & greased cake tins. I like to weigh each one with my handy dandy kitchen scale to make sure they’re all roughly the same weight, that way they all look uniform and pretty at the end.
Bake at 350 degrees for about 25 minutes. That’s the exact right time for my oven, so if you know yours runs hot, perhaps start to check it with a toothpick at 22/23 minutes, and if it takes a bit longer perhaps go up to 27/28 minutes. As soon as a toothpick emerges with just crumbs, no batter, get those babies out of there!
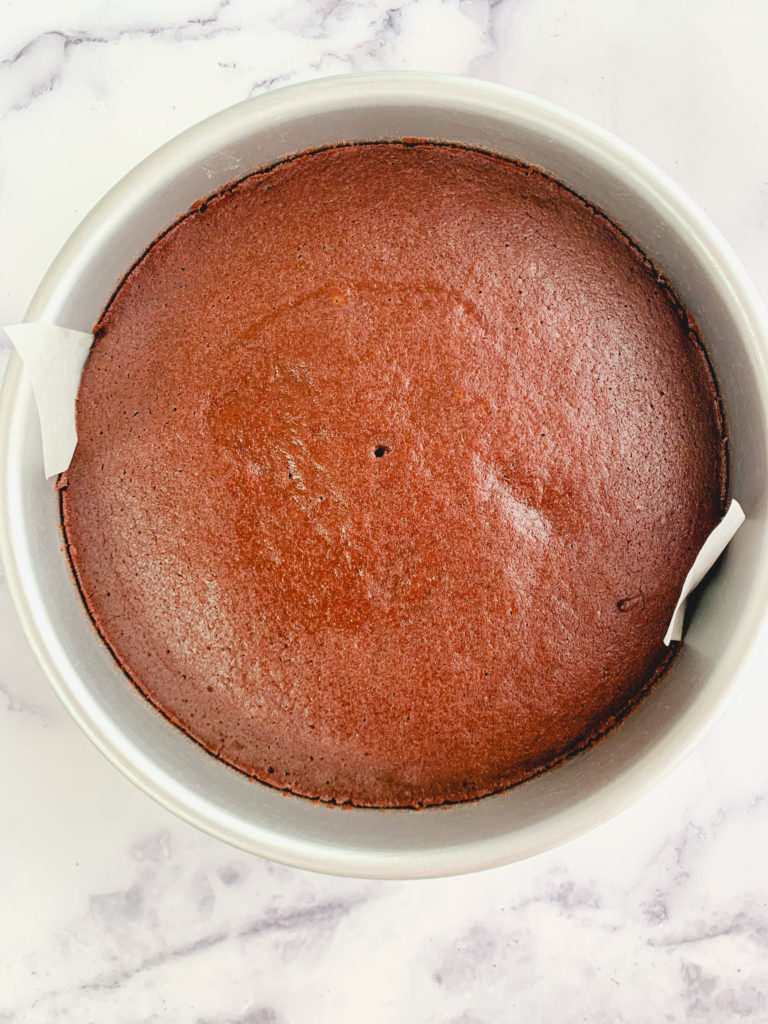
Let them cool in the pan for about 15 or so minutes, then flip them out onto cooling racks. Let them come to room temperature this way, or put in the fridge to chill. Personally I find cakes MUCH easier to frost when they are cold. And you likely need more time for your ganache to keep cooling, so no rush anyway.
One last note on the cake layers – I like to level these so they are not domed at all. They really don’t dome very much while baking, but it’s my personal preference to keep layers as flat as possible!
The frosting!
Okay last step before building your triple chocolate cake masterpiece – the frosting! Let’s talk about this frosting for a minute. The incredibly deep dark rich colored frosting you see in these photos is made using Dutch cocoa powder, not regular cocoa powder. This is completely your choice. I like the dark chocolate flavor that comes with Dutch cocoa powder, but you can use whichever you prefer or have laying around. Also if you are already feeling like this may be a chocolate overload, see a few paragraphs below for other frosting options.
To make the frosting, I use a simple hand mixer, but if you have a fancier mixer then yay you! I start by mixing just the vegan butter on its own until it’s fluffy, since it’s coming cold from the fridge it will be pretty solid and take a few minutes. Then I add the dry ingredients a little bit at a time, combining fully each time before adding more.
I use exactly the amounts I have listed below, but you may need to adjust a little bit based on the moisture content of your butter. If the frosting is too stiff, add a little bit more milk. If it’s too moist, add a little bit more powdered sugar until it’s just right.
Putting it together!
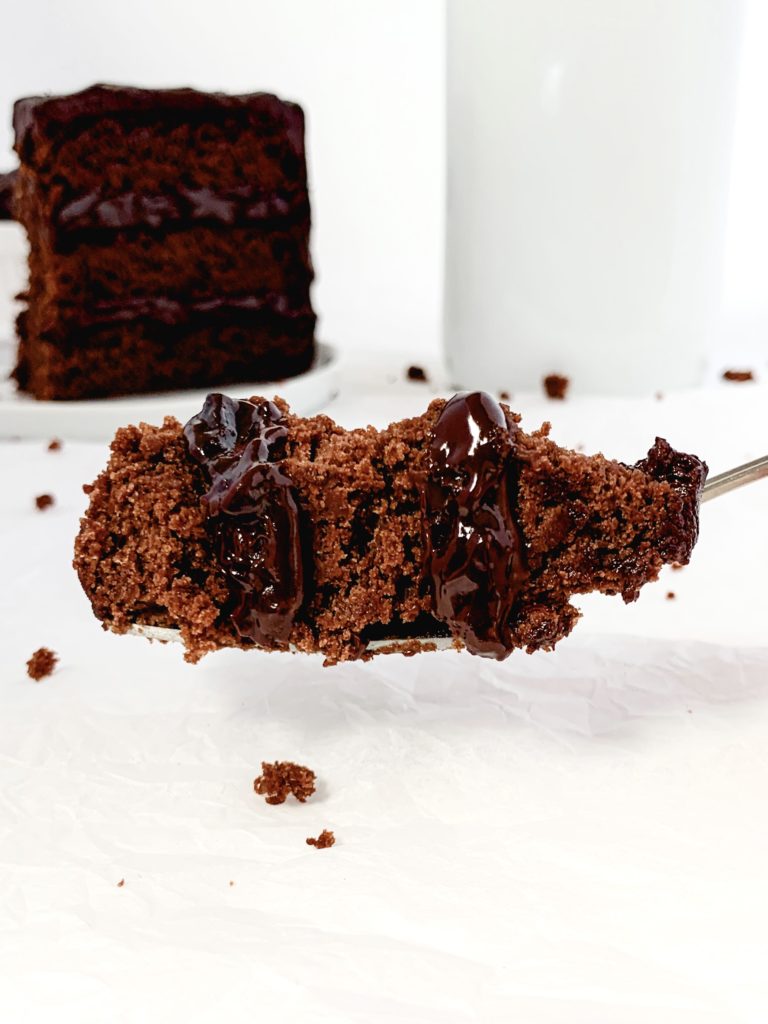
We’re almost at triple chocolate cake time – now we build it! This is pretty straightforward – one layer, chocolate ganache, another layer, chocolate ganache, then the frosting all around the top and sides. The only thing I will say is the ganache is loose, it doesn’t set and get hard in the same way frosting does when you are frosting a cake. I like to pop the cake in the fridge for a few minutes before adding the frosting, that way the ganache sets enough so that if you push down on the cake while frosting it, it won’t squish out the sides. And same goes for when you are cutting pieces – if it’s set for a few minutes, it should stay put.

If you’ve left it in the fridge for a while before serving, or if you’ve stored it there and are coming back for seconds the next day and want the ganache to be melty again, put your piece in the microwave for about 15 seconds. I find this to be the right amount of time to unset the ganache without turning it all into mush.
FINAL THING! As promised, if you want to replace the frosting with a non-chocolate option, personally I’d recommend one of these three options:
-Salted Caramel Frosting! Note if you are doing this one it takes some prep time, so check it out now, don’t wait til the end of the cake making process! Find it in this chocolate cake recipe
-Cream Cheese Frosting! Cream cheese + chocolate is criminally underrated. Find it in this red velvet cake recipe
-Vanilla Buttercream Frosting! Can’t hate on a classic. Find it in this vanilla cupcake recipe
Storage:
This triple chocolate cake can be kept at room temperature for a couple of days, or in the fridge for closer to a week. If you are keeping it in the fridge, I’d recommend warming up each piece for about 15 seconds in the microwave before eating if you want the ganache to be pudding-like again. You can also freeze for a few months.
Pro Tips & Tools:
- Make sure you are measuring your flour either by weight or using the spoon and level method. Do not scoop directly from the container, as you will wind up with too much! This is so important! If you want to buy a pre-made gluten free flour blend, make sure it’s King Arthur’s Measure for Measure Gluten Free Flour, it is BY FAR the best one for my recipes, NOT Bob’s Red Mills or any others. If you want to make a homemade blend, here is a link to the one I use.
- Make sure you measure your liquid ingredients using liquid measuring cups. This will ensure accuracy! I love this set.
- Need any other tools I’ve used here? For the cake itself I use these cake tins, these parchment liners, and this kitchen scale to make sure each layer is the same size. For the frosting, I use this simple hand mixer. And to frost the cake you can use a simple offset spatula, or spring for this whole set of cake stuff.
Ingredients Needed:
- Vegan chocolate bars – two good 4-ounce chocolate bars for the ganache. I love these 56% Cacao Baker’s Bars
- Coconut cream – also for the ganache. This brand is my go-to, but any will work. Make sure not to shake it before opening!
- Flour – Make sure you are measuring your flour either by weight or using the spoon and level method. Do not scoop directly from the container, as you will wind up with too much! This is so important! If you want to buy a pre-made gluten free flour blend, make sure it’s King Arthur’s Measure for Measure Gluten Free Flour, it is BY FAR the best one for my recipes, NOT Bob’s Red Mills or any others. If you want to make a homemade blend, here is a link to the one I use.
- Unsweetened cocoa powder – I use regular here, NOT Dutch. However if you do want to substitute for Dutch, it shouldn’t change the baking process, but I have not tried this myself.
- Granulated sugar – If you want to make these sugar free, I love using this Monkfruit Sweetener in place of granulated sugar.
- Baking powder – I recommend using baking powder that has no added aluminum. This one is my go-to.
- Salt
- Non-dairy milk – any will work here, I use soy
- Apple cider vinegar – to curdle the vegan buttermilk. Can also be white vinegar or lemon juice
- Coconut oil
- Unsweetened applesauce
- Vanilla extract
- Hot or boiling water
- Vegan butter – for the frosting. I use Earth Balance sticks.
- Powdered sugar – for the frosting. If you want this part to be sugar free, you can use this Monkfruit Powdered Sweetener in place of powdered sugar.
- Dutch cocoa powder – I use this Dutch cocoa powder in the frosting to give it a dark chocolate flavor, but you can use regular as well.
What To Bake Next:
- Want more decadent layer cakes like this triple chocolate cake? Try this Vegan Chocolate Cake with Salted Caramel Frosting, or this Vegan One Bowl Red Velvet Cake, or this Vegan Carrot Cake.
- Want more chocolate on chocolate in other forms? Try these Vegan Thin Mint Cookies, or these Vegan Double Chocolate Donuts, or these Vegan S’mores Cupcakes.
- Okay sorry two more chocolate options.. how about these Vegan Fudgy Brownies, or a twist on them, these Vegan Fudgy Brownie Cookies, or chocolate for breakfast with these Vegan Double Chocolate Chip Muffins, or these Vegan Copycat Entenmann’s Donuts !
Vegan Triple Chocolate Cake (Sugar Free and Gluten Free options)
Ingredients
Chocolate Ganache Ingredients
- 8oz chopped vegan chocolate
- 8oz coconut cream – JUST the thicker part that rises to the top of the can!
Chocolate Cake Ingredients – note this makes THREE layers
- 3 cups gluten free flour can sub all-purpose if desired. This links to my favorite store bought gluten free flour blend that works best with all of my recipes, or see "Ingredients Needed" section for further info.
- 1 cup + 2 tbsp unsweetened cocoa powder
- 3 cups granulated sugar *if you want a sugar free option, this links to my favorite sweetener, you can substitute it 1:1 in place of regular granulated sugar
- 1 tbsp baking powder
- ¾ tsp salt
- 1½ cups non-dairy milk room temperature or slightly warm
- 1 tbsp apple cider vinegar, white vinegar, or lemon juice
- 1 cup MELTED coconut oil
- 6 tbsp unsweetened applesauce
- 1 tbsp vanilla extract
- 1 cup filtered water HOT or BOILING
Dark Chocolate Buttercream Frosting Ingredients
- 1 cup vegan butter cold from the fridge
- 2½ cups powdered sugar *if you want a sugar free option, this links to my favorite powdered sweetener, you can substitute it 1:1 in place of regular powdered sugar
- 2/3 cup Dutch cocoa powder can be regular cocoa powder too, Dutch cocoa powder is what makes it "dark chocolate"
- ¼ tsp salt
- 2-4 tbsp non-dairy milk
Instructions
- There are three major parts to this recipe – the chocolate ganache filling, the chocolate cake layers, and the chocolate frosting. The ganache will need to cool for around 2 hours at room temperature, so that will come first. Then we will make the cake layers while the ganache is cooling, then finally the frosting right before it’s all ready to put together.
- Chocolate Ganache: first important note about the ganache – do NOT shake the can of coconut cream. When left undisturbed the contents of the can will naturally separate with the solid cream part rising to the top and the liquid sinking to the bottom. What you want to use here is just the solid part that rises to the top, not the liquid part on the bottom. When you scoop this part out, it will come out to right around 8oz of this heavy cream consistency, which is what you want since you will be using 8oz of chocolate.Finely chop up 8oz of good chocolate bars – I link my favorites above – and place into a heatproof bowl. Then heat the coconut cream either in a small saucepan, or incrementally in the microwave. You want it to get HOT, just before the point where it would boil, but do not let it boil. I do this on the stove and find over medium heat it takes around 3 minutes, right as it starts creating small bubbles around the edges.As soon as it hits this point, immediately pour it over the chopped chocolate, and make sure all the chocolate is submerged beneath the cream. Let it sit completely untouched for 5 full minutes, then at that time you can slowly mix it up with a whisk or metal spoon. Once it is evenly mixed together and smooth, set it aside to cool for AT LEAST 2 hours at room temperature.
- Chocolate Cake Layers: while the ganache is cooling, this is a good time to make the cake layers themselves. I will note again – the amount here is for a 3-layer cake. If you want more layers or fewer layers, make sure to adjust your amounts accordingly.Start by pre-heating the oven to 350°F and greasing 3 8-inch cake tins and lining with parchment rounds. Then prep your vegan buttermilk by mixing the non-dairy milk with the apple cider vinegar and setting aside for a few minutes to curdle, and also melt the coconut oil. Add the flour, cocoa powder, sugar, baking powder, and salt into a large bowl and mix together. Then add in the vegan buttermilk, melted coconut oil, applesauce, HOT or boiling water, and vanilla extract, then fully mix using a large spoon or spatula until it is just combined. Pour the batter evenly into the cake tins – I like to weigh each one to make sure the layers will come out the same size. Put into the oven for about 25 minutes, testing for doneness by sticking a toothpick into the center of the cakes and making sure it comes out with just crumbs and not wet batter. Remove the cakes from the oven and let cool in the pans for about 15-20 minutes before moving to cooling racks. I like to then put the layers directly into the fridge to cool completely, as I find it’s easier to frost the cake when it is cold.
- Chocolate Buttercream Frosting: the final step once you are just a few minutes away from putting your cake together is making the frosting. Take the vegan butter directly from the fridge so it is cold and solid, and put into a large mixing bowl. Use either a hand mixer or a fancier mixer to beat the butter until it is soft and fluffy, then add in the cocoa powder and the powdered sugar a little bit at a time, + the salt, mixing and scraping down the sides of the bowl as you go. Once all the dry ingredients are mixed in, add 1 tbsp of non-dairy milk at a time until you get to your desired consistency. I used about 3½ tbsp in the photos you see here.Note on this portion – I used Dutch cocoa powder in this frosting to give it a dark chocolate taste. You can use any type of cocoa powder you want here.
- Build the cake: Time to put it all together! Important note – I level the tops of the cake layers for this recipe. It’s not necessary, they do not dome that much, but I like having them completely level.Start by splitting your ganache filling into two equal sized portions. Spread half on top of one layer, and the other half on top of a second layer. Very gently now place the layers on top of one another, and the third layer on top. I suggest putting the whole cake in the fridge for a few minutes at this point. The ganache is so soft that if you don’t let it harden in the fridge for a few minutes between the layers, you run the risk that when you’re frosting the cake or cutting into it, it can all ooze out.After 5-10 minutes in the fridge, time to spread the frosting onto the sides and top of the cake. And that’s it! If you are storing the cake in the fridge, I recommend microwaving each slice for about 10-15 seconds before eating it, that way the ganache gets soft and melty again.
- Eat and enjoy!