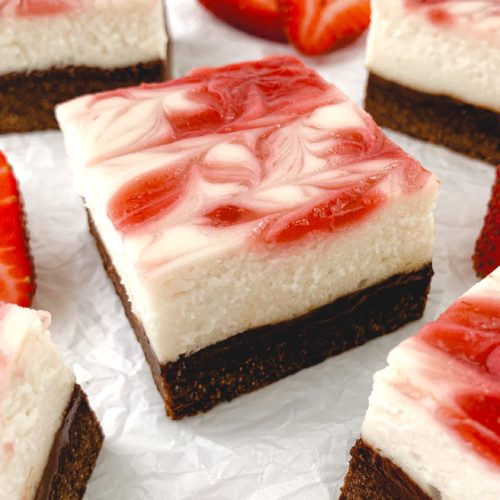
Vegan Cheesecake Brownies with a Fresh Strawberry Sauce (Sugar Free and Gluten Free options)
With a fudgy brownie base, a thick layer of rich and creamy cheesecake, and topped off with a fresh strawberry swirl and sauce, these bars may be the most delicious thing that will ever come out of your kitchen! Plus they can be made gluten free AND sugar free!
Ingredients
Fresh Strawberry Sauce Ingredients
- 8oz fresh strawberries this is around 14 medium sized strawberries, and you can swap out for any other berry you want – raspberry, blackberry, cherry, blueberry, etc.
- ½ tbsp cornstarch
- 3 tbsp warm water
- 1 tsp lemon juice
- 2 tbsp granulated sugar *if you want a sugar free option, this links to my favorite sweetener, you can substitute it 1:1 in place of regular granulated sugar
Cheesecake Filling Ingredients
- 16oz vegan cream cheese at room temperature
- 7oz / 14 tbsp coconut cream - JUST the cream part important – do NOT shake the can, you only want the cream part that rises to the top, NOT the liquid part that sinks to the bottom. When you scoop this out of a 13.5 or 14oz sized can, it will come to around 7oz or around 14 tbsp worth of cream
- ½ cup + 3 tbsp granulated sugar *again, if you want a sugar free option, this links to my favorite sweetener, you can substitute it 1:1 in place of regular granulated sugar
- 2 tsp vanilla extract
- 3 tbsp cornstarch
- 1 tbsp lemon juice
- small pinch of salt
Brownie Base Ingredients
- 5 tbsp vegan butter
- 6oz vegan chocolate around 56% cacao ideally
- 1 cup granulated sugar *one last time, if you want a sugar free option, this links to my favorite sweetener, you can substitute it 1:1 in place of regular granulated sugar
- ¼ cup non-dairy milk room temp or slightly warm
- 1 tsp vanilla extract
- 1¼ cups + 2 tbsp gluten free flour can sub all-purpose if desired. This links to my favorite store bought gluten free flour blend that works best with all of my recipes, or see "Ingredients Needed" section for further info.
- 1/3 cup + 1 tbsp unsweetened cocoa powder
- 1 heaping tsp salt
Instructions
- Preheat the oven to 325°F and line an 8x8 pan with parchment paper. If you want to make this in a 9x13 pan, simply double all the ingredients.
- Fresh Strawberry Sauce: this is optional, and you can use any berry you want here if strawberry isn’t your thing (raspberry, blueberry, blackberry, cherry would be my next picks). If you are making the sauce, start by cutting the strawberries into quarters. Mix the cornstarch and warm water together in a small saucepan, then add in the strawberries, lemon juice, and sugar, and stir together.Heat on medium heat until the mixture begins to simmer, then cook down for 3-5 minutes. Gently press on the strawberries during this time to help release the juices. Remove from heat. If you plan to use some of the liquid to make a swirl on top of the cheesecake layer, reserve a few tsps of the liquid part of the sauce now, and let the rest come to room temperature then seal in an air-tight container and store in the fridge until use.
- Cheesecake Filling: the biggest thing to consider in this part is the coconut cream. You really want to just use the solid, “heavy cream” like part that rises to the top of the can, not the liquid on the bottom. This means do NOT shake the can before opening. As long as it’s been upright and undisturbed, it should have separated. When you remove this part it will come to around 7oz or 14 tbsp worth of cream.In a large bowl, mix together this measurement of coconut cream with the rest of the ingredients listed in this section – vegan cream cheese, sugar, vanilla extract, cornstarch, lemon juice, and a pinch of salt. Mix together with a hand mixer or stand mixer until completely combined, or if you do not have a mixer just mix incredibly thoroughly by hand.
- Brownie Base Layer: start by prepping all of the ingredients. Mix the flour, cocoa powder, and salt in a small bowl and set aside. Measure out the non-dairy milk and make sure it is room temperature or warm, measure out the vanilla extract, and have the sugar handy by the stove. Put the vegan butter and chocolate into a heat-proof bowl that can be used for a double boiler. This is explained at length above if you need a tutorial!Melt the chocolate and vegan butter together on the double boiler. Once combined, while still on the double boiler, add in the sugar and mix for another minute or so until combined. Take off the heat and add in the vanilla extract and non-dairy milk, and yet again, mix until fully combined. Fully, add in the dry ingredients and mix until JUST combined, do not over-mix! I actually use my hands for this part for the most control.
- Putting it all together: finally, start by pressing the brownie batter evenly onto the bottom of the parchment lined pan. Then pour the cheesecake filling over the top and smooth it out. Finally, if you want to make a berry swirl, add a few dollops of the berry liquid and use a toothpick to swirl it around.
- Bake for exactly 30 minutes, and when you remove the pan from the oven be sure to put it directly onto a cooling rack, that way air can circulate around the bottom of the pan too. Note that when you take the pan out of the oven the center will still appear very jiggly – this is correct! Let it come to room temperature, around an hour, then move into the fridge to set. Ideally you should leave the bars overnight, but if you’re in a time crunch they should be okay after about 4 hours.
- Eat and enjoy!
Tried this recipe?Let us know how it was!