


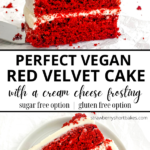
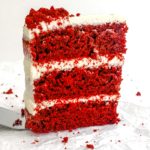
The absolute best vegan red velvet cake you will ever eat! This cake is rich, moist, and fluffy, and generously frosted with the most luxurious cream cheese frosting imaginable! Plus it is quick, easy, and can be made sugar free AND gluten free!

Hello, fellow red velvet fan! There is another cake recipe on my website that I deem to be “my favorite cake on my own site”, and I’m too lazy (aka too full of cake) to go change that entry, so I’ll just say that now THIS CAKE has become my NEW favorite cake on my own site!! Honestly it’s one of the best cakes I’ve ever eaten, period.
Not only is this vegan red velvet cake absolutely delicious, flavorful, and texturally perfect, it is SO EASY. It can be made in one bowl, will only take you a few minutes of prep time, and the frosting is the simplest – and tastiest! – one I’ve ever made. I would say that I’d eat the frosting off a spoon, but honestly that’s giving myself too much credit, because as soon as I finished frosting the cake I ate the spare frosting off my fingers.
If you’re reading this and really getting into the idea of eating red velvet cake, but really NOT in the mood to frost a cake, then might I suggest heading over to my Vegan Red Velvet Cupcake recipe instead, and enjoy the same flavor and texture but in a smaller package!
How To Make It:
I have already said it a few times and I will say it once more – this cake is SO. EASY. Get out one (!) big bowl and let’s get started. First up is making the cake layers, since we want them to bake and fully cool before jumping into the frosting.
Mix all the dry ingredients together in your bowl – gluten free (or all-purpose) flour, unsweetened cocoa powder, granulated sugar (check out the Ingredients Needed section to learn how to make these sugar free), baking powder, and salt. I strongly recommend sifting your cocoa powder if possible, since most cocoa powders have clumps that are difficult to break up fully with just your fingers or a whisk or fork.
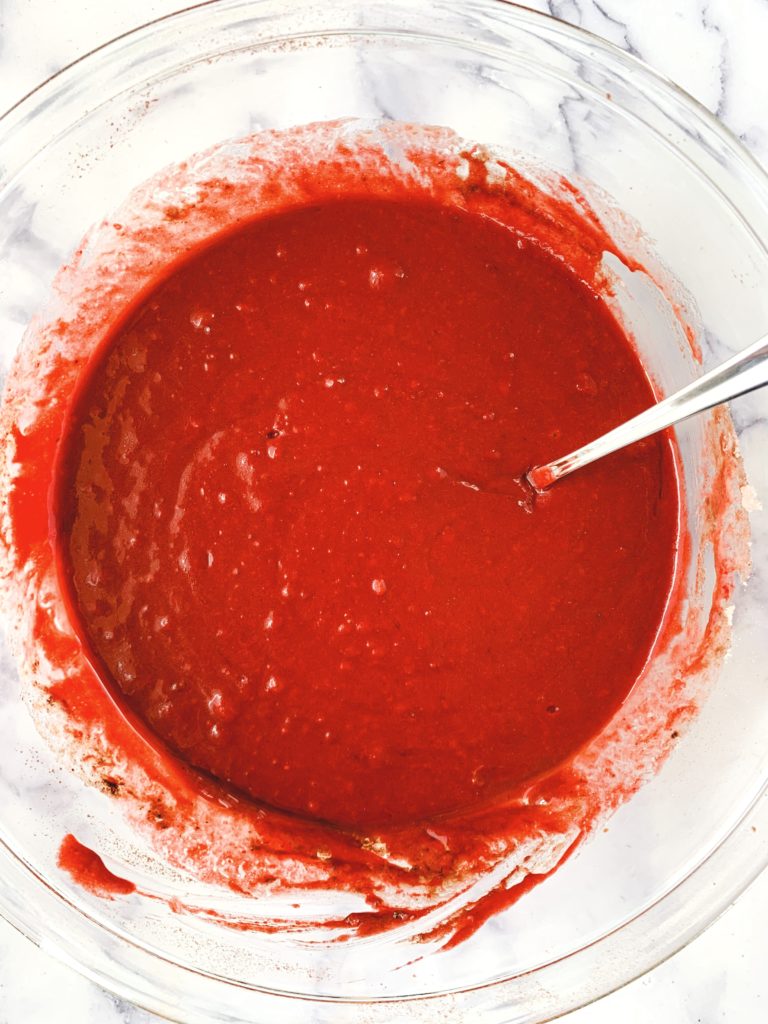
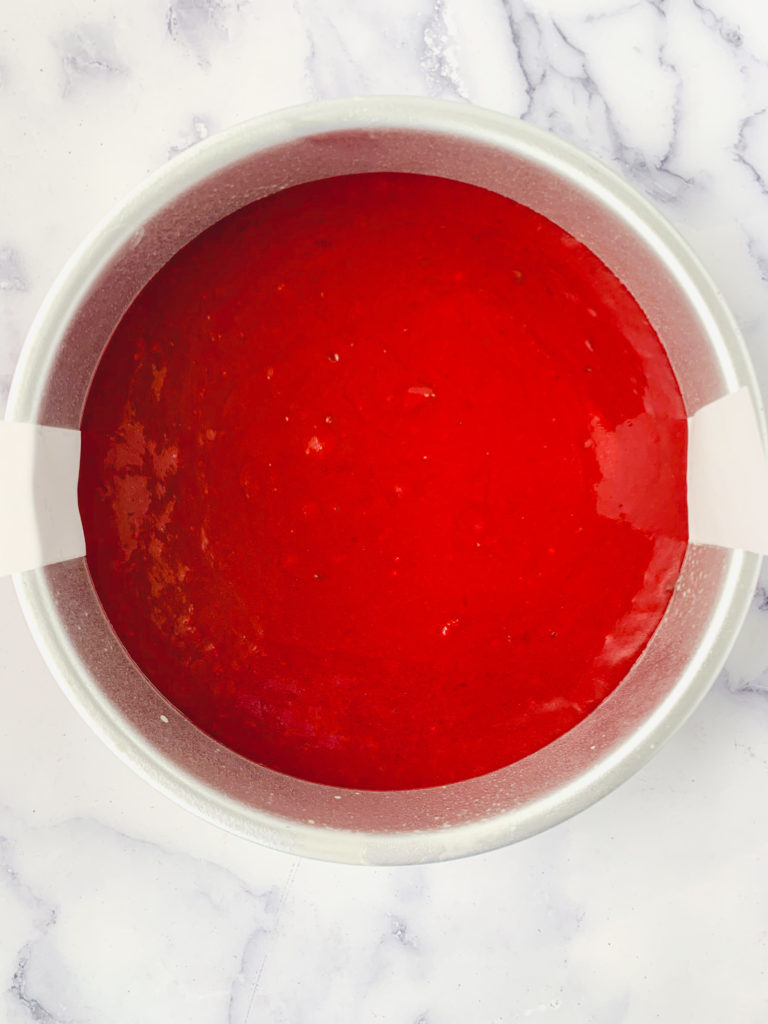
Next, add in the wet ingredients – non-dairy milk, neutral oil, unsweetened applesauce, vanilla extract, and red food coloring GEL. That’s right, gel, NOT liquid. The gel is a far better way to color your baked goods. It’s concentrated, so you only need to use 1tsp of gel where you’d normally use 2-3 tbsps of liquid. Plus it produces a way more vibrant color – just look at these pics! This is seriously what they look like!!
Mix all the ingredients until just combined – don’t overmix! – and then pour evenly into parchment lined & greased 8” cake tins. I like to weigh each one with my handy dandy kitchen scale to make sure they’re all roughly the same weight, that way they look uniform and pretty at the end.
Baking it..
I bake mine for exactly 25 minutes, so I recommend 23-28 here, since you know best how your oven handles recommended bake times. Check for doneness by inserting a toothpick into the middle of the layers and removing the pans from the oven as soon as the toothpick emerges with just crumbs, not wet batter.
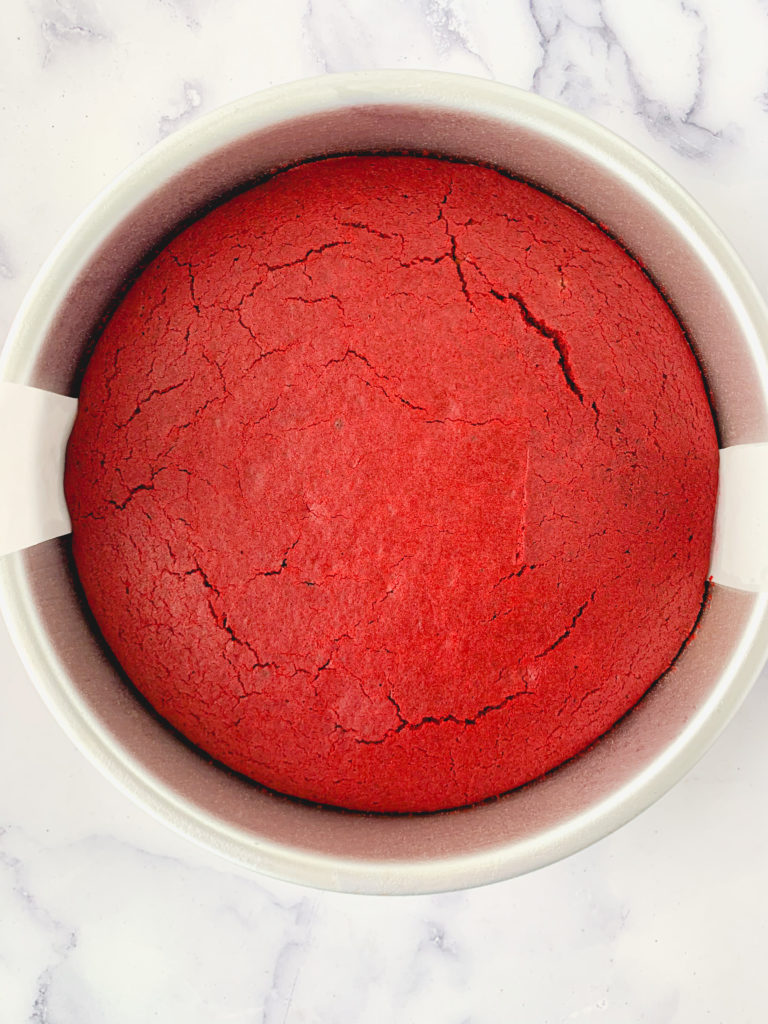
Let the cakes cool in the pans for 15-20 minutes, then invert them onto cooling racks to cool completely before adding the frosting. I like to let mine get closer to room temperature, then I move them into the fridge for a little while, since I find it easier to frost them when they’re cold. Even if you don’t have a lot of time to spare, I suggest letting them cool/chill for at least 30 minutes.
Frosting time!
Now time for the frosting! Wipe down your batter bowl if you want to keep it to one-bowl like I promised in the title.! I use a simple hand mixer to make all of my frostings, but if you have a fancier mixer then certainly use that one. The vegan butter can either be cold and hard straight from the fridge, or softened and at room temp. Either way add the vegan butter, vegan cream cheese, and vanilla extract to your bowl and beat for a minute or two until it’s all fluffy and combined. Then add in the powdered sugar one cup at a time, mixing fully after each one. I like to put in a little pinch of salt as well, but if you’re sensitive to salted foods then leave it out.
One last thing – I note in the ingredients you can add some cornstarch as well. In general, cream cheese frosting will be thinner than buttercream, since it’s made up mostly of cream cheese rather than butter, and just isn’t as structured. If you want to make it thicker either for piping purposes or any other reason, but you don’t want to do more and more powdered sugar, you can do a little cornstarch at the end to continue thickening it without dumping even more sugar in.
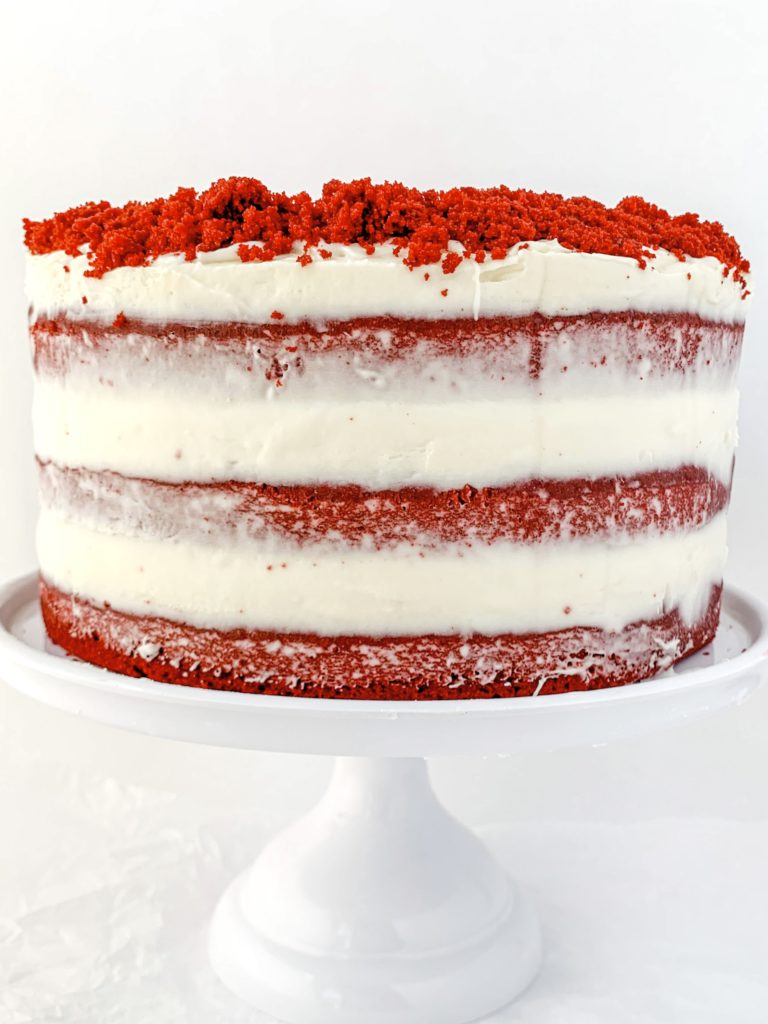
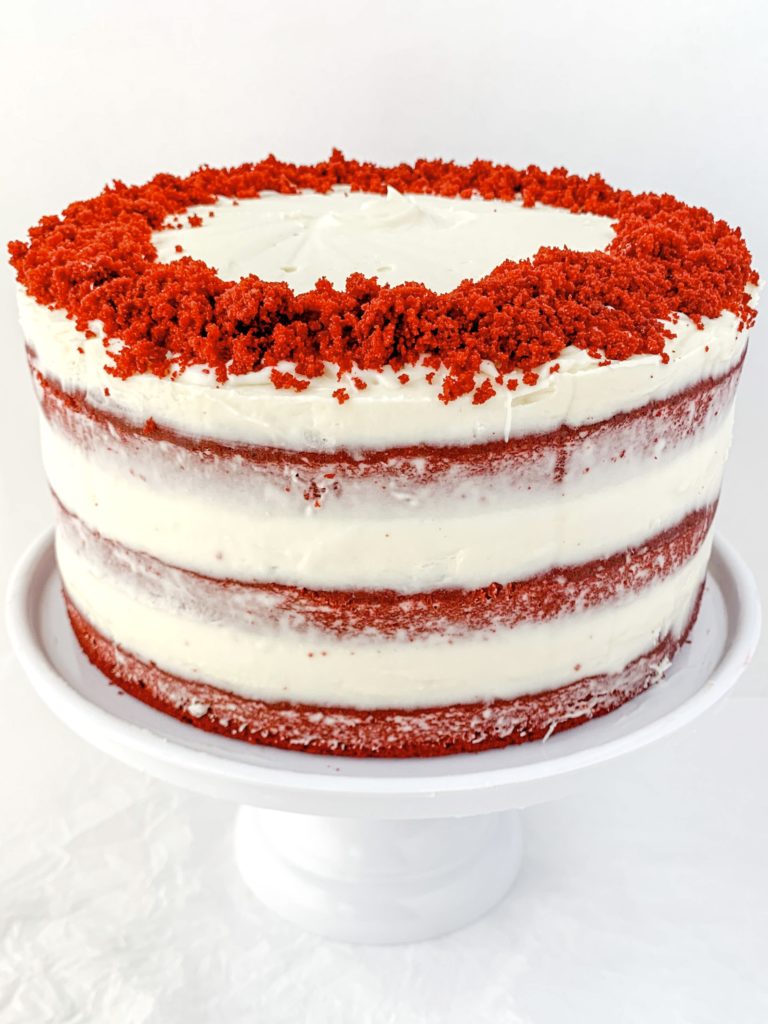
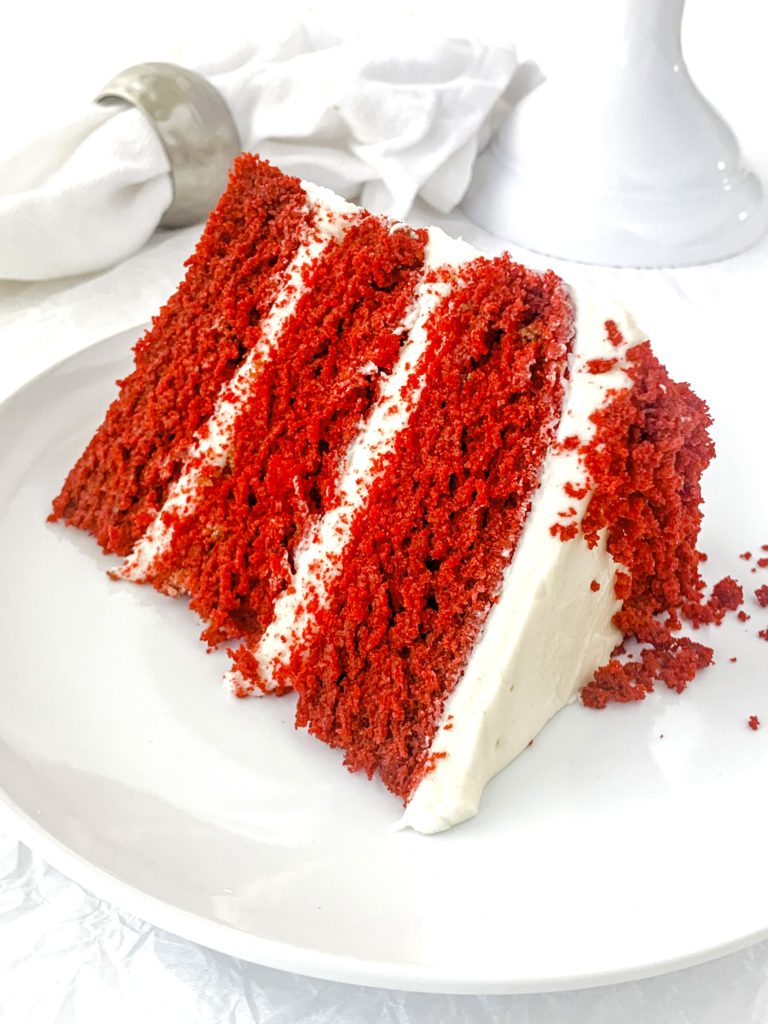
One batch of this frosting should get you enough to put between the layers and do the naked on the outside look like I did, but if you want the frosting to be thicker around the outside too, I’d suggest doing 1.5x the amount below.
That’s it! Time to eat your vegan red velvet cake!!
Storage:
I suggest keeping this cake in the fridge, where it will stay good for 3-5 days. You can also freeze it to enjoy for a few months.
Pro Tips & Tools:
- Make sure you are measuring your flour either by weight or using the spoon and level method. Do not scoop directly from the container, as you will wind up with too much! This is so important! If you want to buy a pre-made gluten free flour blend, make sure it’s King Arthur’s Measure for Measure Gluten Free Flour, it is BY FAR the best one for my recipes, NOT Bob’s Red Mills or any others. If you want to make a homemade blend, here is a link to the one I use.
- Make sure you measure your liquid ingredients using liquid measuring cups. This will ensure accuracy! I love this set.
- Need any other tools I’ve used here? For the cake itself I use these cake tins, these parchment liners, and this kitchen scale to make sure each layer is the same size. For the frosting, I use this simple hand mixer. And to frost the cake you can use a simple offset spatula, or spring for this whole set of cake stuff.
- Get yourself some red food coloring gel! It’s so much better than the liquid stuff. This one is my go-to.
Ingredients Needed:
- Flour – Make sure you are measuring your flour either by weight or using the spoon and level method. Do not scoop directly from the container, as you will wind up with too much! This is so important! If you want to buy a pre-made gluten free flour blend, make sure it’s King Arthur’s Measure for Measure Gluten Free Flour, it is BY FAR the best one for my recipes, NOT Bob’s Red Mills or any others. If you want to make a homemade blend, here is a link to the one I use.
- Unsweetened cocoa powder
- Granulated sugar – If you want to make these sugar free, I love using this Monkfruit Sweetener in place of granulated sugar.
- Baking powder – I recommend using baking powder that has no added aluminum. This one is my go-to.
- Salt
- Non-dairy milk – I usually use soy, but any will work
- Neutral oil – I always use grapeseed, but any will work
- Unsweetened applesauce
- Vanilla extract
- Red food coloring gel – I use this one
- Vegan butter – I use Earth Balance sticks
- Vegan cream cheese – I am fond of the Kite Hill brand, and they come in 8oz packages which is exactly the amount you want for the frosting here
- Powdered sugar – for the frosting. If you want to do this part sugar free, you can use this Monkfruit Powdered Sweetener in place of powdered sugar.
- Cornstarch – optional! Cream cheese frosting is a bit thinner than buttercream, so sometimes you want to thicken it up more but can’t handle adding even more sugar or sweetness to it, so you can use a little cornstarch if needed.

What To Bake Next:
- Want more use out of your cake tins and tools? Try this Vegan Chocolate Cake with Salted Caramel Frosting, or this Vegan Lemon Blueberry Cake with Lemon Curd Filling, or this Vegan Triple Chocolate Cake, or this Vegan Carrot Cake.
- How about some fun CUPCAKES? Try these Vegan S’mores Cupcakes, or these Vegan Funfetti Cupcakes, or these Vegan Carrot Cake Cupcakes.
- Want more birthday party dessert ideas? Try these Vegan Fudgy Brownies, or these Vegan Funfetti Cookies.
One Bowl Vegan Red Velvet Cake with Cream Cheese Frosting (Sugar Free and Gluten Free options)
Ingredients
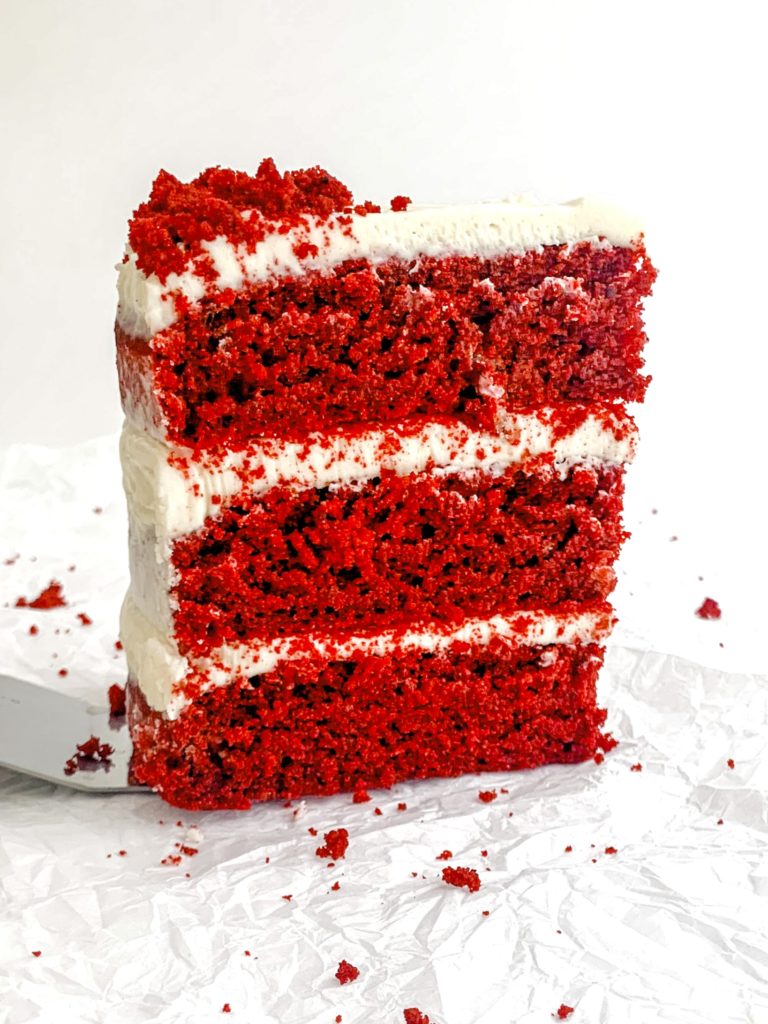
Cake Ingredients – note this makes THREE layers
- 3 1/3 cups gluten free flour can sub all-purpose if desired. This links to my favorite store bought gluten free flour blend that works best with all of my recipes, or see "Ingredients Needed" section for further info.
- 6 tbsp unsweetened cocoa powder
- 1¾ cups granulated sugar *if you want a sugar free option, this links to my favorite sweetener, you can substitute it 1:1 in place of regular granulated sugar
- 4 tsp baking powder
- 1 tsp salt
- 2 cups non-dairy milk
- ¾ cup + 2 tbsp neutral oil
- 4 tbsp unsweetened applesauce
- 4 tsp vanilla extract
- 2 tsp red food coloring gel
Cream Cheese Frosting Ingredients
- ½ cup vegan butter
- 8oz vegan cream cheese
- 1 tsp vanilla extract
- 4 cups powdered sugar *if you want a sugar free option, this links to my favorite powdered sweetener, you can substitute it 1:1 in place of regular powdered sugar
- pinch of salt optional
- ½ – 1 cup cornstarch optional if you want thicker frosting but don’t want to keep adding sugar
Instructions
- Preheat the oven to 350°F and grease 3 8-inch cake tins plus line with parchment rounds. Note – this recipe has amounts for THREE layers of cake. If you are doing more layers or fewer layers, adjust the amounts accordingly!
- In a large bowl, mix together the gluten free flour, unsweetened cocoa powder, granulated sugar, baking powder, and salt. Then add in non-dairy milk, neutral oil, unsweetened applesauce, vanilla extract, and red food coloring gel. Mix together until just combined.
- Pour evenly into your greased and lined cake pans. Bake for 23-28 minutes – mine are perfect at exactly 25 – check to be sure they’re done by sticking in a toothpick and removing the pans when the toothpick comes out with just crumbs, not wet batter.
- Set aside your cake pans to cool for about 15 minutes before removing the cake from the pan and putting onto a cooling rack to come to room temperature. Personally I like to let them come to room temperature for a few minutes and then stick in the fridge, as I find it easier to build a layer cake when the cake itself is cold.
- While your cake layers are cooling, it’s time to make the frosting. Note – this amount of frosting will make what you see in these pictures, which is enough to frost between layers and on top, then do a sort of “naked cake” look on the outside. If you want to go heavier on the sides of the cake, I suggest making 1.5x the amount written above.
- To make the frosting, simply add the vegan butter, vegan cream cheese, and vanilla extract to a bowl and mix first for a minute or two using a hand mixer or stand mixer. Then add in the powdered sugar one cup at a time. You can add a pinch of salt to taste. Also as I note above, if you want a thicker frosting but don’t want to keep adding more and more sweetness to it, you can use some cornstarch to get your desired consistency.
- Eat and enjoy!