


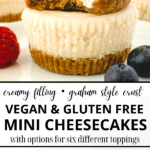
Take the creamy decadence of cheesecake, plus the buttery crumbly goodness of a graham cracker style crust, and now shrink it down to a one serving size and make it undetectably vegan AND gluten free! These Mini Vegan Cheesecakes will be your new favorite treat, and they comes with a bunch of topping options!

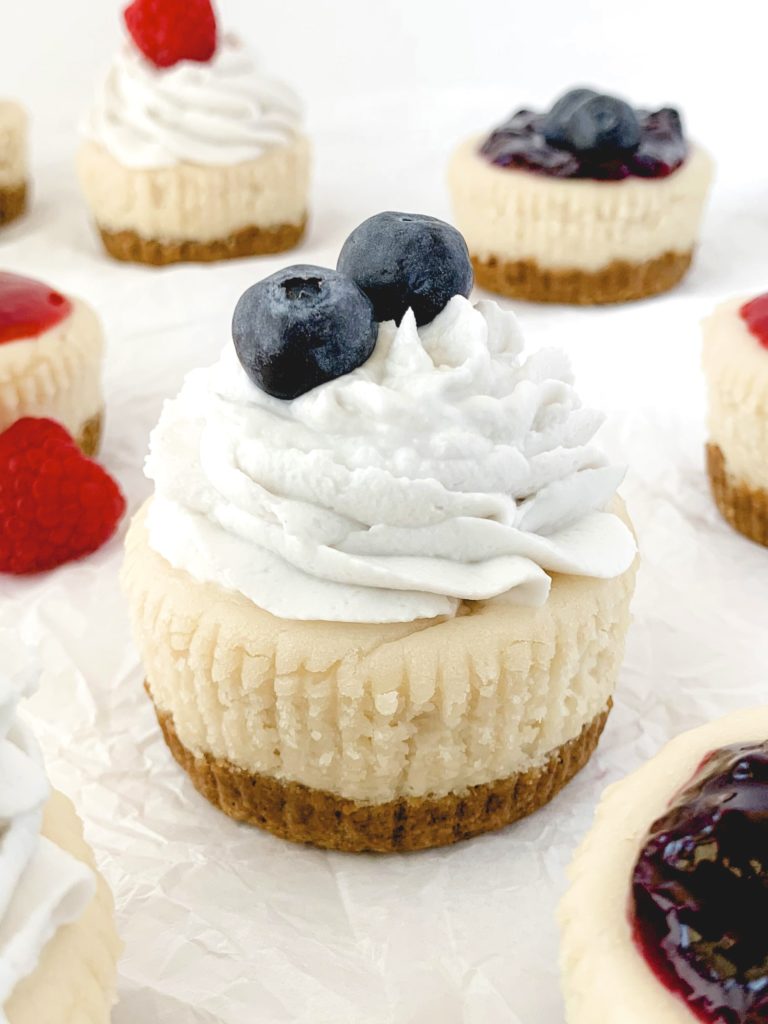
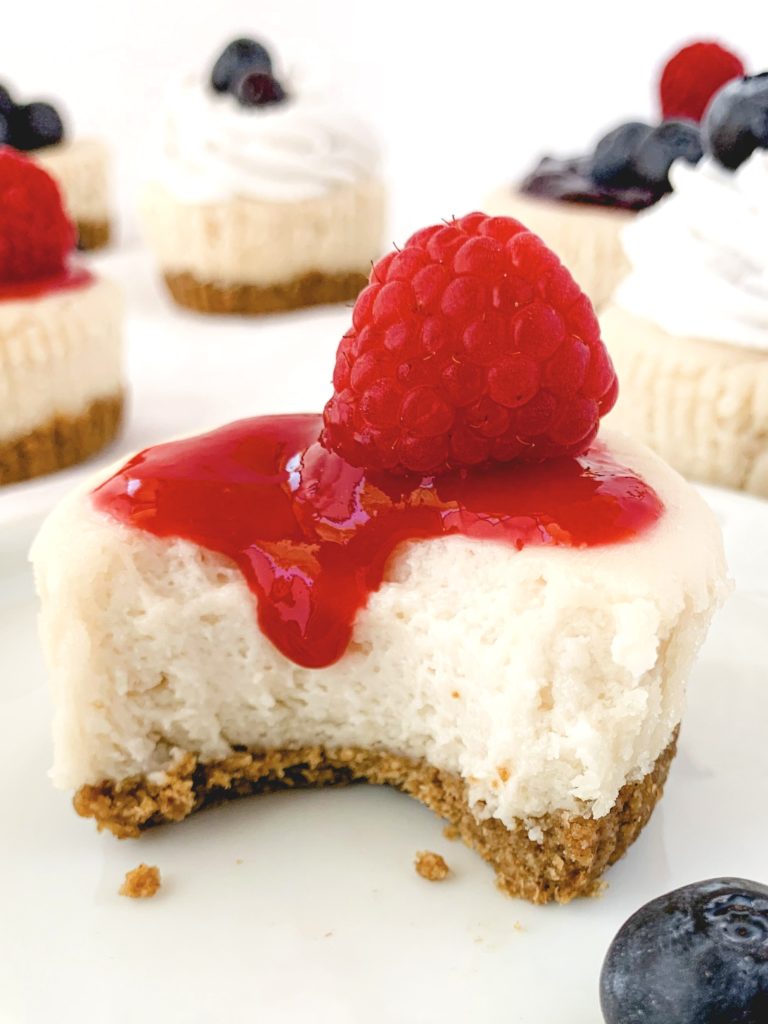
Is there anything better than cheesecake?! Imagine it! It’s tangy, it’s creamy, it’s sweet. Now pair it with a graham cracker style crust. It’s buttery, it’s crumbly, it’s slightly nutty tasting. What about some toppings?! A juicy blueberry compote. A tart raspberry sauce. A fluffy whipped cream.
Okay, NOW picture all of this in a handheld bite sized package, COMPLETELY vegan, gluten free, and with an option for NO refined sugars! Is this even possible?! Could there BE anything better??!! Well, friends, they’re real, and they’re spectacular.
(if you’re keeping track then yes that was a Friends reference immediately followed by a Seinfeld reference)
Welcome to one of my FAVORITE treats, these mini vegan cheesecakes! These perfect little cheesecakes quickly became one of my favorite treats. I made an entire batch for photos, but then decided I wanted to change something very slightly, and so I made an entire other batch instead. If I’m being honest? That first batch was pretty much fine, I just couldn’t fathom letting them all sit in my fridge overnight without being able to eat any.
Anyway, shall we get to making them? They are SUPER easy, but do need a little time to set and cool, so let’s get going!

How To Make Them
These mini vegan cheesecakes are EASY EASY EASY, but they do need a little time to set and cool. So make sure you’re leaving yourself a few hours from start time to serving time, or even overnight. Plus if you’re going to make any of the special toppings, they will also need a little bit of setting or cooling time. All I’m saying is – if you’re reading this and trying to have a dessert on the table for dinner in an hour, this one isn’t right for you right now, but come back tomorrow.
I’m going to start just with the cheesecakes themselves, and then after that will outline the toppings you see in these photos, plus suggest a few other options as well!
The Cheesecakes!!
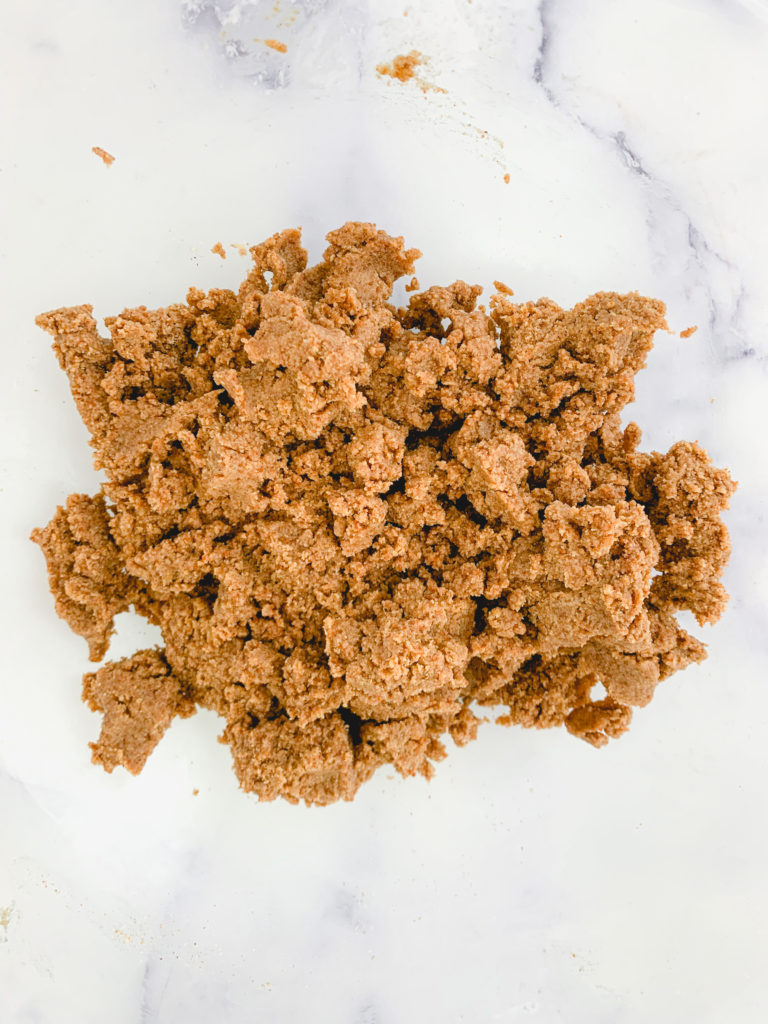
Let’s start with the crust. To keep these vegan AND gluten free, it’s really tough to use a traditional graham cracker crust. Most that you will find either have honey (no good for vegans!) or wheat (no good for GF!). Luckily, the solution is this fantastic graham style crust that is made of oat flour and coconut sugar, which really mimics the taste beautifully. I don’t recommend swapping out either of these ingredients, as it’s their flavor and texture together that leads to the faux graham end result, but you can swap the vegan butter for coconut oil if you want.
Let’s talk about the oat flour for a second. When a recipe calls for oat flour, you always have two options – buying pre-made oat flour, or using rolled oats and grinding them in a food processor. I have another recipe with a faux graham crust, these S’mores Cupcakes, and in that one I recommend grinding rolled oats since it keeps the texture a bit chunkier, and you want that there. HERE however, if possible, I recommend using pre-packaged oat flour. It is ground up more finely than you will likely be able to make your homemade oat flour, and that allows the crust to really pack down more firmly and bake better.
That being said, if you need to use ground up rolled oats, I promise it will still work. But you will need to adjust the amount of melted butter (or coconut oil) a little bit, as that version will need more moisture to hold together. Either way you go, all you do is combine all the ingredients in a bowl and use your fingers or a spoon or fork to combine into a wet sand type mixture. Photo below the specific amounts.
Oat flour amounts..
-If using packaged oat flour, then do 1 cup + 2 tbsp PACKED oat flour, + 7 tbsp melted vegan butter, along with the coconut sugar and salt.
-If using ground up oats, then do 1.75 cups of rolled oats ground up in a food processor, + 2/3 cup melted vegan butter, along with the coconut sugar and salt.
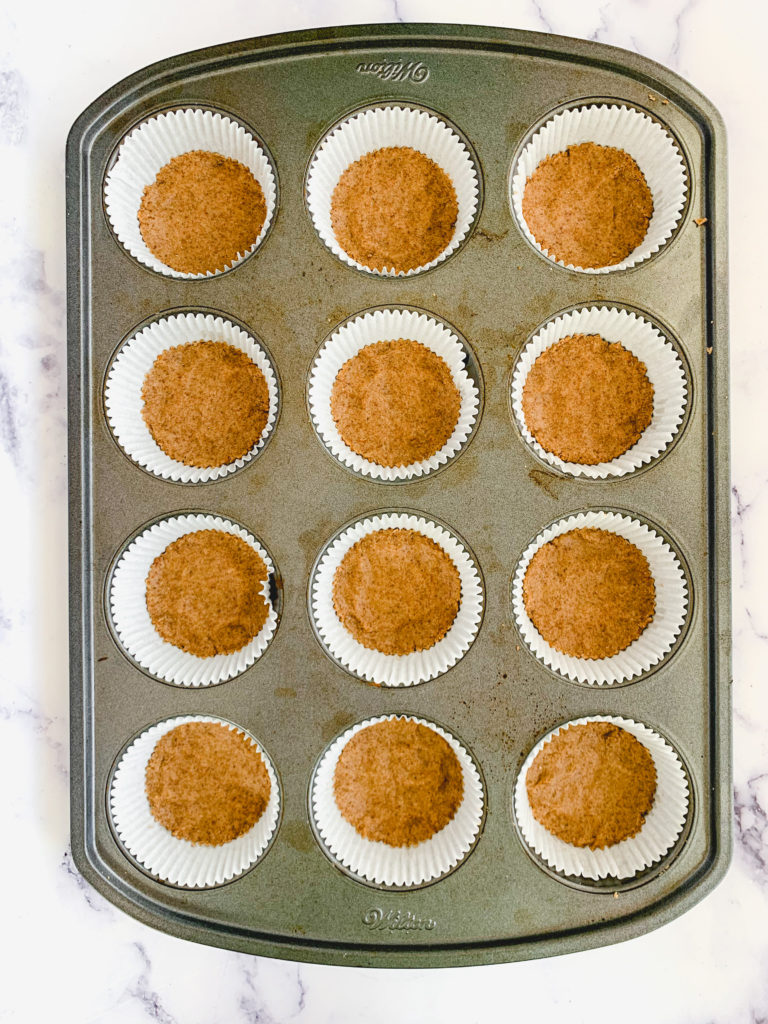
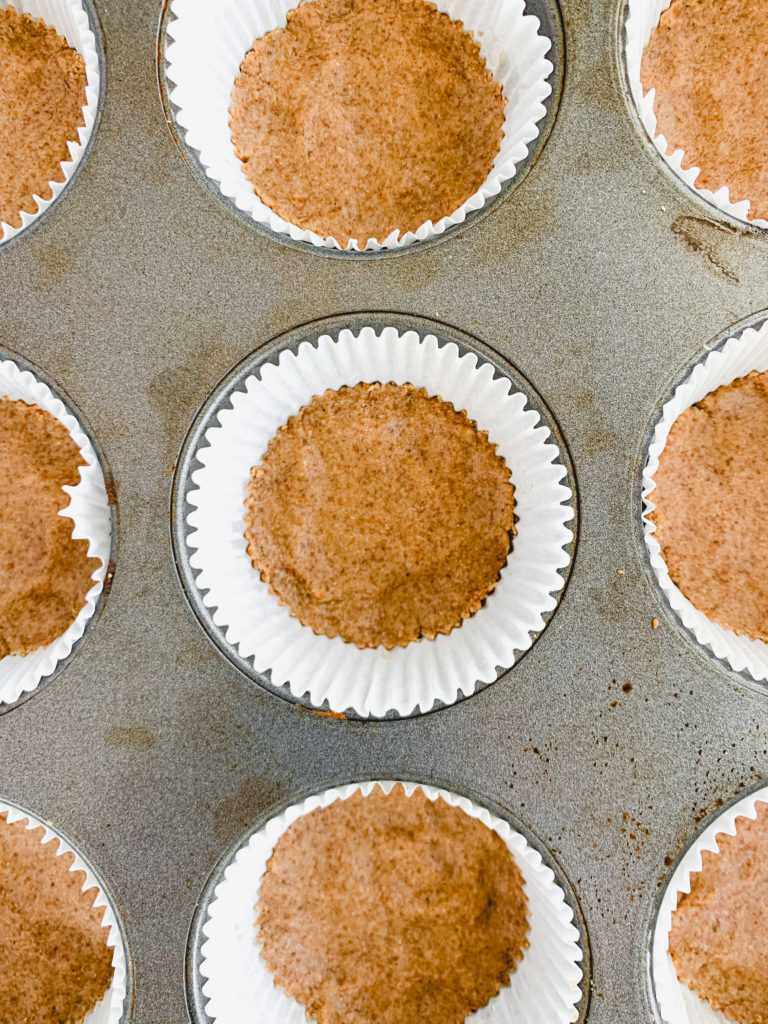
Okay, once your crust is sorted, scoop one PACKED tbsp of topping per each cupcake liner, and pack it down really firmly using your fingers or the bottom of a small glass or measuring cup. You will have some mixture remaining at the end. You can 100% use all of it if you want a heavier crust to filling ratio. What you see in these photos is just one packed tbsp per mini cheesecake, and then to be honest the rest of the mixture became a snack for me while they were baking. We are halfway to mini vegan cheesecakes goodness!!!
The filling!
Start by making sure your vegan cream cheese is at room temperature. This will ensure that it’s extra smooth and creamy, and will combine with the other ingredients with ease. Then get a can of coconut cream, and be very careful not to shake it up. The part that you want is the solidified, “heavy cream” like part that rises to the top of the can, not the liquid part at the bottom of the can. When you open it, scoop this portion out, and leave the watery part over. If you are using a 13.5 or 14oz can, the solid part will likely be around 7-8oz. You can weigh this on a handy dandy kitchen scale if you want to be precise, or if you don’t have a scale, it will come out to around 14 tbsp of creamy part.
Combine the vegan cream cheese, coconut cream, sugar, vanilla extract, lemon juice, cornstarch, and a pinch of salt into a large bowl. I use a simple hand mixer to combine it all for a few minutes until it’s perfectly smooth, you can use a fancier mixer if you have one, or if you don’t have anything then just mix very thoroughly by hand.
Put them together..
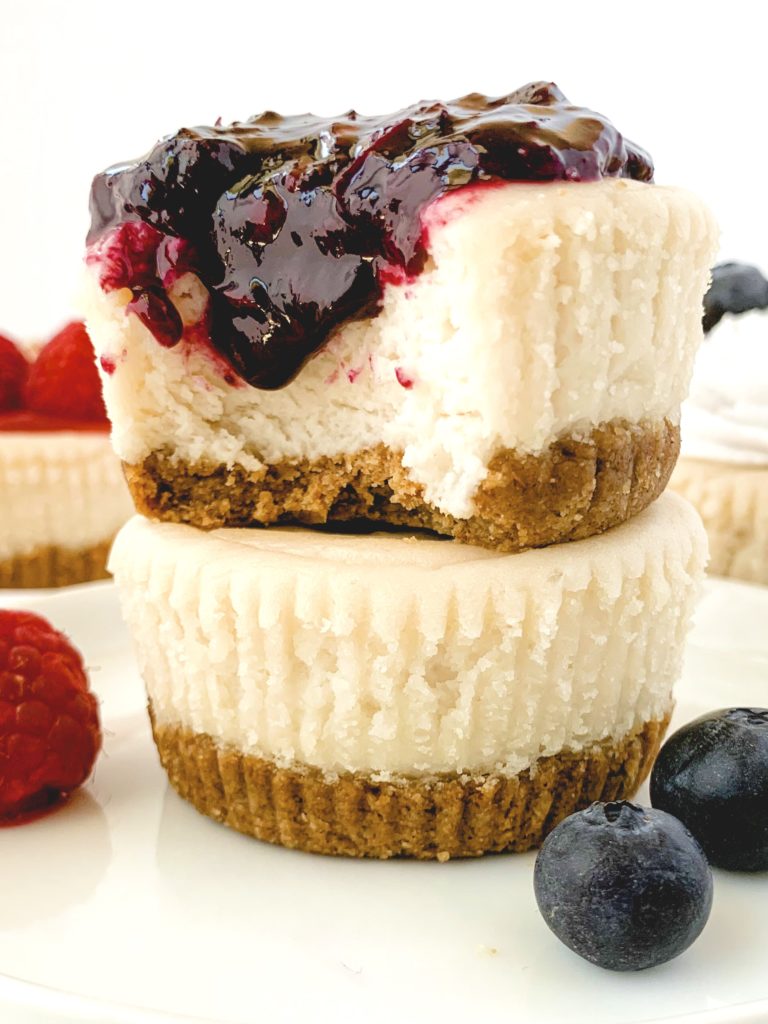
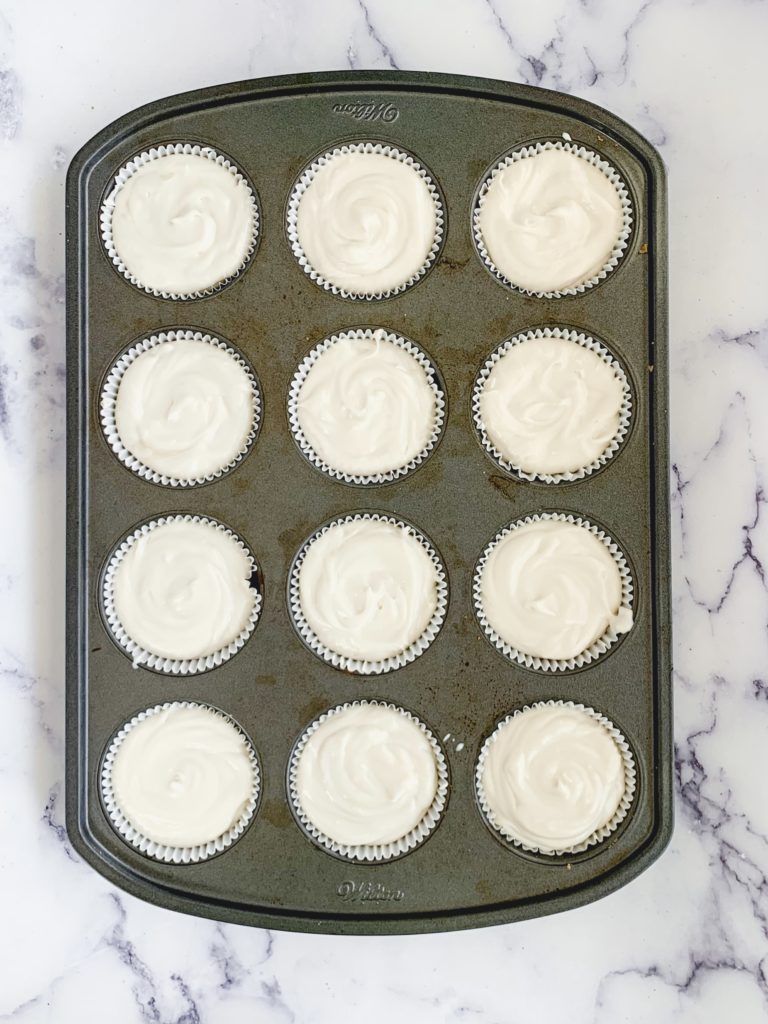
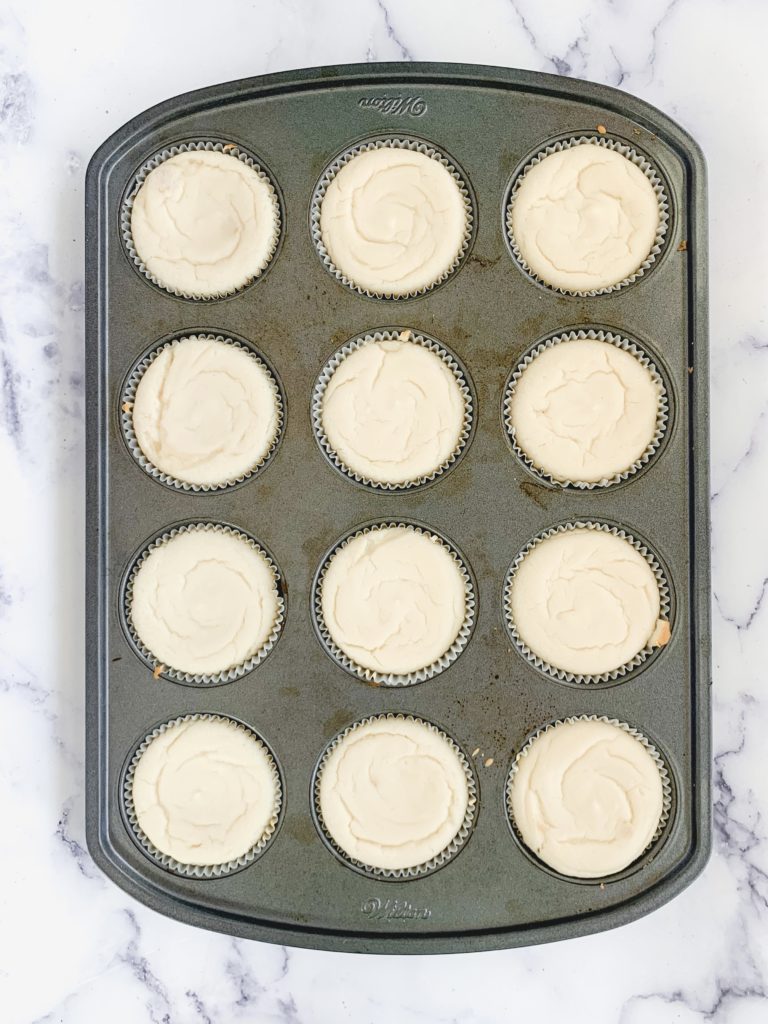
When both parts are ready and the crust is packed down, scoop the cheesecake filling evenly into each of the 12 cupcake liners. They will come up close to the top, as you will see in the first photo below. Bake at 350 degrees for exactly 20 minutes, then remove from the oven and put the pan directly onto a cooling rack so the air circulates around the bottom of the pan not just the top. When you first remove the pan from the oven the cheesecake filling will have puffed up quite a bit and still seem jiggly in the middle, it will set and settle down as they cool.
After baking..
I recommend letting them firm up at room temperature for about 2 hours, then remove from the pan and transfer into the fridge for at least another hour to set. I like to leave mine overnight. and VOILA, mini vegan cheesecakes!!
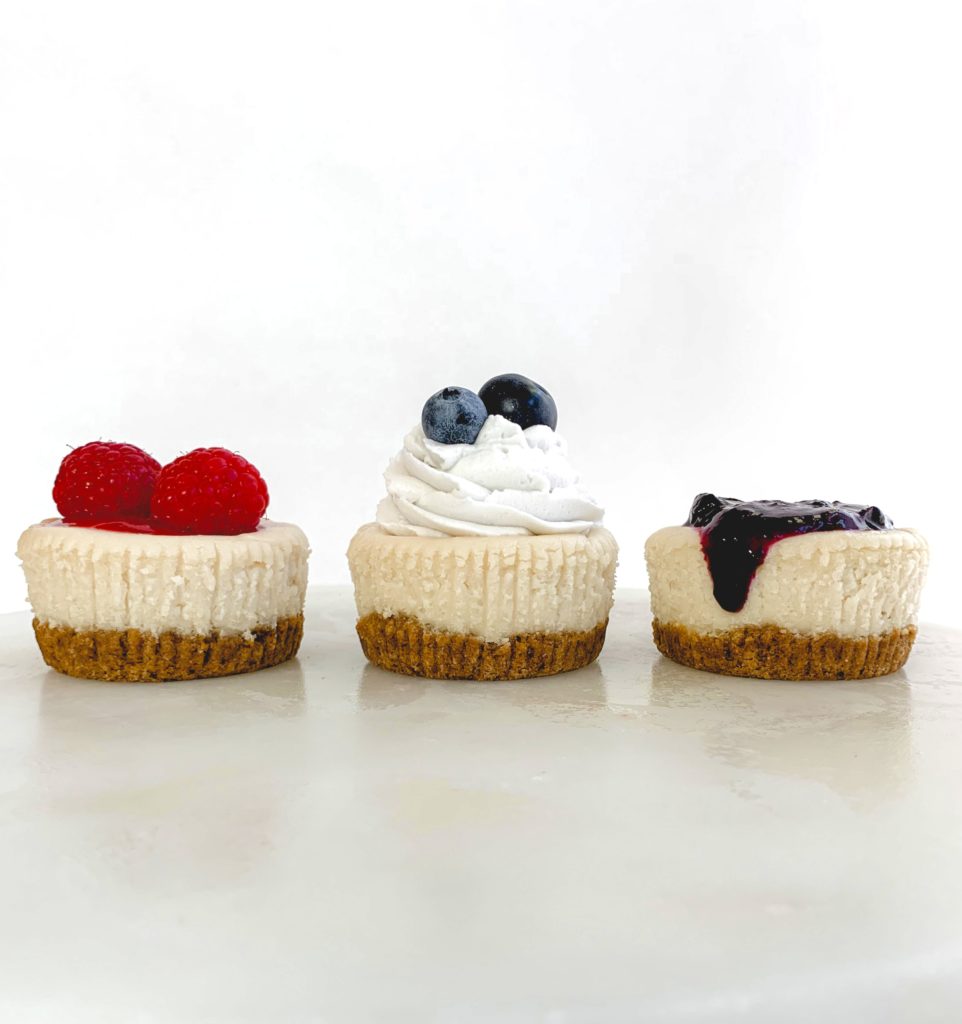
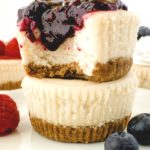
Now, you can totally be done here, and honestly I am obsessed with them on their own. But if you DO want to make any sort of topping, the three you see in the photo are a blueberry compote, a raspberry sauce, and a fresh whipped coconut cream. I am also going to suggest as other options a fresh strawberry sauce, a chocolate ganache, and a salted caramel.
Possible Toppings – in these photos
- Blueberry compote – in a small pot or saucepan, combine the cornstarch and warm water, then add in lemon juice (optional), sugar, and fresh or frozen berries. Heat over medium for about 3-5 minutes, using a fork or spoon to burst the blueberries as they heat up. Then remove from the heat and let cool entirely before use.
- Raspberry sauce – you can make more of a compote like the blueberries above by doing them the exact same way, but it will include the seeds. If you don’t want the sauce to have seeds, you will need to strain the mixture once it’s off the heat, and just use the strained portion. This will leave you with MUCH less to work with than if you keep the whole berries and seeds, so adjust your amounts accordingly.
- Coconut whipped cream – start here by making sure your cans of coconut cream have chilled overnight in the fridge. Not only does this separate the liquid from the solid part (like we did above for the cheesecake filling), but it makes the solid part really firm, and allows it to be whipped. When you’re ready to make the whipped cream you carefully remove the cans from the fridge, open then and scoop out the solid part, and whip in a large bowl using a hand mixer. Mix it until it is creamy but also forms stiff peaks. You can add in sugar if you want it sweetened, but can also just leave as is.
Possible Toppings – not in these photos
- Strawberry sauce – basically the same as the other berry sauces above! But you can follow along for this one specifically using my Cheesecake Brownie recipe, as it details the strawberry sauce I made for that recipe
- Chocolate ganache – if you want to drizzle some chocolate over the top, head on over to this Triple Chocolate Cake recipe and follow the chocolate ganache recipe. This one will be a chocolate pudding like consistency, so if you want it thinner than that, use more liquid and less chocolate
- Salted caramel – this one comes from a different Chocolate Cake Recipe that uses a salted caramel frosting. Just make the salted caramel portion, don’t turn it into the frosting, and voila! Drizzle over the top of each mini cheesecake.
Storage
Store covered in the fridge, they will last nearly a week. Or freeze them and they will last for a few months. Then you can have mini vegan cheesecakes whenever you want!!!
Pro Tips & Tools
- Make sure you measure your liquid ingredients using liquid measuring cups. This will ensure accuracy! I love this set.
- As I mentioned, using a hand mixer with the filling is the way to get the best results there. I use this very simple and effective one.
- Missing any of the basics? Here is my go-to muffin tin, and my go-to cupcake liners.
Ingredients Needed
- Packaged oat flour OR rolled oats – I suggest using packaged oat flour rather than grinding your own oats here, but there are detailed instructions on both ways above.
- Coconut sugar – this is what gives the graham crust/crumble its graham cracker flavor, I don’t recommend substituting for a different sugar.
- Vegan butter – I use Earth Balance sticks
- Salt
- Vegan cream cheese – I am fond of the Kite Hill brand, and they come in 8oz packages which is easy because you just use two packages here.
- Coconut cream – make sure you’re using a good can of coconut cream, this brand is my go-to. As I explain in detail above, you want to keep the can unshaken that way you can scoop the solid part from the top, and leave over the watery part at the bottom.
- Granulated sugar – If you want to make these sugar free, I love using this Monkfruit Sweetener in place of granulated sugar.
- Vanilla extract
- Cornstarch
- Lemon juice
- Additionally you will need other ingredients if you choose to make any of the toppings, all outlined in detail above in the How To Make Them section
What To Bake Next
- Want more use out of vegan cream cheese and had a few too many mini vegan cheesecakes and need something new? Try this Vegan Carrot Cake, or this Vegan Red Velvet Cake, or these Vegan Cheesecake Brownies, or this Vegan Lemon Sheetcake with a Cream Cheese Frosting
- Want more berry goodness? Try these Vegan Berry Crumble Bars, or this Vegan Triple Berry Cake, or this Vegan Blueberry Cake with Lemon Curd Filling.
- Want more use of the muffin pan? Try these Fluffy Vegan Blueberry Muffins, or these Vegan Funfetti Cupcakes, or these Vegan Peanut Butter Banana Breakfast Muffins.
Mini Vegan Cheesecakes (Fully Gluten Free, option for Refined Sugar Free, & Multiple Topping options)
Ingredients
“Graham Cracker” Crust Ingredients
- 1 cup + 2 tbsp packed oat flour see notes if you are going to be grinding up your own rolled oats rather than using packaged oat flour
- ½ cup coconut sugar
- ½ tsp salt
- 7 tbsp melted vegan butter can sub melted coconut oil
Cheesecake Filling Ingredients
- 16oz vegan cream cheese room temperature
- 7oz / 14 tbsp coconut cream – JUST the cream part important – do NOT shake the can, you only want the cream part that rises to the top, NOT the liquid part that sinks to the bottom. When you scoop this out of a 13.5 or 14oz sized can, it will come to around 7oz or around 14 tbsp worth of cream
- ½ cup + 3 tbsp granulated sugar *if you want a sugar free option here, this links to my favorite sweetener, you can substitute it 1:1 in place of regular granulated sugar
- 2 tsp vanilla extract
- 3 tbsp cornstarch
- 1 tbsp lemon juice
- small pinch of salt
Blueberry Compote Ingredients
- ¾ cup fresh or frozen blueberries
- 2 tsp cornstarch
- 1½ tbsp warm water
- ½ tsp lemon juice
- 2 tbsp granulated sugar *again, if you want a sugar free option here, this links to my favorite sweetener, you can substitute it 1:1 in place of regular granulated sugar
Raspberry Sauce Ingredients
- 2¼ cups fresh or frozen raspberries
- 2 tbsp cornstarch
- 4½ tbsp warm water
- 1½ tsp lemon juice
- 6 tbsp granulated sugar *again, if you want a sugar free option here, this links to my favorite sweetener, you can substitute it 1:1 in place of regular granulated sugar
Whipped Cream Ingredients
- 2 cans coconut cream *refrigerated overnight, DO NOT SHAKE, just scoop out the top hardened part
- 6-8 tbsp powdered sugar *optional, but if you want to sweeten the cream and want a sugar free option, this links to my favorite powdered sweetener, you can substitute it 1:1 in place of regular powdered sugar
Instructions
- Preheat the oven to 350°F and line a muffin tin with cupcake liners.
- Start with the “graham cracker” crust. I recommend using pre-packaged oat flour for this part, NOT grinding your own rolled oats, but if you are going to use rolled oats then make sure to read the notes below since it will alter the amounts of the ingredients! Mix your oat flour, coconut sugar, salt, and melted butter in a bowl. Combine into a wet sand consistency, then scoop one PACKED tbsp of the mixture into each cupcake liner. Press down firmly. You will have some leftover mixture which you can either add in here to make heavier crusts, or simply discard (or eat) the leftover.
- Next up is the cheesecake filling. The biggest thing to consider in this part is the coconut cream. You really want to just use the solid, “heavy cream” like part that rises to the top of the can, not the liquid on the bottom. This means do NOT shake the can before opening. As long as it’s been upright and undisturbed, it should have separated. When you remove this part it will come to around 7-8oz or 14 tbsp worth of cream.In a large bowl, mix together this measurement of coconut cream with the rest of the ingredients listed in this section – vegan cream cheese, sugar, vanilla extract, cornstarch, lemon juice, and a pinch of salt. Mix together with a hand mixer or stand mixer until completely combined, or if you do not have a mixer just mix incredibly thoroughly by hand.
- Evenly spoon the cheesecake filling mixture on top of the packed individual crusts, they will fill nearly to the top. Bake for exactly 20 minutes, then remove from the oven and stick the pan straight onto a cooling rack so air can circulate around the bottom of the pan not just the top. When the pan first comes out of the oven, the filling will have puffed up high and the center will seem a little jiggly. Let them set at room temperature for 2 hours, they will settle and set, and then I recommend moving into the fridge for another hour before serving. I let them set overnight.
- The mini cheesecakes are DONE and perfect as is, but if you want to make any of the toppings shown in the photos, then I will go through the instructions below. Additionally, in the How To Make Them section, I link to three other toppings I think could be great here – chocolate ganache, salted caramel, and strawberry sauce.
- Blueberry Compote – combine the warm water and cornstarch in a small pot or saucepan. Then add in the rest of the ingredients and heat over medium for 3-5 minutes until all the blueberries have burst and there are no large chunks left. Remove from heat and let cool entirely before using as a topping.
- Raspberry Sauce – you can make this exactly like the blueberry sauce, same amounts and just swap in raspberries, but because raspberries have seeds the compote will have seeds in it as well. If you want the sauce to be seedless, you will need to strain out the liquid portion, which is why the amounts here are so much larger. Same as with the blueberry sauce, start by combining the warm water and cornstarch in a small pot or saucepan, then add the rest of the ingredients, and heat on medium until there are no large chunks. Then strain out the liquid portion and discard the seeded part, and then let the liquid cool entirely before using as a topping.
- Coconut Whipped Cream – make sure you have chilled your cans of coconut cream in the fridge overnight! This works well if you are letting the cheesecakes set overnight, just pop the cans in with them and make the whipped cream fresh in the morning. Remove your cans of chilled coconut cream from the fridge, being very careful not to shake them up. Open gently and scoop out just the hardened cream part from the top, leaving behind the liquid at the bottom. If your can did not separate it is a dud can! Spoon the hardened cream from the cans into a large bowl, and mix on high speed for a few minutes until it is creamy, and stiff peaks are forming off the mixer. Add in your desired amount of powdered sugar, you can use more or less than the recommended based on your own taste, and mix until combined. Pipe or spoon onto each cheesecake.
- Eat and enjoy!