


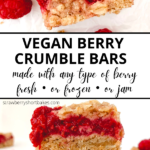
These vegan berry crumble bars have an oat filled cinnamon & brown sugar cookie style base, a soft and crumbly topping, and a raspberry filling that is the perfect mixture of sweet and tart – what’s not to love?? Most importantly – you can swap out raspberries for any berry you want, AND this recipe gives options for using fresh berries, frozen berries, or pre-made jam or preserves!

Guys – I LOVE handheld desserts. I know it’s really not a huge effort to pick up a fork or a spoon, but I get a LOT of satisfaction from knowing a treat was specifically designed to be eaten with my hands. I guess we’ve all got a bit of caveman in our subconscious. So for that reason, these crumble bars are doubly satisfying to me. Not only are they DELICIOUS, but I know I can eat them as a grab & go snack, or put them in a lunchbox as dessert.
The actual best part of these vegan berry crumble bars are how versatile they are! Not a raspberry fan? Make these with strawberries, or blueberries, or blackberries, or a mixture! Don’t have access to fresh berries? Make them with frozen berries, or even pre-made jam or preserves! This recipe will lay out ALL the ways to make those substitutions, so there is NO excuse to not start making these ASAP.
How To Make Them:
There are two components to this recipe – the crumble crust & topping, and the berry filling. Let’s start with the crust, since it’s incredibly simple and straightforward, and that way afterwards we can dig into the berry filling with all the options of how to make sure the recipe works for whatever berries you have available.
The crumble is made in one bowl, and you will use the same mixture for the crust as for the topping. So easy!! Mix together the gluten free (or all-purpose) flour, gluten free rolled oats, light brown sugar, baking powder, cinnamon, and salt. Then add in the melted butter and use a fork or your fingers to mix it all together until it’s got a streusel like texture.

In terms of possible substitutions, I tried this with both coconut oil and coconut sugar, just to see how it worked. All of the combinations do work well, but this standard vegan butter + brown sugar combo is by far the tastiest. The coconut sugar gives it a much different look and texture, and while the coconut oil is always delicious, unless you are using refined coconut oil it will give it a bit of a flavor that doesn’t work in harmony with the others. But if that’s all you’ve got, it will work!
Berry Filling time..
Again, you can absolutely swap out the raspberries for any other favorites, or whatever is in season when you are doing this. I can see blueberries, strawberries, or blackberries working beautifully here. Also in my tester version of using frozen berries I actually used a mixed berry medley and it was delicious! The first option I will outline here is using fresh berries, since that’s what I did for the photos.
Fresh Berries:
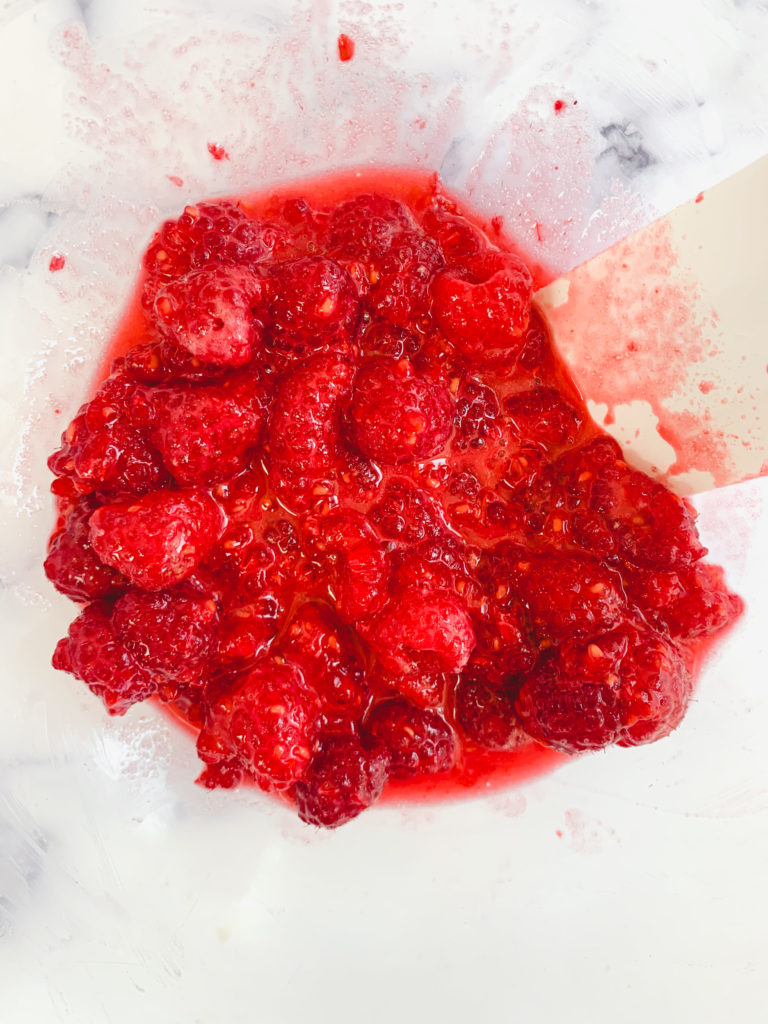
I’d recommend getting a 1-pound container of whichever fresh berry you are using. You will use 2 cups of berries (if you’re using strawberries, be sure to cut them into smaller pieces) and simply mix the berries with cornstarch, sugar, and lemon juice. I also like to sprinkle some fresh berries on top of the mixture when you’re building the bars, so you will wind up using nearly the entire 1-pound container after doing that.
Frozen Berries:
Using frozen berries you have two options. One is if you have a lot of time to kill you can FULLY thaw and drain the berries, thus making them basically like fresh berries, in which case you’ll do just what I outlined above in the Fresh Berries section. More realistically though, you’ll be using the berries from their frozen state, and we will cook them down to sort of a jam-like consistency in this option. It’s almost an identical mixture to the fresh berry ingredients, just a touch less cornstarch, but instead of mixing the lemon juice, cornstarch, and sugar together with the berries in a bowl you, will mix it all together in a small saucepan. Heat over medium heat and let it simmer for 3-5 minutes until it thickens up into a jam-like consistency. Let it cool to room temperature.
Jam or Preserves:
Certainly the easiest – just use ¾ cup of whatever berry jam or preserves you have on hand, and that’s it! If you want to give it a bit of a fresh burst, you can grab a few fresh berries to put on top of the jam layer before adding the crumble topping.
Putting the bars together..
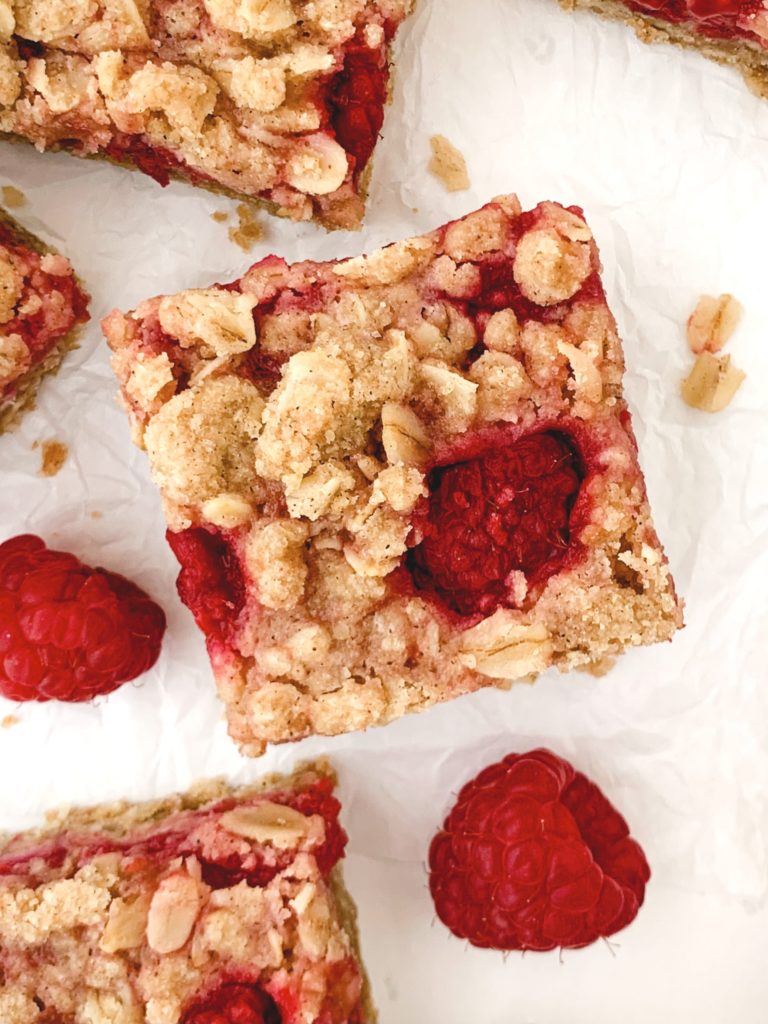
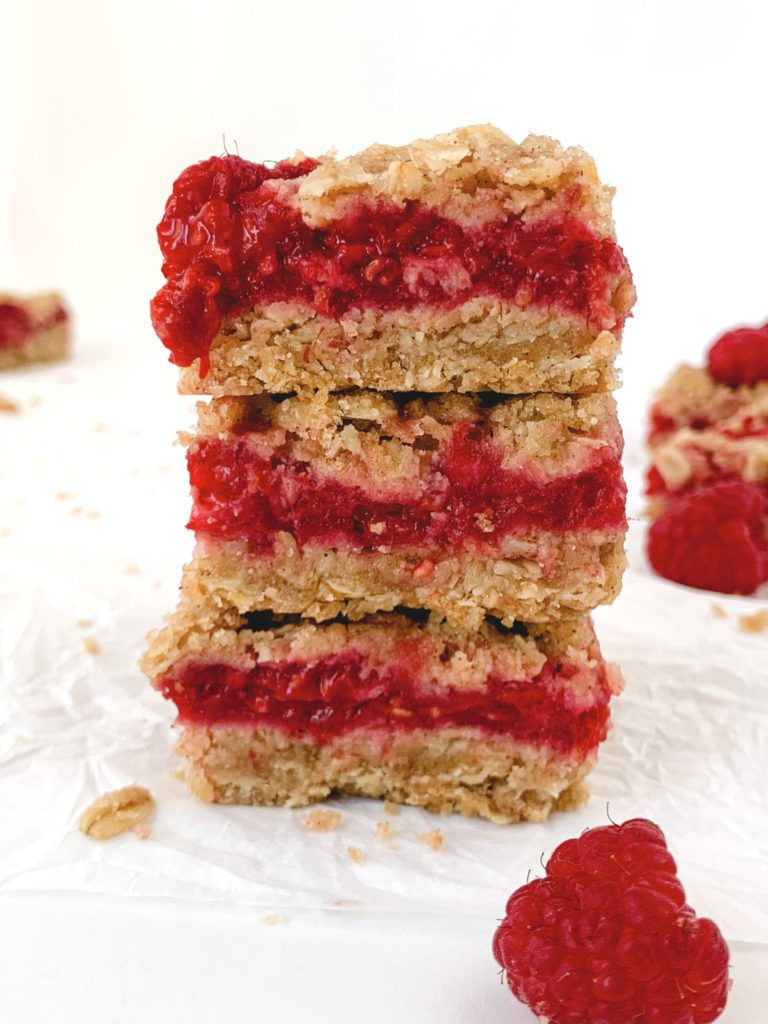
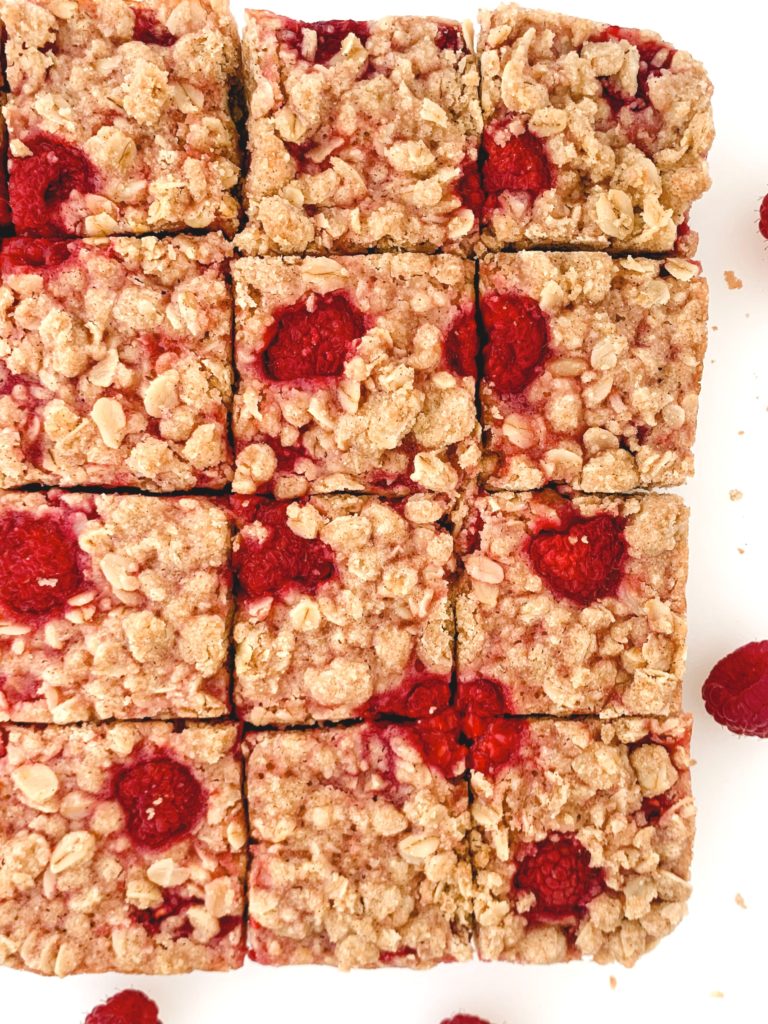
Okay so those are your options! Putting the vegan berry crumble bars together is very simple. Set aside a heaping ¾ cup of the crumble, as that’s the amount you’ll want for the topping, and press the rest firmly into a parchment lined 8×8 pan. Then layer on whatever form of berry mixture you are using – note that in the photos here I used FRESH berries, which have a more watery consistency than the frozen or jam options will. No matter which version you used, if you do have any spare fresh berries, you can add a few over the top of this layer. That’s why you see some whole berries poking out through the top of the crumble layer in my photos. Finally sprinkle on the crumble layer, then put into the oven for 32-35 minutes.
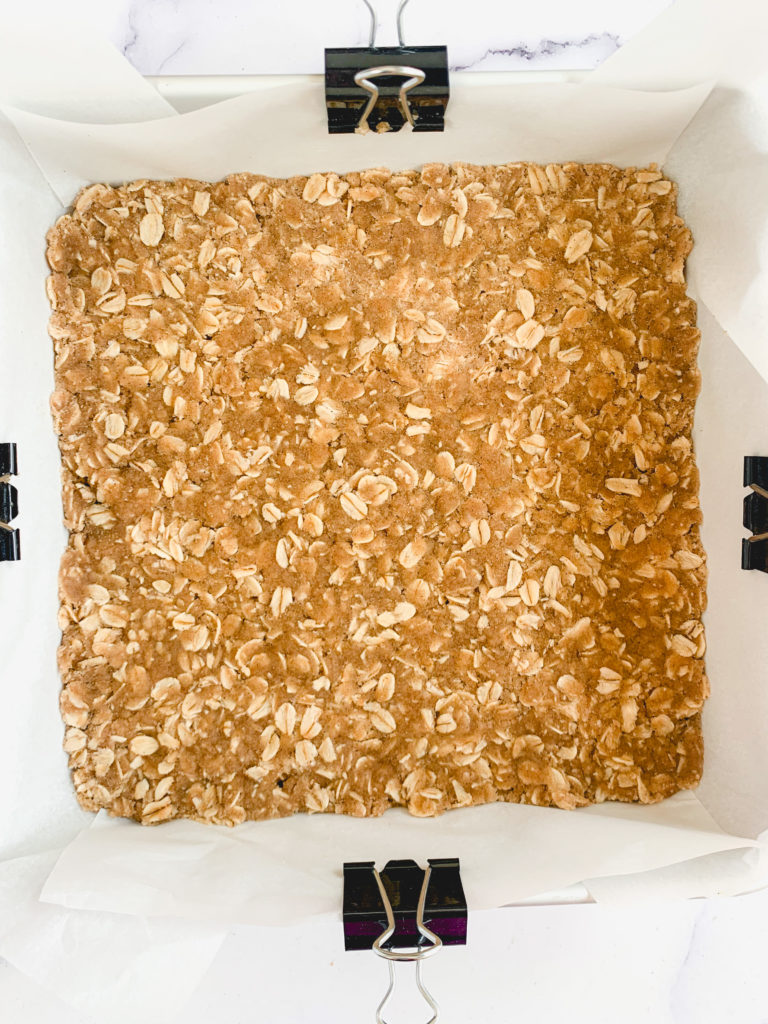

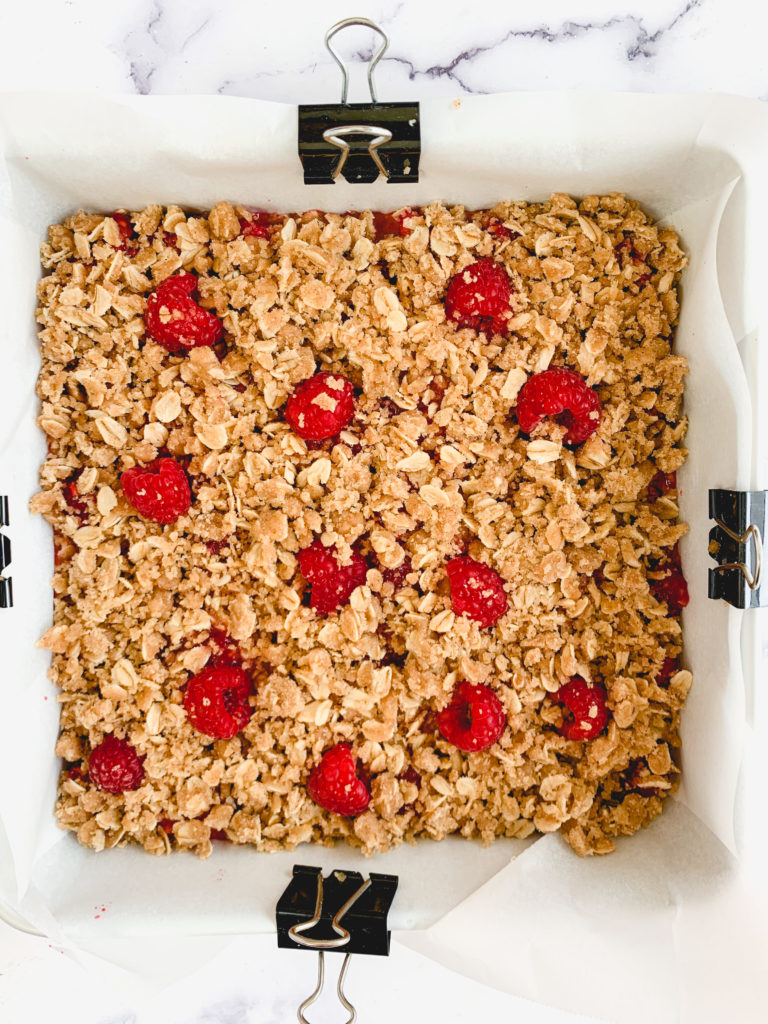
Note – in these photos you’ll see I use binder clips to keep the parchment paper in place while I build the bars. I make sure to take these off BEFORE putting the pan into the oven.
Once the bars are out of the oven, place the pan directly onto a cooling rack so air circulates around the bottom as well. Let them come to room temperature, around 45 minutes to an hour, then move into the fridge to chill and set for a few hours, or even overnight. If you don’t have the will power to wait then you can eat this like a crumble straight from the pan with a fork. But if you want the bars, you’ve got to wait for the chill time.
Final thought!
Depending on the tartness of your berries, you may benefit from making a simple vanilla icing to go over the top. This is made by mixing powdered sugar with non-dairy milk to your desired consistency, then drizzle as much as you want on top of the bars to add some sweetness.
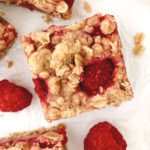
Time to eat your vegan berry crumble bars!!
Storage:
Keep the bars in the fridge, they will stay good for about 5 days, or you can freeze them for up to a few months.
Pro Tips & Tools:
- Make sure you are measuring your flour either by weight or using the spoon and level method. Do not scoop directly from the container, as you will wind up with too much! This is so important! If you want to buy a pre-made gluten free flour blend, make sure it’s King Arthur’s Measure for Measure Gluten Free Flour, it is BY FAR the best one for my recipes, NOT Bob’s Red Mills or any others. If you want to make a homemade blend, here is a link to the one I use.
- Make sure you measure your liquid ingredients using liquid measuring cups. This will ensure accuracy! I love this set.
Ingredients Needed:
- Flour – Make sure you are measuring your flour either by weight or using the spoon and level method. Do not scoop directly from the container, as you will wind up with too much! This is so important! If you want to buy a pre-made gluten free flour blend, make sure it’s King Arthur’s Measure for Measure Gluten Free Flour, it is BY FAR the best one for my recipes, NOT Bob’s Red Mills or any others. If you want to make a homemade blend, here is a link to the one I use.
- Gluten free rolled oats – I buy these in bulk but you can use whichever brand you like
- Light brown sugar
- Baking powder – I recommend using baking powder that has no added aluminum. This one is my go-to.
- Cinnamon – optional
- Salt
- Vegan butter – I like to use Earth Balance sticks
- Berries – LOTS more info on this above, but you can use any berry you want – raspberries, strawberries, blueberries, blackberries.. – and you can use either fresh, frozen, or pre-made jam or preserves
- Cornstarch
- Lemon juice
- Granulated sugar – If you want to make the berry mixture added sugar free, I love using this Monkfruit Sweetener in place of granulated sugar
- Powdered sugar – optional, if you want to make an icing for over the top. If you want to do this part sugar free, you can use this Monkfruit Powdered Sweetener in place of powdered sugar.
- Non-dairy milk – optional, if you want to make an icing for over the top

What To Bake Next:
- Want more berry based goods? Try these Vegan Cheesecake Brownies, or these Vegan Blueberry Muffins, or this Vegan Lemon Blueberry Cake with Lemon Curd Filling
- Want more use of your 8×8 pan? Try these Vegan Lemon Bars, or these Vegan Pecan Pie Bars, or this Vegan Coffee Cake.
- Did you buy those rolled oats in bulk like I said? Go make a few batches of these Vegan Oatmeal Raisin Cookies, or grind them into oat flour and make these Healthy Flourless & Refined Sugar Free Chocolate Chip Mini-Muffins.
Vegan Raspberry Crumble Bars (Gluten Free option)
Ingredients
Crust & Crumble Ingredients
- 1¼ cups gluten free flour can sub all-purpose if desired. This links to my favorite store bought gluten free flour blend that works best with all of my recipes, or see "Ingredients Needed" section for further info.
- 1¼ cups gluten free rolled oats
- ¾ cup + 1 packed tbsp light brown sugar
- ½ tsp baking powder
- ½ tsp salt
- 1 tsp cinnamon optional
- 10 tbsp melted vegan butter
Berry Filling Ingredients – FRESH BERRY OPTION
- 2 cups fresh berries of choice plus extras to sprinkle over the top
- 1½ tsp cornstarch
- ¼ cup granulated sugar *if you want a sugar free option, this links to my favorite sweetener, you can substitute it 1:1 in place of regular granulated sugar
- 1 tbsp lemon juice
Berry Filling Ingredients – FROZEN BERRY OPTION
- 2 cups frozen berries of choice
- 1 tsp cornstarch
- ¼ cup granulated sugar *if you want a sugar free option, this links to my favorite sweetener, you can substitute it 1:1 in place of regular granulated sugar
- 1 tbsp lemon juice
Berry Filling Ingredients – JAM OR PRESERVES OPTION
- ¾ cup jam or preserves of choice
Vanilla Icing Ingredients – optional
- 1 cup powdered sugar *if you want a sugar free option, this links to my favorite powdered sweetener, you can substitute it 1:1 in place of regular powdered sugar
- 5-6 tbsp non-dairy milk
Instructions
- Preheat the oven to 350°F and line an 8×8 pan with parchment paper. If you want to make this in a 9×13 pan, simply double all the ingredients.
- Note – in these instructions I will outline how to do this with either fresh berries, frozen berries, or jarred jam or preserves. If you want more in depth descriptions of anything, read the above How To Make Them section. Otherwise, make the crust/crumble as outlined, then jump to the recipe step that outlines how to handle the berries based on which option you are using.
- CRUST/CRUMBLE MIXTURE. The crust & crumble is made of the same mixture, and comes together in just one bowl. Mix together the gluten free flour, gluten free rolled oats, light brown sugar, baking powder, salt, and cinnamon. Then add in the melted butter and mix using a fork or your fingers until it’s got a streusel like consistency. Reserve a heaping ¾ cup which will be used as the crumble topping, the rest will be used as the crust.
- FRESH BERRY OPTION. If you are using fresh berries, keep reading! Measure out 2 cups of berries (if you are using strawberries, be sure to cut them up) and mix in a bowl with the rest of the ingredients in the Fresh Berry ingredient section above. The mixture will be a little watery, and your berries will get mashed down, that’s okay. If you have more fresh berries to spare, you may want to put some whole berries on top of this mixture when you begin layering the bars together.
- FROZEN BERRY OPTION. If you are using frozen berries, keep reading! You have two options here – one is to let the berries thaw and drain FULLY, so they seem as though they are fresh berries, then use them the same as the Fresh Berry option above. But more realistically, option 2 is to make them from their frozen state. Measure out 2 cups of frozen berries and place into a small saucepan with the rest of the ingredients in the Frozen Berry ingredient section above. Heat over medium heat, and once it begins to simmer mix for another 3-5 minutes until the mixture has thickened. It will seem like jam here and not look like the fresh berry photos, that’s okay! Let it come to room temperature.
- JAM OR PRESERVES OPTION. If you are using jam or preserves, keep reading! This is the easiest section – measure out ¾ cup of your chosen jam or preserves. The end.
- PUTTING IT ALL TOGETHER. Whichever version of berry filling you used, let’s all meet back here at step 7. Start by taking the crust part of your crust & crumble mixture, and pack it down into the parchment lined pan. Next, spread your chosen berry mixture on top of this crust layer. No matter which one you used, if you happen to have fresh berries around, you can add a few over the top at this point, too. Finally, take the reserved ¾ cup of crumble mixture and sprinkle generously over the top of the berry mixture. Photos of all these steps are above throughout the rest of this post.
- Put in the oven for 32-35 minutes, and when you remove the pan place directly onto a cooling rack so air circulates to the bottom of the pan as well. Let them come to room temperature for at least 45 minutes, then move to the fridge to fully cool and firm up into bars. I like to leave mine overnight, but if you only have a few hours, they should be okay to remove from the pan after 3-4 hours.
- Finally, if your berries are a bit tart and you want to add some extra sweetness, mix together the vanilla icing ingredients and drizzle over the top of the cooled bars.
- Eat and enjoy!