


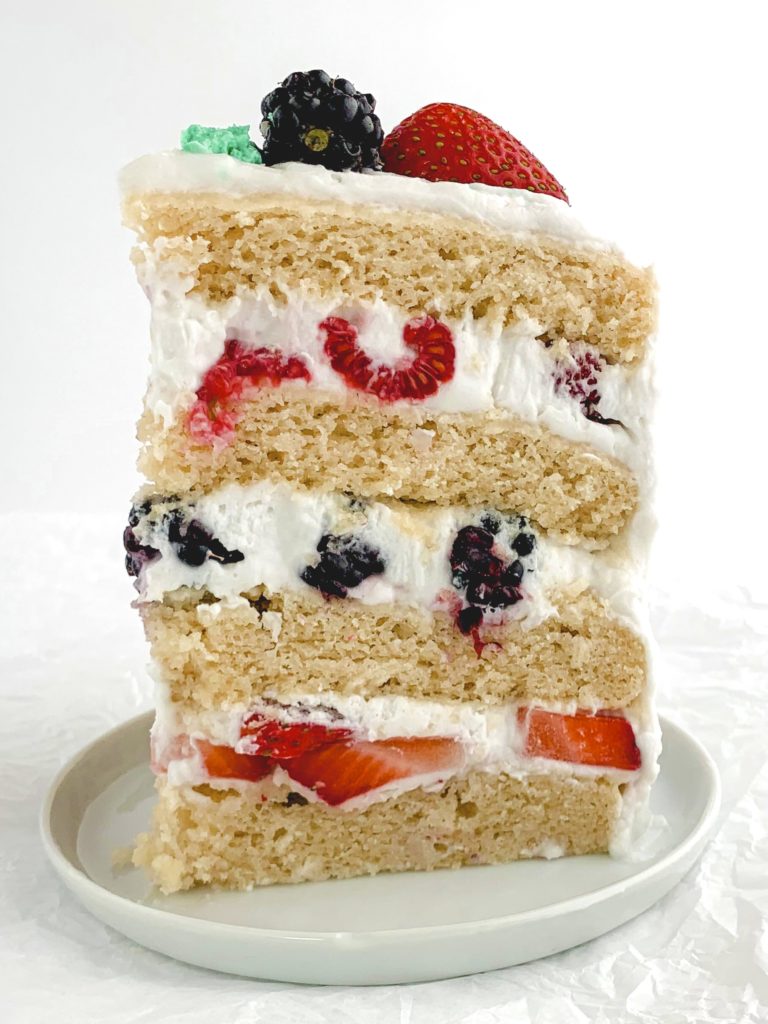
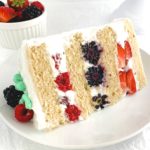
This beautiful cake is an homage to one of the best cakes on the planet – the Triple Berry Cake from Sweet Lady Jane in Los Angeles! Four layers of fluffy, buttery vanilla cake, plus three layers of fresh berries, all held together with luscious lightly sweetened whipped cream. This cake is as delicious as it is gorgeous, and makes a perfect centerpiece for any gathering!

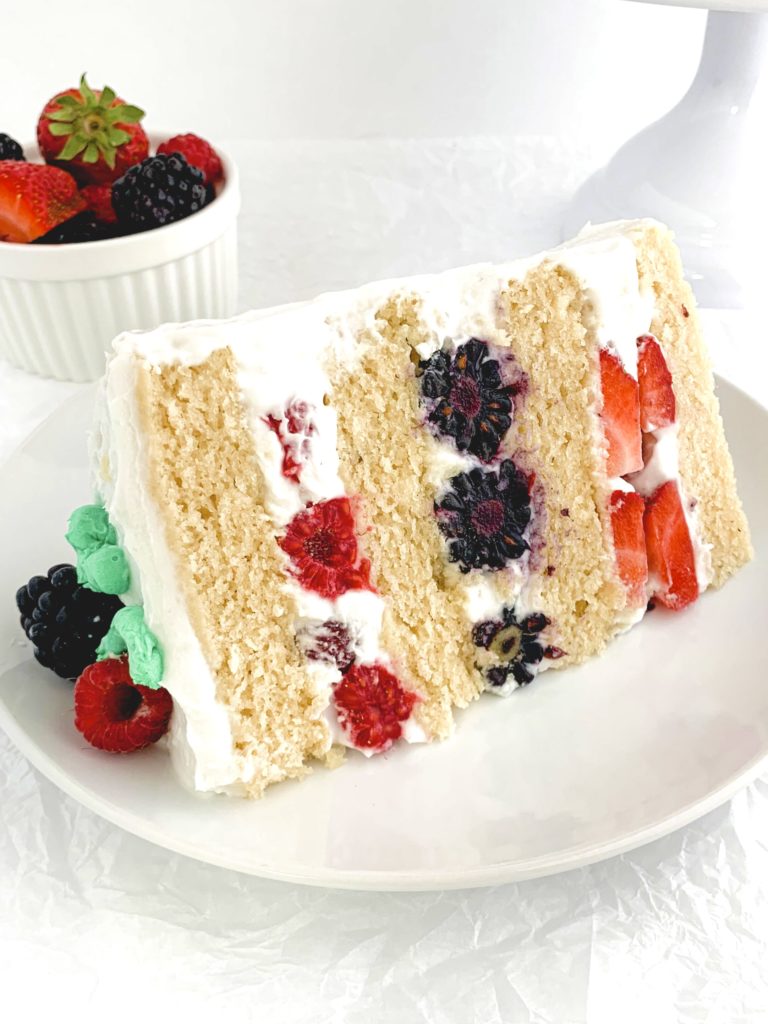
Berries and cream. It doesn’t get more delicious – and more simple! – than this classic and refreshing summer dessert pairing. The only thing that could make it better? Well, adding 4 layers of buttery vanilla cake surrounding the berries and cream, of course.
Now, if you’ve ever been to Los Angeles and indulged in a Sweet Lady Jane Triple Berry Cake, then you know this is the ULTIMATE in berry based cakes. Also, if you’ve ever developed food allergies as an adult, then you know there are some things that are painful to give up, and this was certainly one of those things for me. But never one to wallow, I have taken matters into my own hands! Behold, this vegan version of the Triple Berry Cake masterpiece!! You can also make it gluten free, AND sugar free, so really there’s an option for everyone.
This cake is decadent, but somehow still feels light, and is insanely easy. You start with four moist and fluffy layers of super buttery vanilla cake. Then you add a layer of strawberries, then a layer of blackberries or blueberries, then a layer of raspberries. Holding the berries together inside each layer is a lightly sweetened smooth whipped cream. (In this case a coconut cream since it’s vegan, of course.) Then top it all off with some extra berries, perhaps some green food coloring colored leaves and vines to add to the berry wilderness look, and voila!!! You have made your own Homage to the Sweet Lady Jane Triple Berry Cake, and now you should go show it off to everyone you’ve ever met.
How To Make It:
There are two major components to this cake – the cake layers themselves, and the coconut whipped cream. The whipped cream comes together very quickly, so we will save that for the end, BUT I will say quickly right now there is one advance prep thing you need to do, and that’s refrigerating your cans of coconut cream overnight. We will get more in depth on this during the whipped cream portion, but noting this first thing so you can get prepared!!
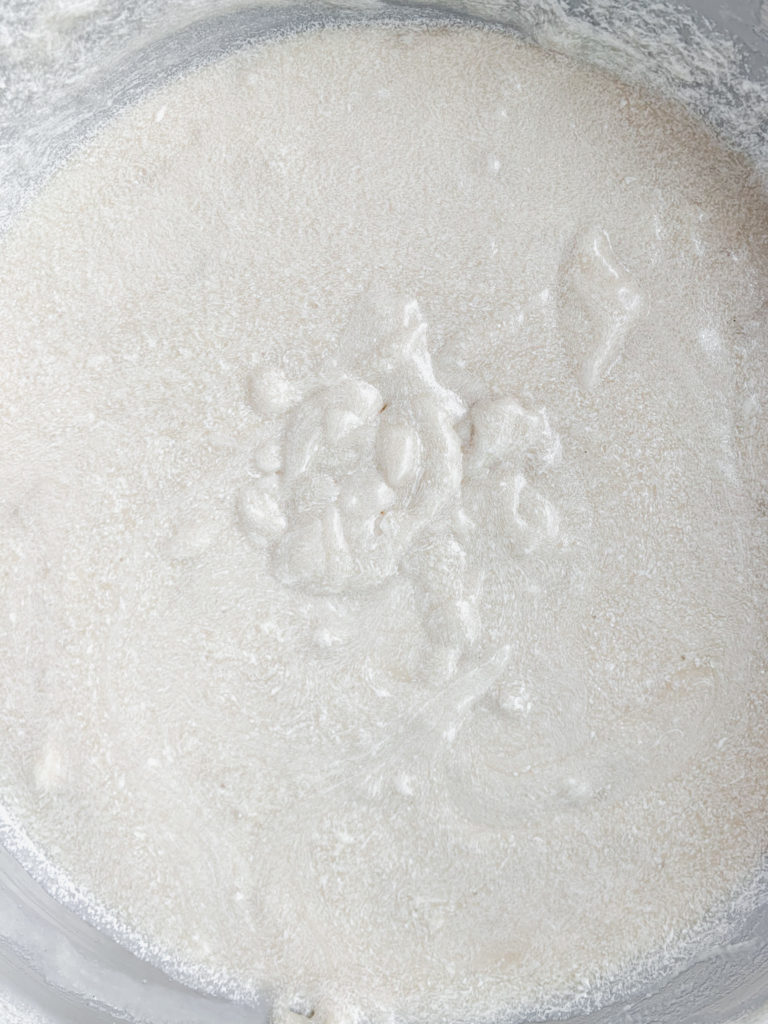
So – the cake! Your short advance prep here is to make sure your vegan butter and non-dairy milk have come to room temperature for around 2-3 hours before beginning to bake. When you are ready to go, it’s all very simple. Cream together the vegan butter, neutral oil, and sugar (see the Ingredients Needed section to learn how to make the cake layers sugar free!) in a large bowl. You can use a mixer, or get down and dirty with your hands, but either way make sure you mix these ingredients for a solid few minutes until they are light and fluffy. See the below photo as reference.
Next up, add in the non-dairy milk and vanilla extract, and mix again. The mixture is going to look ugly here, and not fully combined. That’s okay! That’s how it should look. Again, see below for reference for this step.

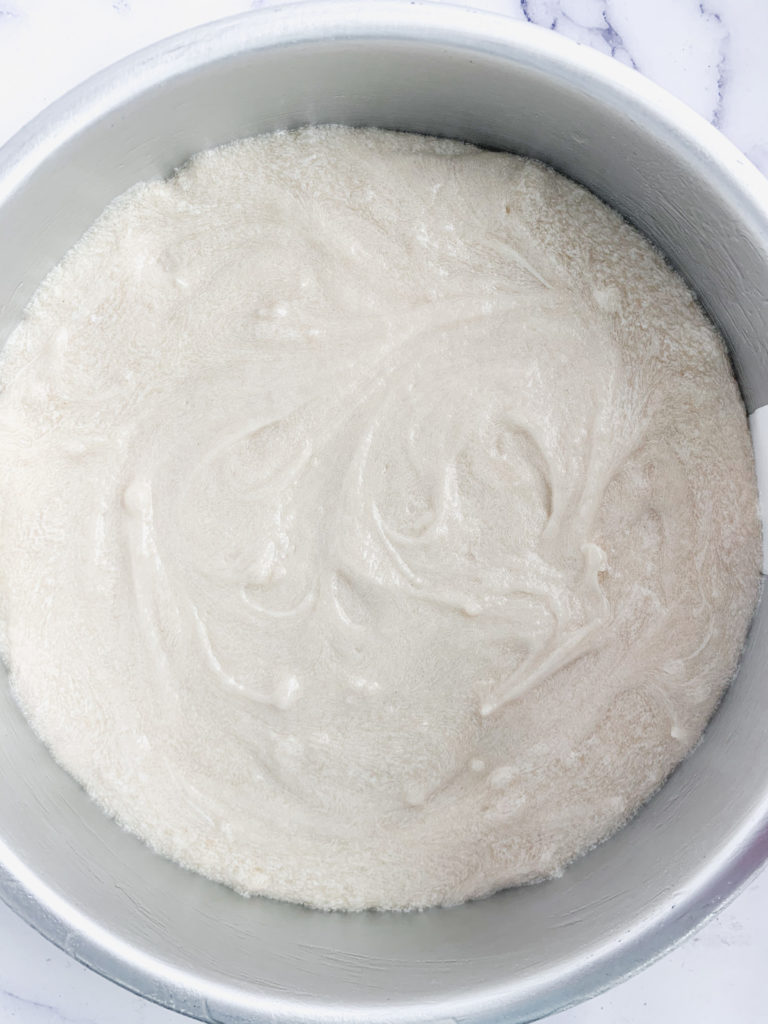
Next up, add in gluten free (or all-purpose) flour, baking powder, and salt, then mix again. If you want to match against mine again you can see below. But let’s talk about baking them for a second. You need to get four layers out of this batter, so you have a few options.
Layer baking options:
You can either divide the batter into four equal portions and bake each layer on its own, or you can divide it into two equal portions and bake two jumbo sized layers, which you will later need to level and cut in half so you still wind up with four. Unless you are really skilled at leveling cake layers, I strongly recommend you use the four equal portions method. Even if you only have 2 cake tins, or can only fit 2 in your oven at once, just make the first two layers, let them cool for a few minutes and remove from the pan, then make the other two. It will take a little bit of extra time but it is MUCH easier. This is the method I do.
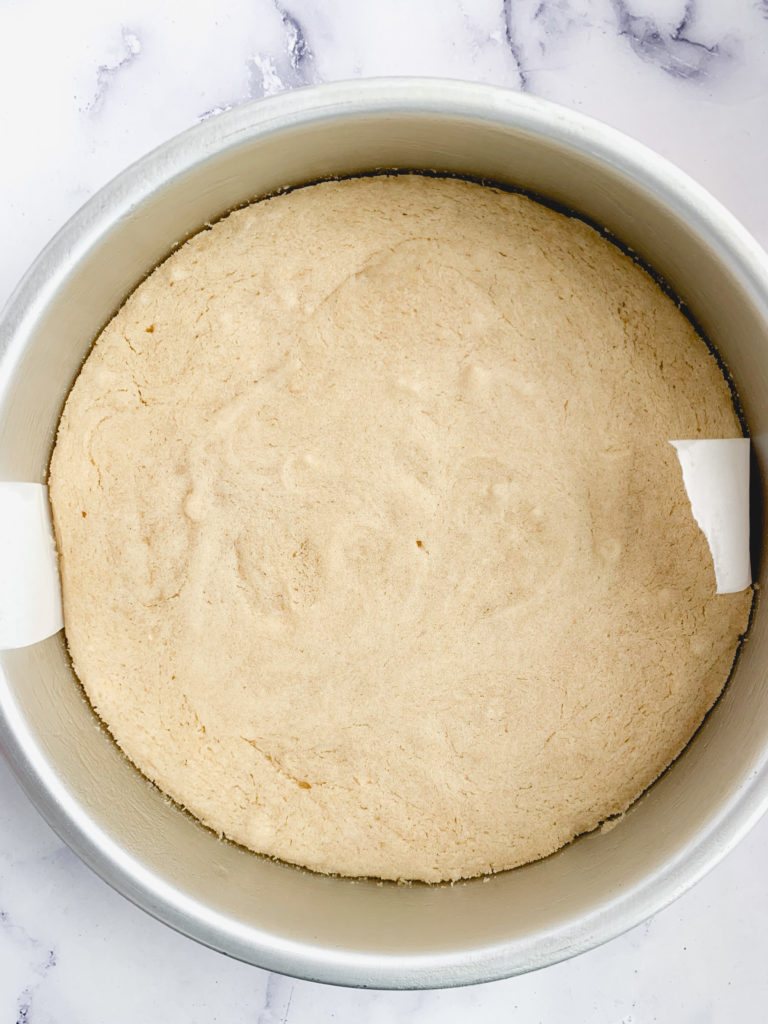
Either way you go, I recommend a handy dandy kitchen scale so you can make sure all your layers come out to the same amount. If you are using my way and baking four individual layers, they will bake for around 20-22 minutes each. If you are making the jumbo sized two layers to cut in half, they will bake for around 30-34 minutes each. You can always test for doneness by sticking a toothpick into the center of a layer and making sure it comes out with just crumbs, not wet batter.
Let the cakes cool for about 15-20 minutes in the pans, then invert them out onto cooling racks to come fully to room temperature before starting to frost and put them together. I personally like to let mine come to room temp and then put them in the fridge for a little bit, I find them easier to work with when chilled.
(note – the photos got a little washed out due to bad lighting, the batter is not quite this white colored)
Whipped cream time!
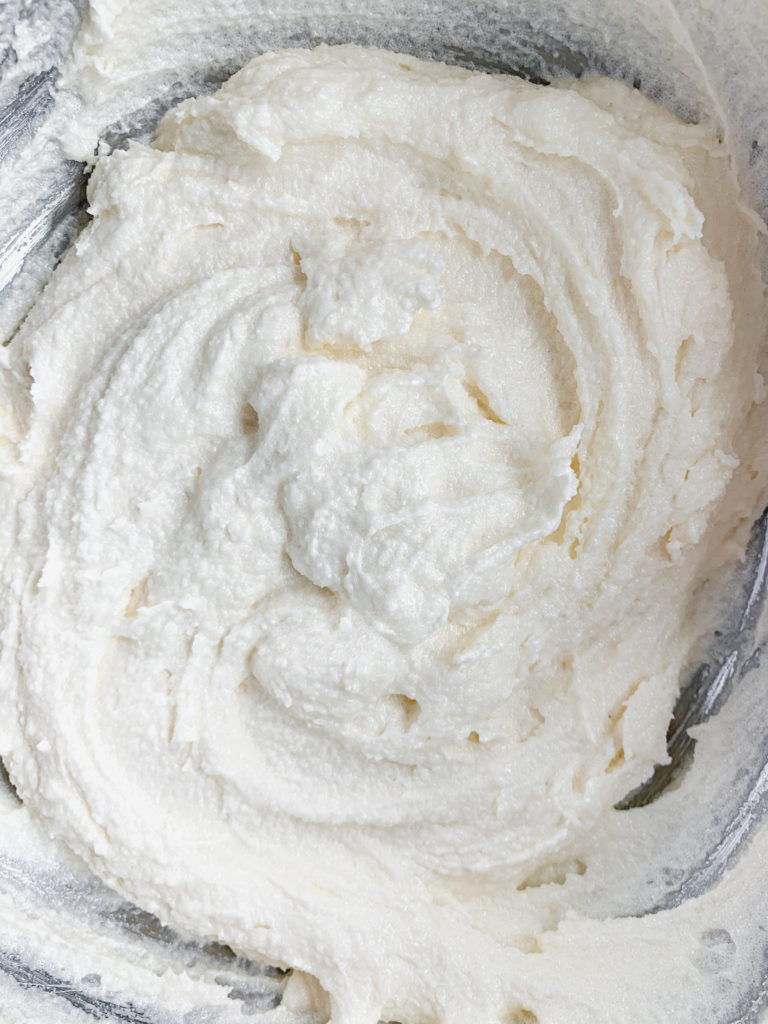
I said this before and will say it again – make sure you put your cans of coconut cream in the fridge the night before you are making this cake! Chilled and hardened coconut cream is a beautiful thing. Whipping this is the closest to actual whipped cream we vegans or dairy free folk are gonna find.
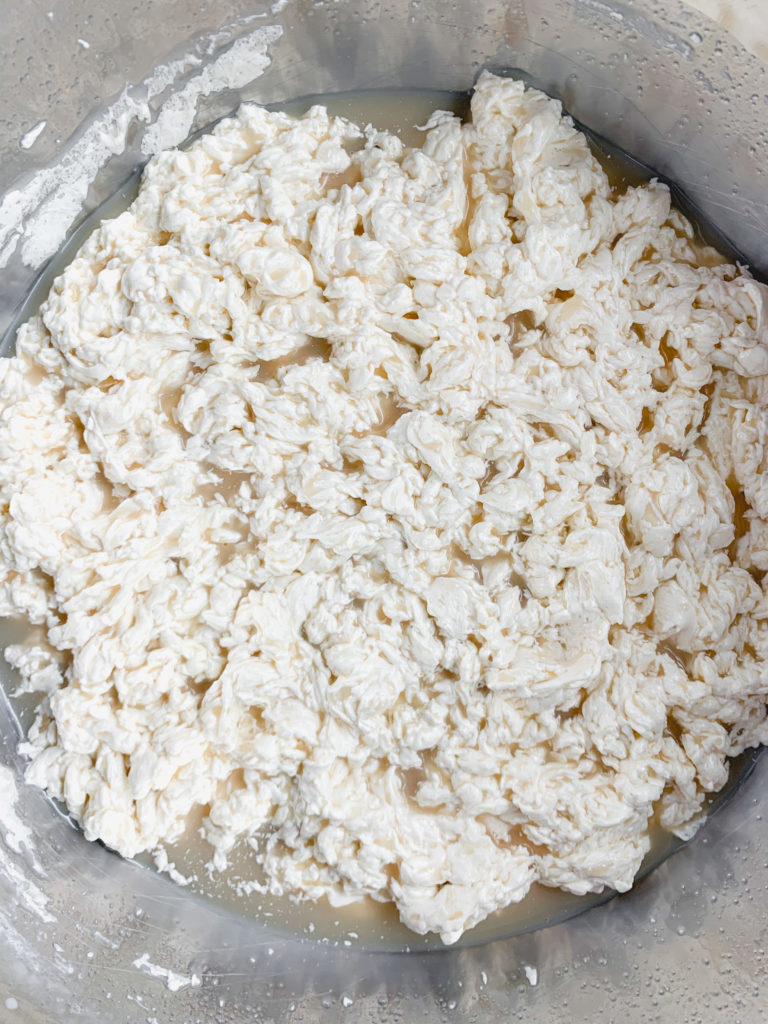
The way it works is when you remove the cans from the fridge, be sure not to shake them. Open then carefully and you will notice the cream has risen to the top and hardened into a sort of clay-like consistency. Scoop this out, leaving behind the liquid at the bottom of the can. Spoon the hardened parts from each can into a large bowl, then using either a simple hand mixer (which is what I use) or a fancy mixer, whip the cream for a few minutes.
The mixture will take on a creamy consistency, but also should stay firm, forming stiff peaks off the mixer. I add in 3-4 tbsp of powdered sugar (again, see Ingredients Needed section for a sugar free option here) per can, you can use more or less to your own taste. I used 5 cans of coconut cream to get the amount of whipped cream you see in these photos, but you can definitely get away with just 4 if you need.
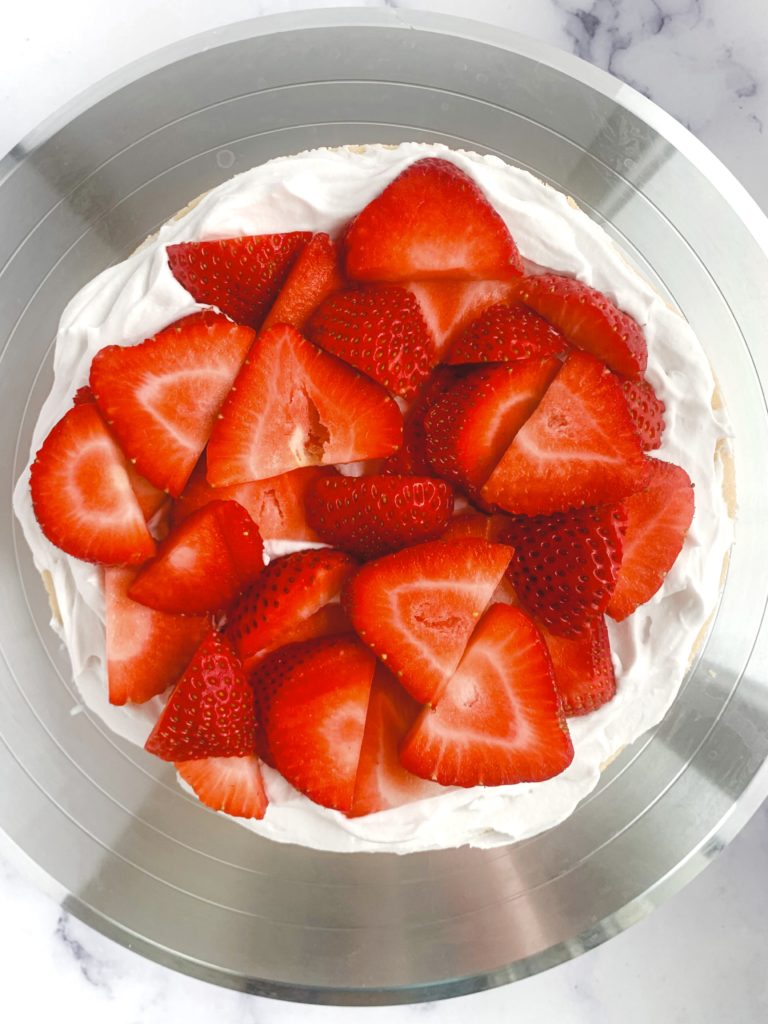
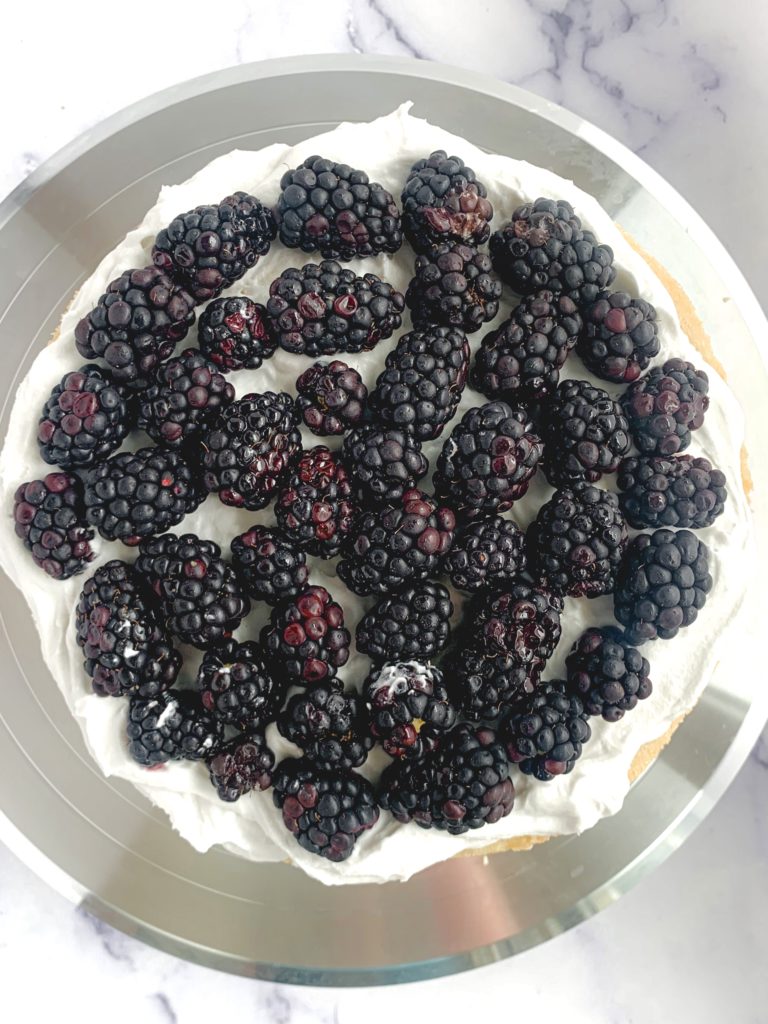
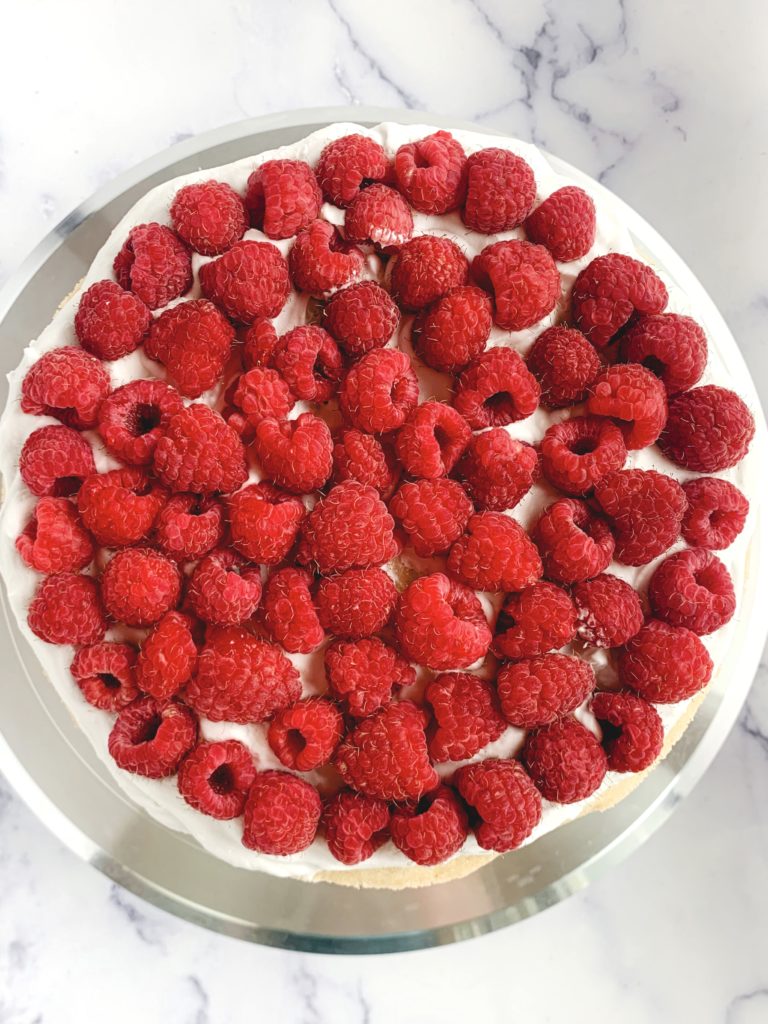
You’re almost ready to put the cake together! Let’s just talk berry amounts for one minute so you know how much to buy to prepare for this moment. All of the amounts I share below are exactly what I used in the cake in all these photos.
Berry amounts:
- Strawberries – I got a one-pound container and sliced up a little more than half of it, then used a few extras for the top.
- Blackberries (or blueberries) – nearly 2 6-ounce containers
- Raspberries – same as blackberries, nearly 2 6-ounce containers
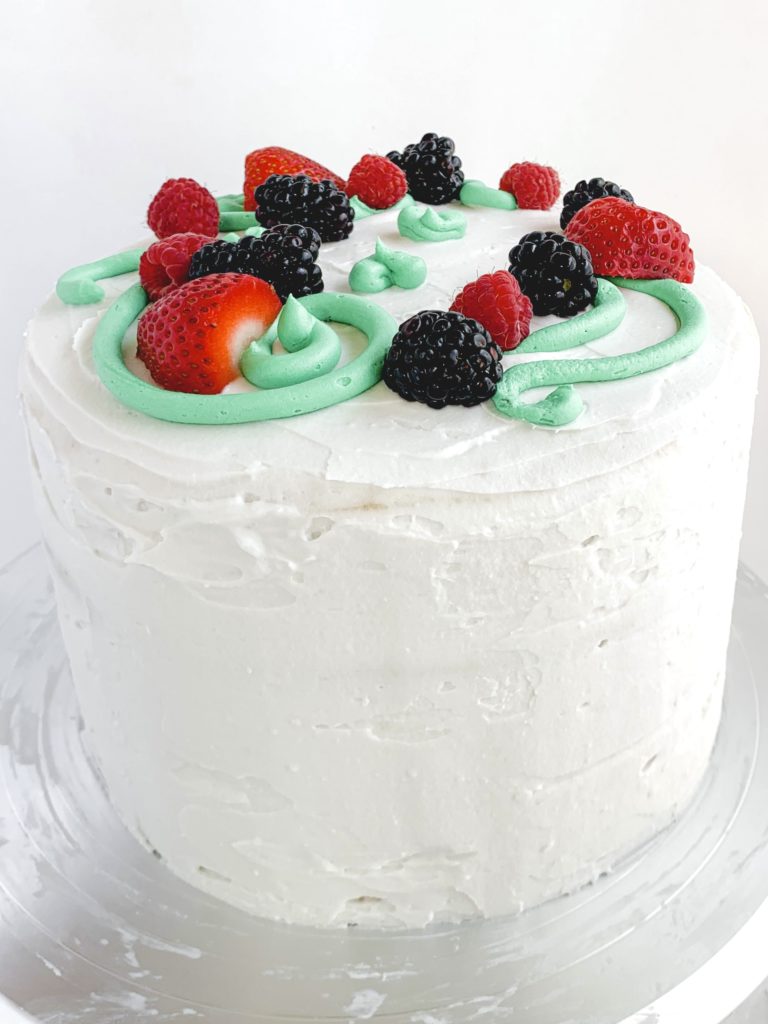
NOW you are ready!! Let’s layer this baby together. Start with one layer of cake, then a generous helping of the whipped cream, plus the sliced strawberries, then cover in more cream. Then another layer, then more cream, blackberries, and more cream. Next put on another with more cream, raspberries, and more cream. Then finally add the final layer to the top, and cover the top and outsides of the cake with the remaining whipped cream, and smooth and decorate to your heart’s desire! VOILA, triple berry cake!!!
Storage:
This triple berry cake should be kept in the fridge or the whipped cream will get a bit runny and the berries will get a bit gross. It should last 3-5 days.
Pro Tips & Tools:
- Make sure you are measuring your flour either by weight or using the spoon and level method. Do not scoop directly from the container, as you will wind up with too much! This is so important! If you want to buy a pre-made gluten free flour blend, make sure it’s King Arthur’s Measure for Measure Gluten Free Flour, it is BY FAR the best one for my recipes, NOT Bob’s Red Mills or any others. If you want to make a homemade blend, here is a link to the one I use.
- Make sure you measure your liquid ingredients using liquid measuring cups. This will ensure accuracy! I love this set.
- Need any other tools I’ve used here? For the cake itself I use these cake tins, these parchment liners, and this kitchen scale to make sure each layer is the same size. For the frosting, I use this simple hand mixer. And to frost the cake you can use a simple offset spatula, or spring for this whole set of cake stuff.

Ingredients Needed:
- Vegan butter – I use Earth Balance sticks
- Neutral oil – any should do, I always use grapeseed.
- Granulated sugar – If you want to make these sugar free, I love using this Monkfruit Sweetener in place of granulated sugar.
- Non-dairy milk – any should do here! I usually use soy or almond.
- Vanilla extract
- Flour – Make sure you are measuring your flour either by weight or using the spoon and level method. Do not scoop directly from the container, as you will wind up with too much! This is so important! If you want to buy a pre-made gluten free flour blend, make sure it’s King Arthur’s Measure for Measure Gluten Free Flour, it is BY FAR the best one for my recipes, NOT Bob’s Red Mills or any others. If you want to make a homemade blend, here is a link to the one I use.
- Baking powder – I recommend using baking powder that has no added aluminum. This one is my go-to.
- Salt
- Coconut cream – This brand is my go-to, but any will work. Make sure to chill overnight in the fridge and then do NOT shake before opening!
- Powdered sugar – for the whipped cream. If you want this part to be sugar free, you can use this Monkfruit Powdered Sweetener in place of powdered sugar.
- Fresh strawberries, blackberries or blueberries, and raspberries
What To Bake Next:
- Want more use out of your cake pans? Try this Vegan Blueberry Cake with Lemon Curd Filling, or this Vegan Carrot Cake, or this Vegan One Bowl Red Velvet Cake, or this Vegan Triple Chocolate Cake.
- Want more berry based goodies? Try these Vegan Raspberry Crumble Bars, or these Vegan Cheesecake Brownies with a Strawberry Swirl, or these Perfectly Fluffy Vegan Blueberry Muffins.
- Want more summertime party treats? Try these Perfect Vegan Lemon Bars, or this Vegan Mimosa Bundt Cake, or this Vegan Lemon Pound Cake.
Vegan Triple Berry Cake (Sugar Free and Gluten Free options)
Ingredients
Cake Layer Ingredients
- 11 tbsp vegan butter *softened to room temperature
- 3 tbsp neutral oil
- 1¾ cups granulated sugar *if you want a sugar free option, this links to my favorite sweetener, you can substitute it 1:1 in place of regular granulated sugar
- 2 cups non-dairy milk *at room temperature
- 2 tbsp vanilla extract
- 3½ cups gluten free flour can sub all-purpose if desired. This links to my favorite store bought gluten free flour blend that works best with all of my recipes, or see "Ingredients Needed" section for further info.
- 4 tsp baking powder
- 1 tsp salt
Whipped Cream Ingredients
- 5 cans coconut cream *refrigerated overnight, DO NOT SHAKE, just scoop out the top hardened part
- 15-20 tbsp powdered sugar *if you want a sugar free option, this links to my favorite powdered sweetener, you can substitute it 1:1 in place of regular powdered sugar
Berries
- 1 pound container of fresh strawberries
- 2 6-ounce containers of fresh blackberries or blueberries
- 2 6-ounce containers of fresh raspberries
Instructions
- In advance – make sure the cans of coconut cream have chilled in the refrigerator overnight, and make sure the vegan butter and non-dairy milk has come to room temperature for 2-3 hours before beginning to bake.
- Preheat the oven to 350°F and grease 2 or 4 8-inch cake tins plus line with parchment rounds. See notes below on options for how to get 4 layers if you do not have 4 pans.
- Cake Layers. In a large bowl, cream together the vegan butter, neutral oil, and granulated sugar. Make sure you do this for a few minutes, whether it is by hand or with a mixer, as you want it to be light in color and fluffy. Then add in the non-dairy milk and vanilla extract and mix again. This time the mixture will separate. Photos of both of these steps can be found above in the How To Make It section.
- Finally, add in the gluten free flour, baking powder, and salt, and mix until combined. Pour the batter evenly into your cake tins if you are using 4 tins. If you only have 2, or can only fit 2 into your oven at a time, see notes below for instructions on how to handle. Bake for 20-22 minutes, checking for doneness by inserting a toothpick into the center of the cake and removing from the oven when the toothpick comes out with just crumbs, not wet batter.
- Let the cakes cool in the pans for about 20 minutes before inverting onto cooling racks to cool entirely before frosting. During this time you can either make the second batch of cakes if you were doing two at a time, or begin to make the whipped cream.
- Whipped Cream. Remove your cans of chilled coconut cream from the fridge, being very careful not to shake them up. Open gently and scoop out just the hardened cream part from the top, leaving behind the liquid at the bottom. If your can did not separate it is a dud can! Spoon the hardened cream from all the cans into a large bowl, and mix on high speed for a few minutes until it is creamy, and stiff peaks are forming off the mixer. Add in your desired amount of powdered sugar, you can use more or less than the recommended based on your own taste, and mix until combined.
- Building the Cake. When your cake layers are cooled and the whipped cream is made, it’s time to build the cake! Make sure you slice your strawberries up before you begin layering. Start with one layer of cake on the bottom, and cover that generously with whipped cream, and then the sliced strawberries. Cover the berries with more cream, and then place the next layer on top of that. Repeat for blackberries or blueberries, and then lastly raspberries. Finally add the top layer of cake on and cover the whole top and outsides with the remaining whipped cream.
- Eat and enjoy!