Vegan Triple Berry Cake (Sugar Free and Gluten Free options)
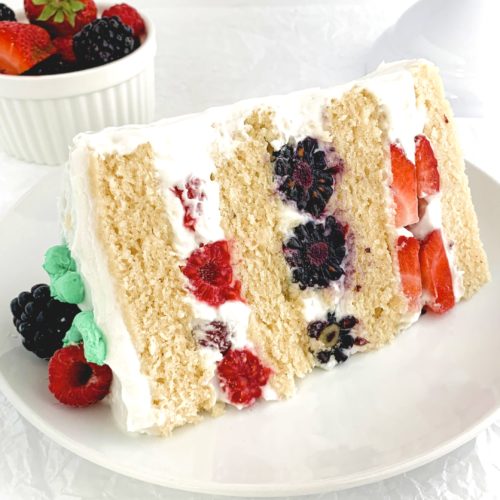
This beautiful cake is an homage to one of the best cakes on the planet – the Triple Berry Cake from Sweet Lady Jane in Los Angeles! Four layers of fluffy, buttery vanilla cake, plus three layers of fresh berries, all held together with luscious lightly sweetened whipped cream. This cake is as delicious as it is gorgeous, and makes a perfect centerpiece for any gathering!
Ingredients
Cake Layer Ingredients
- 11 tbsp vegan butter *softened to room temperature
- 3 tbsp neutral oil
- 1¾ cups granulated sugar *if you want a sugar free option, this links to my favorite sweetener, you can substitute it 1:1 in place of regular granulated sugar
- 2 cups non-dairy milk *at room temperature
- 2 tbsp vanilla extract
- 3½ cups gluten free flour can sub all-purpose if desired. This links to my favorite store bought gluten free flour blend that works best with all of my recipes, or see "Ingredients Needed" section for further info.
- 4 tsp baking powder
- 1 tsp salt
Whipped Cream Ingredients
- 5 cans coconut cream *refrigerated overnight, DO NOT SHAKE, just scoop out the top hardened part
- 15-20 tbsp powdered sugar *if you want a sugar free option, this links to my favorite powdered sweetener, you can substitute it 1:1 in place of regular powdered sugar
Berries
- 1 pound container of fresh strawberries
- 2 6-ounce containers of fresh blackberries or blueberries
- 2 6-ounce containers of fresh raspberries
Instructions
- In advance – make sure the cans of coconut cream have chilled in the refrigerator overnight, and make sure the vegan butter and non-dairy milk has come to room temperature for 2-3 hours before beginning to bake.
- Preheat the oven to 350°F and grease 2 or 4 8-inch cake tins plus line with parchment rounds. See notes below on options for how to get 4 layers if you do not have 4 pans.
- Cake Layers. In a large bowl, cream together the vegan butter, neutral oil, and granulated sugar. Make sure you do this for a few minutes, whether it is by hand or with a mixer, as you want it to be light in color and fluffy. Then add in the non-dairy milk and vanilla extract and mix again. This time the mixture will separate. Photos of both of these steps can be found above in the How To Make It section.
- Finally, add in the gluten free flour, baking powder, and salt, and mix until combined. Pour the batter evenly into your cake tins if you are using 4 tins. If you only have 2, or can only fit 2 into your oven at a time, see notes below for instructions on how to handle. Bake for 20-22 minutes, checking for doneness by inserting a toothpick into the center of the cake and removing from the oven when the toothpick comes out with just crumbs, not wet batter.
- Let the cakes cool in the pans for about 20 minutes before inverting onto cooling racks to cool entirely before frosting. During this time you can either make the second batch of cakes if you were doing two at a time, or begin to make the whipped cream.
- Whipped Cream. Remove your cans of chilled coconut cream from the fridge, being very careful not to shake them up. Open gently and scoop out just the hardened cream part from the top, leaving behind the liquid at the bottom. If your can did not separate it is a dud can! Spoon the hardened cream from all the cans into a large bowl, and mix on high speed for a few minutes until it is creamy, and stiff peaks are forming off the mixer. Add in your desired amount of powdered sugar, you can use more or less than the recommended based on your own taste, and mix until combined.
- Building the Cake. When your cake layers are cooled and the whipped cream is made, it’s time to build the cake! Make sure you slice your strawberries up before you begin layering. Start with one layer of cake on the bottom, and cover that generously with whipped cream, and then the sliced strawberries. Cover the berries with more cream, and then place the next layer on top of that. Repeat for blackberries or blueberries, and then lastly raspberries. Finally add the top layer of cake on and cover the whole top and outsides with the remaining whipped cream.
- Eat and enjoy!
Notes
You need to get four cake layers out of this batter, so you have a few options. You can either divide the batter into four equal portions and bake each layer on its own, or you can divide it into two equal portions and bake two jumbo sized layers, which you will later need to level and cut in half so you still wind up with four. Unless you are really skilled at leveling cake layers, I strongly recommend you use the four equal portions method. Even if you only have 2 cake tins, or can only fit 2 in your oven at once, just make the first two layers, let them cool for a few minutes and remove from the pan, then make the other two. It will take a little bit of extra time but it is MUCH easier. This is the method I do.
Either way you go, I recommend a kitchen scale so you can make sure all your layers come out to the same amount. If you are using my way and baking four individual layers, they will bake for around 20-22 minutes each. If you are making the jumbo sized two layers to cut in half, they will bake for around 30-34 minutes each.
Tried this recipe?Let us know how it was!