


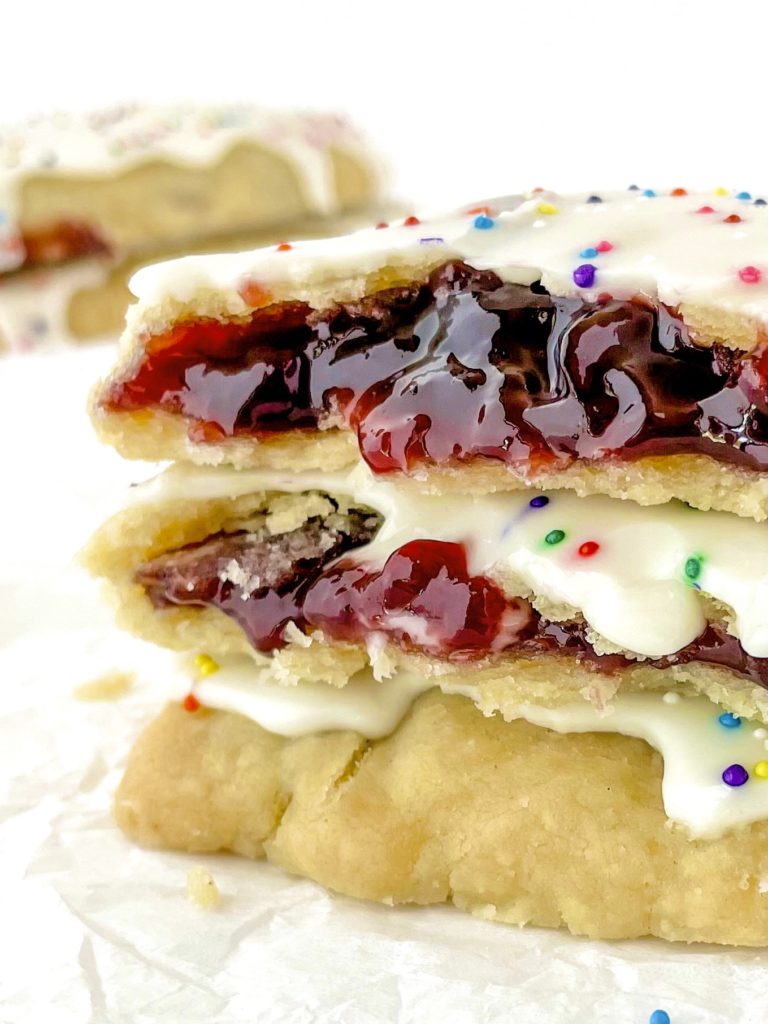
These Homemade Vegan Pop Tarts have everything you love about the originals – a flaky, buttery crust around the outside, a sweet and jammy berry filling on the inside, and a thick vanilla icing over the top! All fully vegan, with no added sugar, and easily made gluten free!

This could easily become one of those recipe posts that everyone on the internet loves to hate on, where the blogger goes in depth about their childhood and what the food means to them and rambles nostalgically for paragraphs on end before getting to the meat of the actual recipe (pun intended, sorry). So I won’t do that! But I will say if you’re anything like me, these were your go-to pick at the vending machine at your high school whenever you found some spare change in your pockets.
The fun of these Homemade Vegan Pop Tarts is how customizable they are to EXACTLY what you want! They are vegan, and can also be gluten free. You can use any type of berry filling you want – either your favorite flavor premade jam, or you can cook down frozen berries. Go as light or heavy as you want on the icing, and add any kind of sprinkles or even mini chocolate chips right onto the icing while it’s hardening.
Doesn’t this sound seriously fun?! Let’s get into it!!
How To Make Them
These Homemade Vegan Pop Tarts are not difficult to make, but they are a bit time consuming. I’m obviously going to explain how to make the dough and how to handle the filling, but the majority of this section – and the majority of your time making them – will be spent on actually forming the pop tart itself. Let’s go one thing at a time, starting with the dough for the crust, since it needs some chill time.
The Crust..
Measure out your gluten free (or all-purpose) flour and salt, and pour into a food processor, or if you don’t have one of those then just add to a large bowl. Take the vegan butter straight from the fridge so it is cold and hard – I highly recommend using Earth Balance sticks or any kind of vegan butter sticks here, not a tub, since otherwise it will be really tough to measure out while cold. With the sticks it’s 1 cup (2 full sticks) plus 2 tablespoons from a third stick.
Cut the butter into small cubes and add to the food processor, pulsing until it’s evenly distributed and the mixture is coarse and crumbly. If you don’t have a food processor, cut the butter into the dry ingredients by using either a pastry cutter or two forks. Transfer the mixture into a large bowl if you started in a food processor, and now it’s time to add in the ice water. It’s very important that this is ice water, don’t get lazy and just run kinda cold water from your tap. Keeping the whole mixture as cold as possible is what will lead you to the amazingly flaky crust you see in these photos.
Now make it a dough!
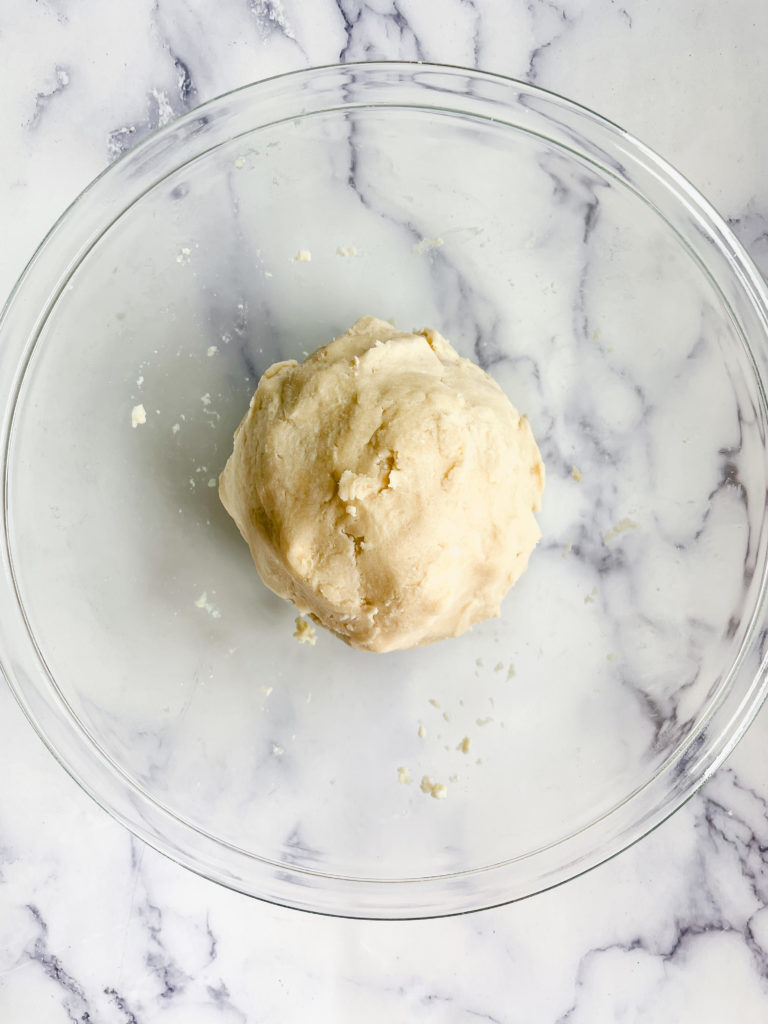
Pour a couple of tablespoons of the water in as a time and mix all together with a spoon until a dough begins to form. My sweet spot is about 5.5-6 tbsp. As soon as you have a dough that you can shape into a ball, it’s time to wrap it tightly in plastic cling wrap and chill chill chill. It should stay in the fridge for at least 2 hours, but can hang out there overnight if you want to get the dough prepared in advance. The dough really needs this time to firm up so you can actually shape it how you need to, but also the chill time will help give it the flaky crispiness for the final result.
A quick filling detour..
I’m going to take a detour here just to talk about the berry filling for a minute, then come back to forming the pop tarts, since like I said that is the most time consuming piece. The simplest way to handle the filling is just to use your favorite jarred jam. Strawberry, raspberry, blueberry, blackberry, cherry.. you know what types there are. Go grab your favorite from the market and just use that.
However, if you don’t have jam on hand but you do happen to have some frozen berries, you can use those instead. Just cook them down in a small pot with a little bit of sugar, then let them fully cool while the crust dough is chilling. If you want a more in depth description of cooking down the berries with photos, head on over to this cake with Mixed Berry Frosting and see how I cooked down some frozen mixed berries on the stove.
Back to the fun!
OKAY, now it is time to talk about how to actually make these homemade vegan pop tarts. You have two major options here – one is using a rolling pin to roll out the dough and cutting equally sized rectangles. The other is measuring out 16 equal sized balls of dough (aka a bottom crust and a top crust for each of your 8 pop tarts) and using your fingers to press each ball out into a rectangular shape.
Personally? I MUCH prefer the second option. If at all humanly possible, I avoid recipes that involve a rolling pin. Maybe it’s just me, but I feel like no matter how much I chill the dough, no matter how much I flour the surface, as soon as I get the dough as thin as it needs to be, I cannot for the life of me get it off the counter where I’ve rolled it out and move it flawlessly onto the pan. If you are more skilled than I am, please feel free to do the rolling pin option! I’ll go into more depth on both.
Using your fingers:
Again, my personal pick. I find you have far more control over the temperature of your dough, and the shape that it will become, and no need to deal with the challenge of moving rolled out dough from the counter to the pan. When your dough has chilled for at least 2 hours and you’re ready to make the pop tarts, take the big ball of dough from the fridge and use a big knife to cut it into 16 equally sized balls. It really helps here to have a kitchen scale, so you can be meticulous about it like I am. Any dough balls you’re not using at any moment should go back into the fridge so keep cool.
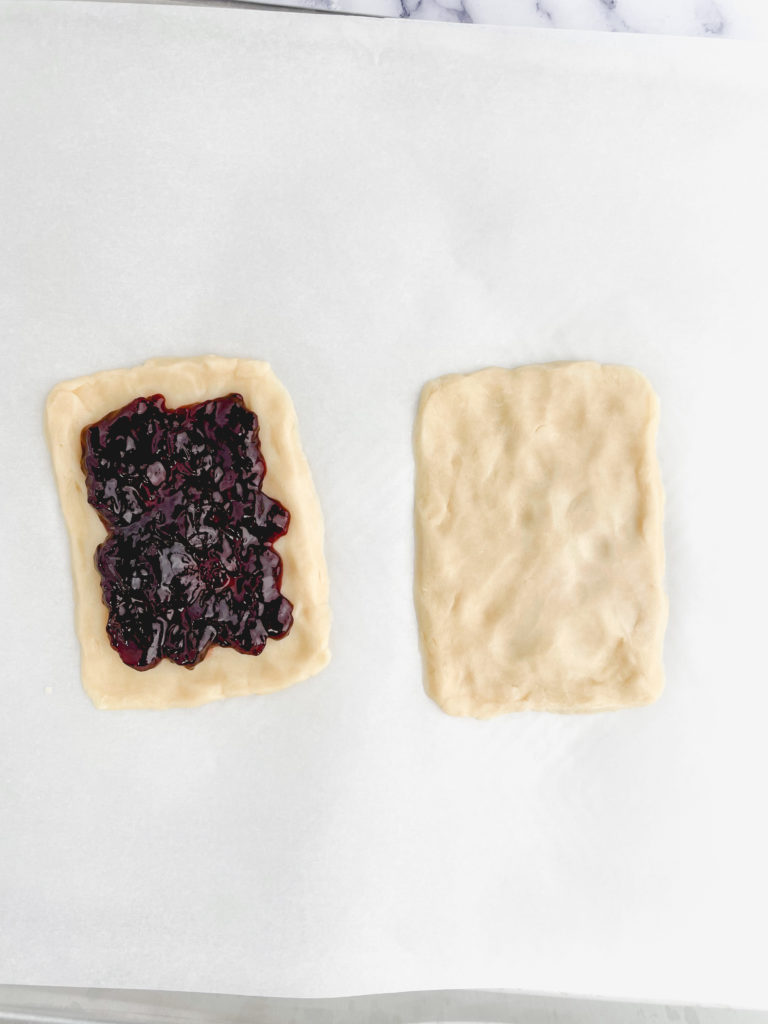
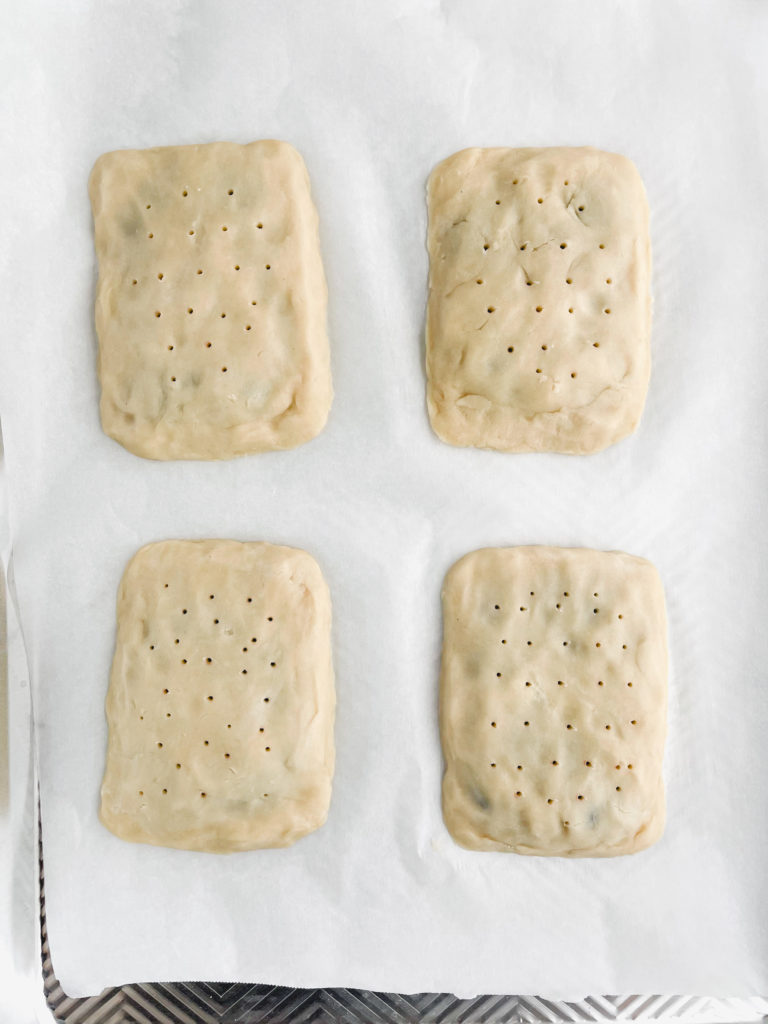
Here’s the real beauty of this method – you press the dough out directly onto the parchment paper. No transferring needed. Start by lining your biggest pan with parchment paper and work using that sized parchment paper, so you can see how many you can fit at a time. They don’t really spread or get larger, so you don’t need to leave a ton of space between each tart. However you may still need to bake them in 2 batches, 4 at a time, which is what I do. With each individual ball of dough, let it warm up for a minute or so in your hands just so it’s moldable, sort of like clay, and then use the heel of your hand to flatten it and your fingertips to shape it. I recommend making each one 3”x4”.
After you’ve pressed some out..
Once you’ve fit as many dough rectangles as you can onto the parchment paper, move that parchment paper carefully back into your fridge so the dough can get cold again, since by now it’s definitely room temperature. Any time you handle the dough, you want to chill it again for 10-15 minutes to firm up before handling again. Now, measure out another piece of parchment paper, the same size, and repeat this process, and when you have this paper filled up as well, move this one into the fridge and take the first one back out. Now we begin to assemble!
The filling..
Place your berry filling onto the center of each dough rectangle. Use 1½ tbsp of jam or cooked down frozen berries, do NOT do more, trust me! Spread it around a bit, but make sure to leave about ½ inch around the edges so you can seal the tart with the top piece of dough. Once each of these is ready, it’s time to add the top layers on. Get that second sheet of parchment from the fridge, your top pieces. As long as they’ve been in there for at least 10 or so minutes, they should be firmed up enough to very carefully remove from the paper and gently place on top of a counterpart bottom piece.
Once you’ve lined them up, make sure to seal them shut so the jam can’t easily escape. You can either use the tines of a fork which will give you a traditional pop tart looking pattern around the edges, or just use your fingertips to carefully press down and around each of the sides of the rectangles. Optionally at this time you can also brush some melted butter on top of each pop tart, this will just make it extra buttery and flaky and golden. You can totally skip it though, it’s not a huge deal.
Your last move before putting them into the oven is using a toothpick or fork tines to make some holes on top. Here’s the thing – some jam will probably leak out of each one no matter what. But if you make air holes on top, you’re less likely to have a full on jam explosion from out the sides.
Bake!
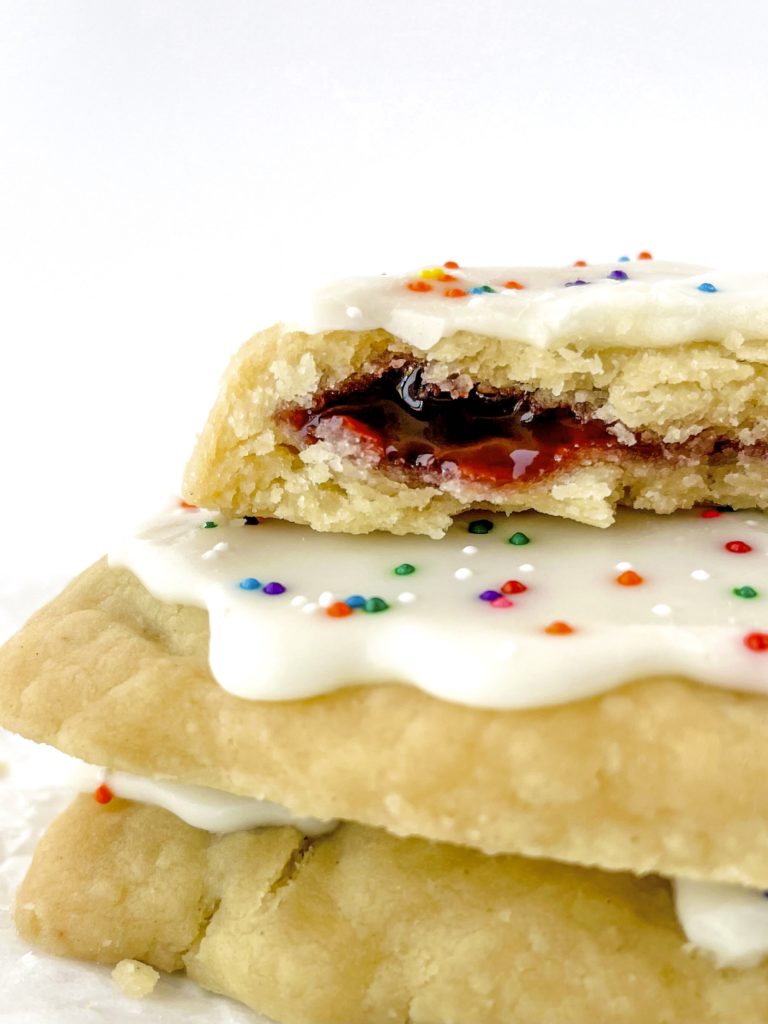
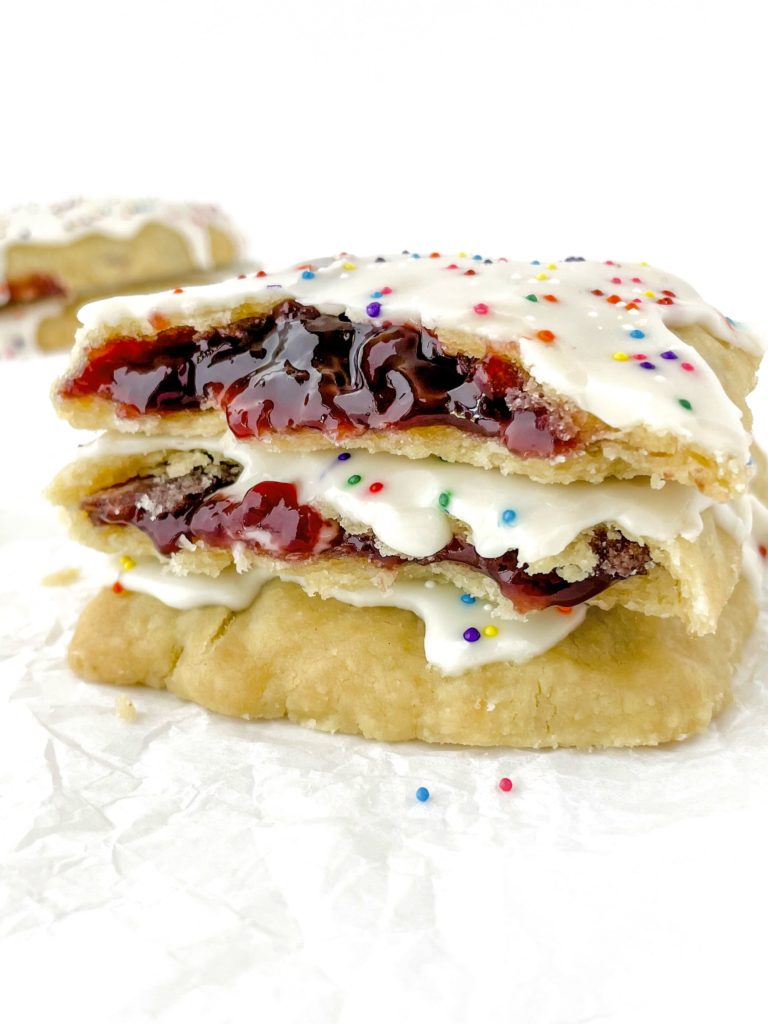
Bake for 23-25 minutes then remove from the oven. Again, likely some jam will have leaked out. Don’t worry! This is normal. Also they will look uglier than you want. Also normal. Why do you think we cover them with icing at the end?! See my photo for reference so you’re not worried you did something wrong. Let them cool on the pan for about 15 minutes or until you can comfortably pick them up and move them to a cooling rack, and then let them come fully to room temperature before moving on to the icing. If you are baking them in two batches of 4, make your other half now.

Using a rolling pin:
For starters, if you are going this route, I recommend splitting your dough into two equally sized portions. One will make your 8 bottom pieces, one will make your 8 top pieces. You can keep one half in the fridge while you work with the other half. When your dough has been chilled and you’re ready to begin rolling it out, make sure to clean and flour your surface, and then remove one half of the dough from the fridge. Roll it out to around 1/8th of an inch thick, perhaps a little thicker, and then cut 3”x4” rectangles from it. You will do exactly the same thing with the other half of the dough when it’s time.
From here, the recipe will follow exactly what I outlined above, starting with the paragraph that begins “Once you’ve fit as many dough rectangles as you can onto the parchment paper”. Basically you’ll cut and chill the bottom pieces, cut and chill the top pieces, add the jam, put them together, and bake.
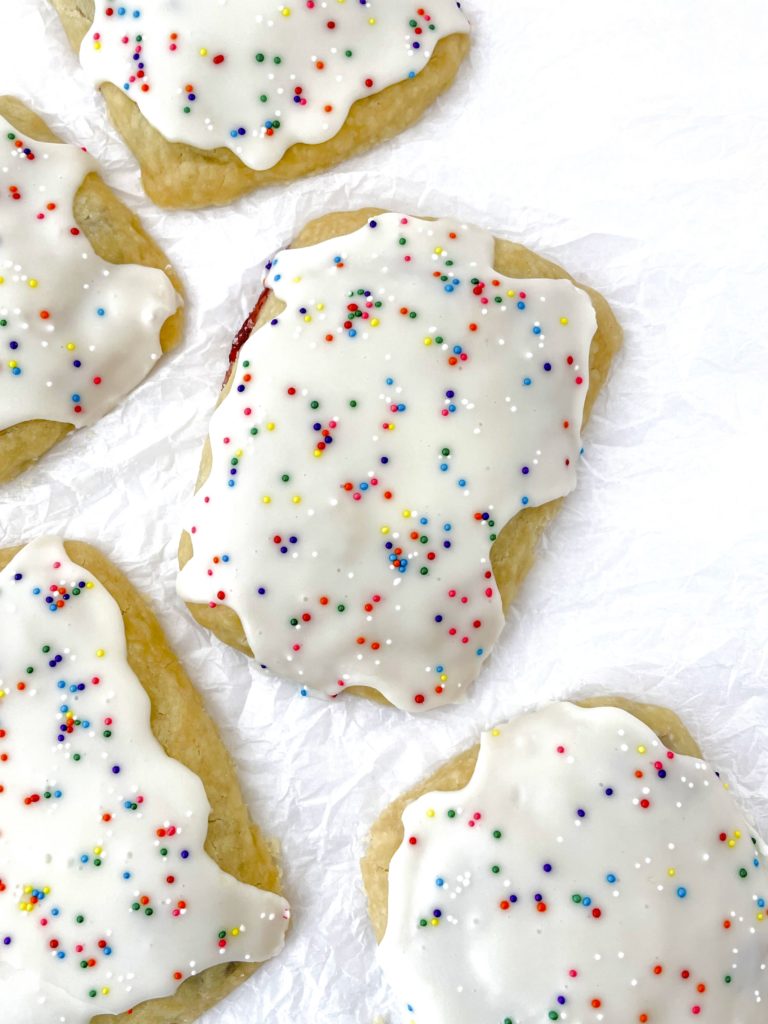
Once all 8 of your homemade vegan pop tarts are complete and have cooled completely to room temperature, now you can make the icing! Mix your powdered sugar (or see the Ingredients Needed section to learn how to do this part sugar free) with non-dairy milk to your desired consistency – I like to keep it really thick – and spoon on top of each pop tart. If you want to add sprinkles or mini chocolate chips make sure to do so while the icing is still wet, then let it harden for a few minutes, then GUESS WHAT you are DONE, time to eat these homemade vegan pop tarts!!
Storage:
Store the pop tarts at room temperature in an air-tight container, they will stay good 2-3 days. Also if you want to make a fresh pop tart each day, I recommend freezing the raw pop tarts once they are put together, then each night take one out to defrost in the fridge, then bake in the morning.
Pro Tips & Tools:
- Make sure you are measuring your flour either by weight or using the spoon and level method. Do not scoop directly from the container, as you will wind up with too much! This is so important! If you want to buy a pre-made gluten free flour blend, make sure it’s King Arthur’s Measure for Measure Gluten Free Flour, it is BY FAR the best one for my recipes, NOT Bob’s Red Mills or any others. If you want to make a homemade blend, here is a link to the one I use.
- Need a food processor? Go grab my favorite one!
- Want those adorable little sprinkles?! Here’s a link to get some!
Ingredients Needed:
- Flour – Make sure you are measuring your flour either by weight or using the spoon and level method. Do not scoop directly from the container, as you will wind up with too much! This is so important! If you want to buy a pre-made gluten free flour blend, make sure it’s King Arthur’s Measure for Measure Gluten Free Flour, it is BY FAR the best one for my recipes, NOT Bob’s Red Mills or any others. If you want to make a homemade blend, here is a link to the one I use.
- Salt
- Vegan butter – I use Earth Balance sticks, and strongly recommend you use sticks here not a tub if possible! Easier for measuring.
- Ice water
- Jam – any jam of your choice for the filling. Or if you don’t have any around and want to make these ASAP but you DO have frozen berries, there’s an option for that as well
- Powdered sugar – for the icing. If you want this part to be sugar free, you can use this Monkfruit Powdered Sweetener in place of powdered sugar.
- Non-dairy milk – for the icing. Any type will work.
- Sprinkles – optional for over the top. Here’s a link to the ones I use here!
What To Bake Next:
- Want more fun breakfast treats like these homemade vegan pop tarts? Try these Vegan Fluffy Blueberry Muffins, or these Vegan Copycat Entenmann’s Donuts, or this Vegan Coffee Cake, or these Vegan Buttermilk Pancakes.
- Want more goodies you can put in a lunch box? Try these Vegan Cinnamon Sugar Donuts, or these Vegan Berry Crumble Bars, or these Healthy Vegan Flourless Mini-Muffins.
- Want more berry goodness? Try these Vegan Blueberry Pancakes, or this Vegan Vanilla Sheet Cake with Mixed Berry Frosting, or these Mini Vegan Cheesecakes with Berry Toppings.

Homemade Vegan Pop Tarts (No Added Sugar and Gluten Free option)
Ingredients
Crust Ingredients
- 2½ cups gluten free flour can sub all-purpose if desired. This links to my favorite store bought gluten free flour blend that works best with all of my recipes, or see "Ingredients Needed" section for further info.
- 1 tsp salt
- 1 cup + 2 tbsp vegan butter cold, straight from the fridge
- 5-6 tbsp ice water
Filling Ingredients
- ¾ cup berry jam of your choice
- or if you don't have jam and want to use frozen berries:
- 1 cup frozen berries of your choice
- 1 tbsp granulated sugar *if you want a sugar free option, this links to my favorite sweetener, you can substitute it 1:1 in place of regular granulated sugar
Icing Ingredients
- 2½ cups powdered sugar *if you want a sugar free option, this links to my favorite powdered sweetener, you can substitute it 1:1 in place of regular powdered sugar
- 3-4 tbsp non-dairy milk or more if you want a thinner icing
- sprinkles or mini-chocolate chips optional
Instructions
- Start by making the dough for the crust, as this needs a lot of chill time. Add the gluten free flour and salt to a food processor, and then add the cold cubed vegan butter and pulse until it’s mixed throughout and has a coarse crumbly consistency. If you do not have a food processor, you can do this in a large bowl using a pastry cutter or two forks.
- Move the mixture to a large bowl if it’s not already there, and then slowly add the ice water – important that it is truly ice water and not just cold water! – a little bit at a time, mixing with a spoon as you go, until a dough forms. Once you can form the dough into a large solid ball, wrap it tightly in plastic cling wrap, and move to the fridge to chill for at least 2 hours, or up to overnight.
- Berry filling: I recommend using jarred jam for the filling, but if you are going to cook down frozen berries, do that now while the dough is chilling, as they will need some cool time as well. For this step, simply add the berries and sugar into a small pot or saucepan and cook on medium heat for 10-15 minutes. During this time, break up the berries as much as possible using a spoon or spatula or even a fork, and simmer until there are no big chunks left. Then transfer to a heat proof bowl and let cool fully before using as your filling.
- Once your dough is chilled and you are ready to start building your pop tarts, preheat your oven to 375°F and line a large pan with parchment paper. Now to make the dough into pop tart shapes, you have two options. I go into a LOT of detail on this above in the How To Make Them section, which I recommend taking a few minutes to read fully before starting. But if you are in a time crunch, I will outline both options here. One option is to use a rolling pin to roll the dough out and then cut the rectangles from there and transfer them onto a pan. The other option is to cut the dough into 16 equally sized balls and simply use your fingers to shape each one into a rectangle directly on parchment paper. This second method is the one I prefer. Skip down to Step 6 if you want to use that one.
- Rolling pin method: if you want to roll out the dough with a rolling pin, start by cutting your dough into two equal sized balls, one will make the 8 bottom pieces and one will make the 8 top pieces. Keep the second half in the fridge while you begin work on the first half. Roll out the dough on a clean and floured surface, it should be around 1/8th of an inch thick or a little thicker, and then use a knife to cut 3”x4” rectangles. These will make the bottoms of each pop tart. Move them onto your parchment lined pan, fit as many as you can leaving just a little space between, they won’t grow too much during baking. You may need to make these in 2 batches if you can only fit 4 at a time. Once the rectangles are successfully transferred onto the parchment paper, move the paper into the fridge to let them chill and firm up again. During this time, repeat the process with the other half of the dough and again move onto parchment paper, then move that paper into the fridge. Each time you are moving handled dough back into the fridge to re-chill, it should be in there for 10-15 minutes before handling again. Once you’ve made all your rectangles and they are all chilled, skip down to step 7 where we will pick this back up.
- Finger shaping method: my method of choice. Start by cutting your dough into 16 equal sized balls. I’d recommend using a kitchen scale here to make sure they’re all actually the same size. Keep them all in the fridge, only removing one at a time as you are ready to work on your next rectangle. Line a pan with parchment paper, then one at a time you will press each ball out into the rectangle shape directly onto the parchment paper. With each individual ball of dough, let it warm up for a minute or so in your hands just so it’s moldable, sort of like clay, and then use the heel of your hand to flatten it and your fingertips to shape it. I recommend making each one 3”x4”. Once you’ve fit as many dough rectangles as you can onto the parchment paper, move that parchment paper carefully back into your fridge so the dough can get cold again, since by now it’s definitely room temperature. Any time you handle the dough, you want to chill it again for 10-15 minutes to firm up before handling again. Now, measure out another piece of parchment paper, the same size, and repeat this process, and when you have this paper filled up as well, move this one into the fridge and take the first one back out. Now we begin to assemble!
- Whichever method you used to create your rectangles, start with one sheet of parchment paper with as many chilled rectangles as you were able to fit. These will be the bottoms of the pop tarts. Add your filling by scooping 1½ tbsp of jam – or cooked down frozen berries – onto the center of each rectangle. Spread it around but be sure to leave about ½ inch around the edges to seal them up. Once the jam is added to each bottom layer, remove your other piece of parchment paper from the fridge with the other set of rectangles – the tops of each pop tart. Slowly and carefully remove them from the parchment paper one at a time and gently place on top of each jam filled bottom layer. Seal the edges either using the tines of a fork to press down around the edges, or use your fingertips to firmly but carefully press all the way around.
- Optionally you can brush a little bit of melted vegan butter on the tops of each pop tart. Whether you do that or not, the last step before baking is make sure to poke holes in the tops of each using a toothpick or the tines of a fork. It’s likely that a little jam will leak out of each pop tart no matter what, but the air holes help to prevent the jam from fully exploding out of the sides.
- Bake for 23-25 minutes, remove the pan from the oven and let the pop tarts remain on the pan for 15 or so minutes until they have firmed up. Move to a cooling rack and let them cool entirely before icing them. If you are making the pop tarts in two batches, make the second batch now.
- Once all the pop tarts are made and fully cooled, make the icing by mixing the powdered sugar and non-dairy milk. The amount I outlined here will make a very thick icing, if you want it to be thinner use less sugar or more non-dairy milk. Spoon it over the top of each pop tart, and optionally add sprinkles or mini chocolate chips while the icing is still wet. It will harden fully over 5-10 minutes.
- Eat and enjoy!